
Secrets for tender, flaky pie crust using real butter?

The Quest for the Perfect Pie Crust
There’s nothing quite like a homemade pie, and at its heart lies a truly exceptional crust. Achieving that delicate balance of tenderness and flakiness, coupled with the rich flavor of real butter, can seem like a baking enigma. Many home bakers struggle with tough or crumbly crusts, but with a few crucial insights and techniques, you can master the art of butter-based pie dough. Forget shortening; real butter offers unparalleled taste and texture, and with these secrets, you’ll be turning out show-stopping pies every time.

Cold is Your Best Friend: The Butter Principle
The single most important rule when working with real butter for pie crust is: keep everything COLD. This isn’t just a suggestion; it’s a golden rule. Cold butter creates pockets of steam in the oven, which is what gives your crust its glorious flakiness. Warm butter, on the other hand, melts into the flour too quickly, leading to a dense, tough crust.
- Chilled Butter: Ensure your butter is straight from the refrigerator, ideally cut into small cubes (about 1/2 inch) or grated directly into the flour for even colder distribution. Some professional bakers even pop their butter into the freezer for 10-15 minutes before using.
- Ice Water: Always use ice-cold water. You can even add a few ice cubes to your measuring cup and let it sit for a few minutes before measuring out the required amount.
- Cold Hands/Tools: If mixing by hand, work quickly. Better yet, use a pastry blender or a food processor for minimal heat transfer. Chill your mixing bowl and even your flour for optimal results.
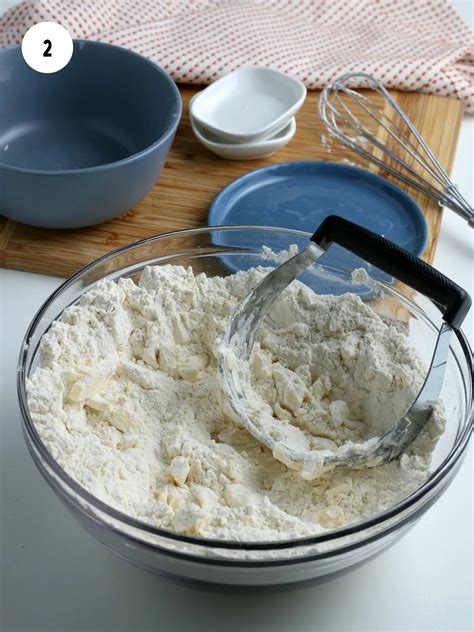
The Art of Cutting in Butter
Whether you’re using a pastry blender, your fingertips, or a food processor, the goal is to break the butter into pea-sized pieces (or even smaller, like cornmeal for a very tender crust) while keeping it cold. These small pieces of butter will melt slowly in the oven, creating those sought-after steam pockets.
Minimize Handling, Maximize Tenderness
Overworking pie dough is the quickest way to develop gluten, which leads to a tough, chewy crust. The less you handle the dough, the more tender your final result will be.
- Gentle Mixing: Add the ice water gradually, a tablespoon at a time, mixing just until the dough comes together. It should still look a bit shaggy, not perfectly smooth.
- Visual Cue: The dough is ready when you can press a small handful together and it holds its shape, but it’s not wet or sticky. You might not need all the water specified in the recipe.
- Forming the Disk: Once the dough comes together, gently gather it into a disk shape. Do not knead it like bread dough. Wrap it tightly in plastic wrap.

The Essential Chill: Resting Your Dough
Before rolling, your pie dough absolutely needs to chill in the refrigerator for at least 30 minutes, but preferably 1-2 hours. This step is non-negotiable for several reasons:
- Relaxes Gluten: Chilling allows the gluten developed during mixing to relax, making the dough easier to roll out without shrinking.
- Re-solidifies Butter: It gives the butter a chance to firm up again, ensuring those crucial cold pockets are intact for flakiness.
- Hydration: It allows the flour to fully hydrate, resulting in a more uniform texture.
Rolling and Baking for Perfection
Once chilled, remove your dough from the fridge and let it sit for a few minutes at room temperature until it’s pliable enough to roll without cracking, but still very cold. Roll it out on a lightly floured surface, working from the center outwards, rotating frequently to prevent sticking and ensure an even thickness. Aim for about 1/8-inch thick.

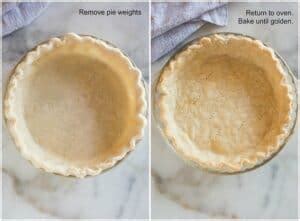
After fitting the crust into your pie plate, give it another chill (15-30 minutes) before baking, especially if blind baking. This helps prevent the crust from shrinking. When baking, start at a higher temperature (e.g., 400-425°F/200-220°C) for the first 15-20 minutes to set the crust and promote flakiness, then reduce the temperature for the remainder of the baking time, as per your recipe.
Conclusion
Mastering a tender, flaky pie crust with real butter is truly a game-changer for any baker. By prioritizing cold ingredients, minimizing handling, and embracing the crucial chilling steps, you’ll elevate your pie-making to a professional level. Remember, practice makes perfect, so don’t be discouraged if your first attempt isn’t flawless. With these secrets in your arsenal, you’re well on your way to creating unforgettable homemade pies that will impress everyone at your table.