


How to build simple, sturdy pantry shelves for bulk food storage?
Why Build Your Own Pantry Shelves?
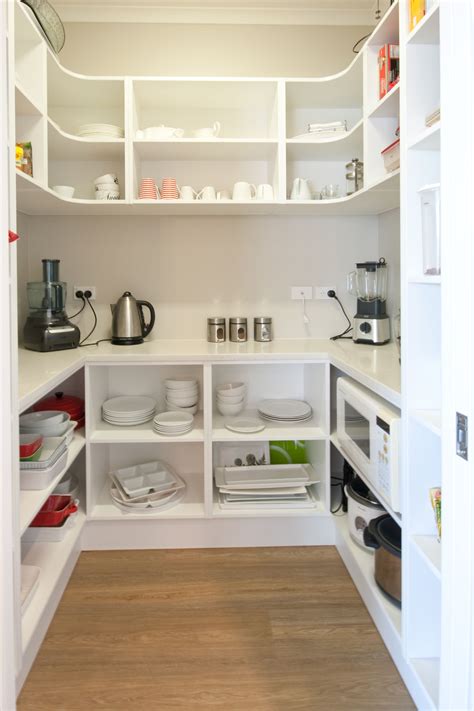
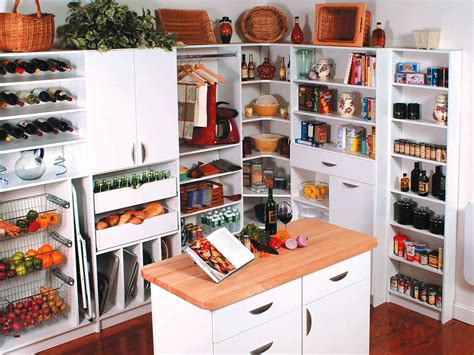
Transforming your pantry into a highly functional bulk food storage area doesn’t have to be complicated or expensive. Building your own shelves allows for complete customization, ensuring every inch of space is utilized efficiently. Unlike flimsy store-bought units, DIY shelves can be engineered for serious weight, making them ideal for large bags of flour, cases of canned goods, or heavy appliances. This project is a rewarding way to organize your kitchen, save money, and ensure your provisions are stored securely.
Planning Your Pantry Shelves: Design and Materials
Before cutting any wood, thoughtful planning is crucial. Start by measuring your pantry space accurately – height, width, and depth. Consider what you’ll be storing: large bins, jars, appliances, or smaller packages. This will dictate your shelf spacing and depth. For bulk items, deeper and taller shelves are often preferred.
When it comes to materials, prioritize strength and durability. Plywood (¾-inch thick) or MDF are excellent choices for the shelves themselves. For the support structure, 2x4s or 2x3s (dimensional lumber) are robust and readily available. Fasteners should be wood screws (2.5 to 3 inches for framing, 1.5 inches for shelf attachment). Don’t forget wood glue for added strength at every joint.
Essential Tools and Materials:
- Measuring tape and pencil
- Circular saw, miter saw, or hand saw
- Drill with driver bits and pilot hole bits
- Level
- Stud finder (recommended)
- Safety glasses and hearing protection
- Dimensional lumber (e.g., 2x4s or 2x3s for uprights and supports)
- Plywood or MDF (¾-inch thick for shelves)
- Wood screws (various lengths)
- Wood glue
- Sandpaper (medium grit)
- Optional: Paint, stain, or sealant

Step-by-Step Construction Guide
1. Cut Your Lumber
Based on your measurements and design, cut all your lumber to size. You’ll need:
- Uprights: Pieces for the vertical supports on the side walls.
- Horizontal Supports (Cleats): Pieces that will be attached to the uprights and walls to hold the shelves.
- Shelves: Your plywood/MDF cut to the desired shelf dimensions.
2. Install Vertical Uprights (Optional but Recommended)
If you’re building a framed system, begin by securing vertical 2×4 uprights to the wall studs (if possible). Use a stud finder to locate studs and mark their positions. Pre-drill holes through your uprights and into the studs, then secure them with long wood screws. Ensure they are plumb using a level.
3. Attach Horizontal Shelf Supports (Cleats)
Determine the desired height for each shelf. Mark these heights on your uprights or directly on the wall. For maximum sturdiness, you’ll want cleats running along the back and sides for each shelf. Using a level, draw lines at each shelf height. Attach the horizontal cleats to the uprights or directly to the wall studs using wood glue and screws. These cleats will bear the weight of your shelves and their contents, so ensure they are very secure.
4. Install the Shelves
Once all your cleats are securely in place, it’s time to lay your cut plywood shelves. Place each shelf on top of its corresponding cleats. For an exceptionally sturdy build, you can secure the shelves to the cleats from below using shorter wood screws (e.g., 1.5 inches). This prevents any shifting and adds structural integrity.
5. Finishing Touches
Once all shelves are installed, sand any rough edges or splinters. For a clean look and added protection, you can paint, stain, or seal your new pantry shelves. This will protect the wood from moisture and food spills, making them easier to clean and prolonging their life. Allow ample drying time before loading with bulk food items.

Tips for Maximum Sturdiness and Bulk Storage Efficiency
- Wall Anchoring: Always anchor your shelving unit to wall studs if possible. If studs aren’t available, use heavy-duty toggle bolts or other appropriate wall anchors.
- Load Distribution: When loading your shelves, distribute weight evenly.
- Edge Banding: For a more finished look and to protect the plywood edges, consider applying iron-on edge banding.
- Labeling: Once your bulk items are stored, use clear labels on containers for easy identification.
- Flexibility: Design with future needs in mind. If possible, consider adjustable shelf heights using a peg system or wall standards, though this might slightly reduce ultimate weight capacity compared to fixed cleats.
Conclusion
Building your own sturdy pantry shelves for bulk food storage is a project that delivers immense satisfaction and practical benefits. With careful planning, the right materials, and a few basic tools, you can create a custom storage solution that perfectly meets your needs, stands up to heavy loads, and brings order to your kitchen. Say goodbye to cluttered cupboards and hello to an organized, efficient, and well-stocked pantry!


