
Secrets to a truly flaky, not soggy, homemade pie crust?

The Quest for the Perfect Pie Crust
A homemade pie crust can elevate any pie from good to extraordinary. That delicate, buttery flakiness that melts in your mouth, perfectly complementing the filling, is the stuff of culinary dreams. However, many home bakers dread the process, fearing a tough, crumbly, or, worst of all, a soggy bottom crust. But fear not! With a few key secrets and a little practice, you can consistently achieve pie crust perfection.
The Foundation: Ingredients Matter
Success begins with your ingredients. While seemingly simple, their quality and temperature are paramount.
- Flour: All-purpose flour is typically ideal. Avoid high-protein flours that can lead to a tough crust.
- Fat: Cold, unsalted butter is the gold standard for flavor and flakiness. Some recipes incorporate a portion of shortening for extra tenderness and ease of handling, but butter delivers unparalleled taste. Ensure your butter is straight from the fridge, or even colder.
- Water: Ice-cold water is non-negotiable. It helps keep the butter solid, preventing it from melting into the flour prematurely, which is crucial for those distinct layers.
- Salt: Essential for flavor, don’t omit it!
Technique is King: Handling the Dough
Your method for combining ingredients is just as important as the ingredients themselves. This is where the magic of flakiness truly happens.
Keep Everything Cold: This cannot be stressed enough. Cold butter creates pockets of steam in the oven, which separate the layers of dough, resulting in flakiness. Use chilled bowls, work quickly, and even chill your flour if your kitchen is warm.
Cutting in the Fat: Incorporate the cold butter into the flour mixture until it resembles coarse meal with some pea-sized pieces still visible. These larger pieces are what create the signature flaky layers. You can use a pastry blender, two knives, or even your fingertips, but work swiftly to avoid warming the butter with your hands.

Minimal Handling: Overworking the dough develops gluten, leading to a tough, chewy crust. Add just enough ice water, a tablespoon at a time, until the dough barely comes together. It should feel shaggy, not sticky or smooth. Gently press it into a disk, wrap it, and refrigerate.
The Crucial Chill
Chilling your dough is a non-negotiable step. It serves two vital purposes:
- Relaxes Gluten: After mixing and handling, the gluten in the flour tightens. Chilling allows it to relax, making the dough easier to roll without shrinking back.
- Solidifies Fat: It re-chills the butter, ensuring those precious pockets of fat are firm and ready to create steam in the oven.
Aim for at least 30 minutes to an hour of chilling, or even overnight for best results. You can also chill the rolled-out dough in the pie plate before baking.
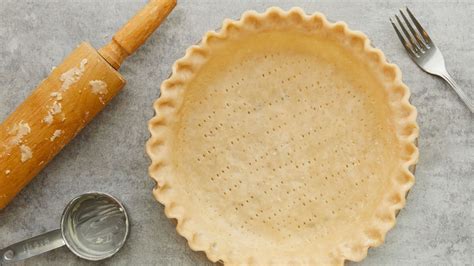
Rolling Out Perfection
When it’s time to roll, work on a lightly floured surface with a lightly floured rolling pin. Roll from the center outwards, rotating the dough frequently to prevent sticking and ensure an even thickness. Avoid stretching the dough, as this can lead to shrinking during baking.

Conquering the Soggy Bottom
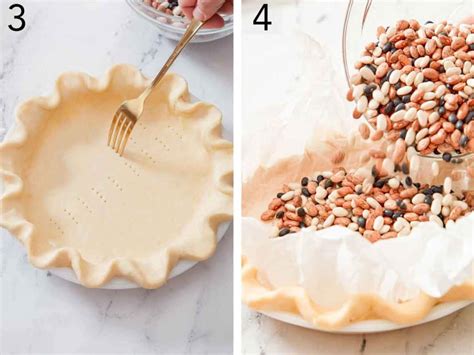
A soggy bottom is the bane of many pie makers. Here’s how to ensure your crust stays crisp and firm:
Blind Baking: For most wet fillings (like quiches, custards, or fruit pies with high moisture content), blind baking (or par-baking) your crust is essential. Line the pie shell with parchment paper, fill it with pie weights, dried beans, or rice, and bake until the edges are set and lightly golden. Remove the weights and parchment, then continue baking for a few more minutes until the bottom appears dry and lightly colored. This creates a barrier against moisture.
Egg Wash or Butter Barrier: For some pies, brushing the bottom of a par-baked crust with a thin layer of egg white or melted butter before filling can create an additional moisture barrier.
Hot Oven and Preheated Baking Sheet: Place your pie on a preheated baking sheet or pizza stone in a hot oven. The immediate blast of heat to the bottom of the crust helps it set quickly before the filling has a chance to soak in.
Baking Smart
Pay attention to your oven temperature and baking time. Many pies benefit from starting at a higher temperature (e.g., 425°F/220°C) for the first 15-20 minutes to set the crust, then reducing it to a moderate temperature (e.g., 375°F/190°C) to finish baking evenly. If your crust edges start browning too quickly, gently cover them with foil or a pie shield.
Conclusion
Crafting a truly flaky, non-soggy homemade pie crust is a skill that comes with understanding these fundamental principles and, most importantly, practice. Embrace the cold, handle with care, and don’t skip the chill or the blind bake. Soon, you’ll be confidently turning out pies with crusts so perfect, they’ll become the star of any meal.