How to build rich compost for a thriving country vegetable garden?

The Foundation of a Flourishing Garden: Rich Compost
For any country vegetable garden to truly thrive, the secret lies beneath the surface: the soil. And the best way to transform ordinary soil into a nutrient-dense powerhouse is through rich, homemade compost. Composting is an ancient art that recycles organic waste into a valuable amendment, teeming with microbial life and essential nutrients. It’s not just about waste reduction; it’s about nurturing your garden from the ground up, promoting robust plant growth, and ensuring bountiful harvests.
Building a successful compost pile doesn’t require complex machinery or advanced degrees in soil science. With a few basic principles and a commitment to consistency, you can produce black gold that will invigorate your vegetable beds, improve soil structure, and reduce the need for synthetic fertilizers.
Understanding the Basics: Greens, Browns, Air, and Water
A balanced compost pile relies on the right ratio of ‘greens’ and ‘browns,’ along with adequate air and moisture. Think of it as a recipe for decomposition:
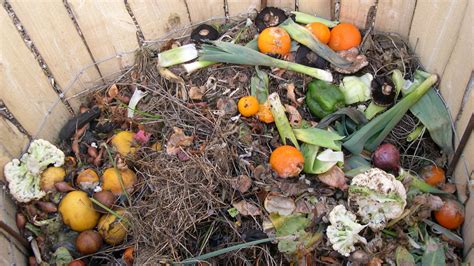
- Greens (Nitrogen-rich): These provide the nitrogen necessary for microbial activity and heat generation. Examples include fresh grass clippings, fruit and vegetable scraps, coffee grounds, tea bags, and fresh manure (from herbivores like chickens, cows, or horses).
- Browns (Carbon-rich): These provide the carbon structure for the compost and help balance the nitrogen. Examples include dried leaves, straw, wood chips, sawdust, shredded newspaper, and cardboard.
Aim for a rough 2:1 or 3:1 ratio of browns to greens by volume. Don’t worry too much about perfection; nature is forgiving!
Selecting Your Composting Method
There are various ways to compost, each suited to different scales and preferences:
- Open Pile: The simplest method, just a designated area where you stack your materials. Great for large quantities.
- Compost Bins: Enclosed structures (e.g., wooden pallets, wire mesh, plastic tumblers) that contain the pile, making it tidier and sometimes speeding up decomposition.
- Three-Bin System: Ideal for larger country gardens, allowing you to have one bin for new additions, one for actively decomposing material, and one for finished compost.
Step-by-Step Guide to Building Your Compost Pile
- Choose the Right Spot: Select a well-drained area, preferably shaded to prevent drying out, but accessible for adding materials and turning. Keep it reasonably close to your garden and kitchen.
- Start with a Base: Lay down a 4-6 inch layer of coarse browns (twigs, straw) at the bottom. This ensures good airflow and drainage.
- Layer Your Materials: Alternate thin layers of greens and browns. For example, a layer of kitchen scraps (greens) followed by a layer of dried leaves (browns). Chop larger items into smaller pieces to speed up decomposition.
- Add a Starter (Optional but Recommended): A handful of finished compost, garden soil, or a specific compost starter will introduce beneficial microorganisms to kickstart the process.
- Moisture is Key: Each layer should be moistened as you add it. The pile should feel like a damp sponge – not soaking wet, not bone dry. Rain will help, but in dry spells, you may need to water it.

Maintaining Your Compost for Optimal Richness
Turning the Pile
Regular turning (aeration) is crucial for ‘hot’ composting, which breaks down material quickly. Aim to turn your pile with a pitchfork every 1-2 weeks. This introduces oxygen, prevents anaerobic conditions (which cause foul odors), and helps distribute moisture and microbes. If you’re less active, a ‘cold’ compost pile will still work, just at a slower pace.
What NOT to Compost
To keep your compost healthy and avoid attracting pests or spreading diseases, avoid adding:
- Meat, bones, dairy products, and oily foods (attract pests, create odors).
- Diseased plants (can spread pathogens).
- Weeds that have gone to seed or invasive weeds (can propagate in your garden).
- Pet waste (can contain harmful pathogens).
- Chemically treated wood or sawdust.
When is Your Compost Ready?
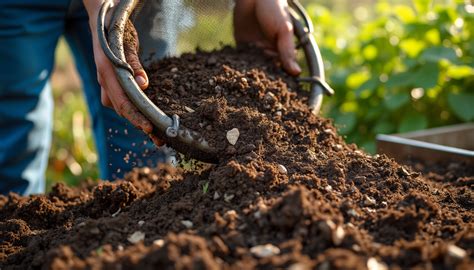
Finished compost will be dark brown or black, crumbly, and have an earthy smell. You won’t be able to identify the original materials. Depending on your method and effort, this can take anywhere from 2 months to a year. Once ready, you can sift it to remove any larger, un-decomposed pieces and return them to the active pile.
Using Your Rich Compost in the Garden
The beauty of homemade compost is its versatility. You can:
- Top-dress: Spread a 1-2 inch layer over your garden beds in spring or fall.
- Amend soil: Work it into the top 6-8 inches of new garden beds.
- Potting mix: Mix it with perlite, vermiculite, or coir for a nutrient-rich potting medium.
- Compost tea: Steep it in water to create a liquid fertilizer.

Building rich compost is a rewarding cycle that benefits both your garden and the environment. By transforming kitchen scraps and garden waste into a vital resource, you’re not just growing vegetables; you’re cultivating a healthier, more sustainable country garden ecosystem. Embrace the process, and watch your garden flourish like never before.