


Tips for making a flaky pie crust from scratch using real butter?

The Magic of Real Butter in Pie Crust
There’s nothing quite like a homemade pie, and at the heart of every great pie is a truly flaky, tender crust. While shortening or lard can yield good results, real butter imparts an unparalleled richness and flavor that elevates your baking. The secret to its flakiness lies in how the butter interacts with the flour and water during mixing and baking. When butter melts in the oven, it creates pockets of steam, which in turn separate the layers of dough, resulting in that coveted flaky texture.
1. Keep Everything Cold
This is arguably the most crucial rule for a flaky butter crust. Cold butter is key because it prevents the butter from fully incorporating into the flour. Instead, it remains in discrete pieces, which then melt and create steam pockets in the oven. Use ice water for your liquid, and ideally, chill your flour beforehand. Even your mixing bowl and pastry blender can benefit from a stint in the freezer!
2. Proper Butter Preparation and Integration
Start with very cold butter, cut into small cubes (about 1/2-inch or 1.25 cm). Some bakers even freeze their butter for 10-15 minutes before cutting. When adding the butter to the flour, use a pastry blender, your fingertips, or a food processor with quick pulses. The goal is to work the butter into the flour until the mixture resembles coarse meal with some pea-sized chunks of butter still visible. These larger pieces are essential for flakiness.
3. Use Just Enough Ice Water
Water activates the gluten in the flour, but too much water makes the dough tough. Too little, and it won’t hold together. Add ice water, one tablespoon at a time, mixing gently after each addition. The dough is ready when it just barely comes together when squeezed, but isn’t sticky. It should feel slightly shaggy. For most recipes, this is usually between 4-8 tablespoons for a double crust.
4. Minimize Handling and Chill Thoroughly
Overworking the dough develops gluten, leading to a tough, less flaky crust. Once the dough just comes together, gently form it into one or two discs, wrap tightly in plastic wrap, and refrigerate for at least 30 minutes, but ideally 2 hours or more (up to 2 days). Chilling allows the gluten to relax and the butter to firm up again, making the dough easier to roll out and preventing shrinkage during baking.
5. Roll Evenly and Efficiently
When rolling, work on a lightly floured surface, dusting your rolling pin as well. Roll from the center outwards, rotating the dough frequently to prevent sticking and ensure an even thickness. Aim for about 1/8-inch (3 mm) thick. If the dough starts to get warm or sticky, pop it back into the fridge for 10-15 minutes.

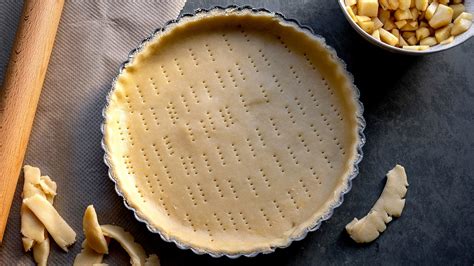
6. Blind Baking for the Win (When Applicable)
For custard or fruit pies with very moist fillings, blind baking (or pre-baking) your crust is crucial to prevent a soggy bottom. Line the chilled crust with parchment paper, fill with pie weights or dried beans, and bake until the edges are set. Remove the weights and parchment, then continue baking until the bottom is lightly golden. This creates a barrier against moisture.

7. Baking Temperature and Timing
Start your pie in a very hot oven (400-425°F or 200-220°C) for the first 15-20 minutes. This high heat helps to set the crust quickly and encourages maximum steam production from the butter, contributing to flakiness. After this initial blast, reduce the temperature to finish baking your pie, preventing over-browning while the filling cooks through.
Mastering a flaky butter pie crust takes practice, but by following these tips, you’ll be well on your way to creating pies that are truly a cut above the rest. The reward of that golden, delicate, and utterly delicious crust is well worth the effort!