


How to build a simple, pest-proof raised garden bed for heirloom veggies?

Cultivating Your Own Heirloom Haven: A Pest-Proof Raised Bed Guide
Dreaming of fresh, organic heirloom tomatoes, crisp lettuce, or unique varieties of your favorite vegetables right from your backyard? A raised garden bed offers an ideal solution, providing better soil control, drainage, and accessibility. But to protect those precious heirloom plants from hungry critters, a pest-proof design is essential. This guide will walk you through building a simple, durable, and critter-resistant raised garden bed, perfect for your prized heirloom collection.
Why a Raised Bed for Heirloom Veggies?
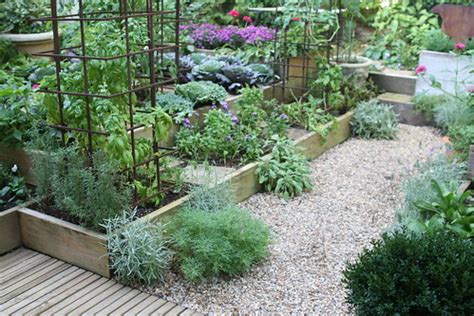
Raised garden beds offer numerous advantages over traditional in-ground gardens. They allow you to control the soil composition precisely, ensuring your heirlooms get the nutrient-rich, well-draining environment they need. They also warm up faster in spring, extending your growing season, and improve drainage, preventing waterlogging. Furthermore, they reduce soil compaction and can be more accessible, saving your back from excessive bending.

The Importance of Pest-Proofing
Heirloom vegetables are often unique and delicate, making them particularly vulnerable to pests like voles, gophers, rabbits, and even curious pets. Incorporating a robust pest barrier from the outset is crucial for protecting your investment of time and effort. This simple step ensures your plants thrive undisturbed, leading to a bountiful and satisfying harvest.
Materials You’ll Need
Before you start, gather all your materials and tools. Choosing untreated, rot-resistant wood like cedar or redwood is recommended for longevity and safety, especially since you’re growing edibles. Alternatively, composite lumber or pressure-treated wood (check for food-safe ratings) can be used for even greater durability.
- Lumber: (4) 2x10x8-foot boards (for a 4×8 bed), or dimensions suitable for your desired size.
- Hardware Cloth: 1/4-inch or 1/2-inch galvanized steel mesh, wide enough to cover the bottom and extend up the sides slightly (e.g., 4×8 feet).
- Wood Screws: 3-inch exterior-grade screws.
- Staples or U-nails: For securing hardware cloth.
- Optional: Landscape fabric (non-woven) or cardboard for lining.
Tools Required
- Measuring tape
- Pencil
- Circular saw or miter saw (or hand saw)
- Drill/driver
- Staple gun or hammer
- Tin snips or heavy-duty wire cutters
- Level
- Shovel and rake
Step-by-Step Construction Guide
Step 1: Plan Your Location and Dimensions
Choose a sunny spot in your yard that receives at least 6-8 hours of direct sunlight daily. Consider water access and proximity to your home. Decide on the dimensions of your raised bed. A 4×8 foot bed is a popular and manageable size, allowing you to reach the center from either side without stepping into the bed.

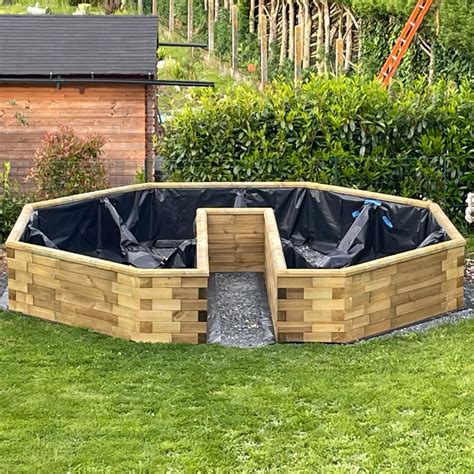
Step 2: Cut and Assemble the Frame
- Cut your lumber: For a 4×8 foot bed, you’ll need two 8-foot boards and two 4-foot boards. If using 2x10x8-foot boards, cut two of them in half to create four 4-foot pieces. You’ll use two 8-foot pieces and two 4-foot pieces per layer. For a standard 10-inch deep bed, one layer is sufficient. For deeper beds, you can stack two layers.
- Form a rectangle with your cut boards. The shorter boards will fit between the longer boards at the ends.
- Pre-drill pilot holes at the corners to prevent the wood from splitting.
- Secure the corners with 3-inch exterior-grade screws, using two or three screws per corner for a sturdy connection. Ensure the frame is square using a measuring tape to check diagonal measurements (they should be equal).
Step 3: Attach the Pest Barrier
This is the crucial pest-proofing step. Lay your assembled wooden frame over the area where you intend to place your bed. If your ground is uneven, level it as best as you can now. Unroll the hardware cloth and place it over the bottom of the raised bed frame, ensuring it extends up the inside edges by at least 6-8 inches. This creates an impenetrable barrier against burrowing pests like gophers and voles.
Using a staple gun or U-nails, firmly attach the hardware cloth to the bottom edges and the inside walls of the wooden frame. Overlap any seams in the hardware cloth by at least an inch and secure them well to prevent gaps. Trim any excess hardware cloth with tin snips, being careful to avoid sharp edges.
Step 4: Prepare the Site and Place the Bed
Once the pest barrier is attached, prepare the ground beneath where the bed will sit. Clear away any weeds, grass, or debris. You might want to loosen the soil underneath slightly with a fork to improve drainage. Place a layer of cardboard or landscape fabric over the ground inside the bed to suppress weeds from below, ensuring it doesn’t interfere with the hardware cloth.
Carefully move your completed raised bed frame into its final position. Use a level to ensure the bed is sitting evenly on the ground. If necessary, shim any corners or slightly adjust the ground beneath until it’s level.
Step 5: Filling with Premium Soil
Now for the fun part! Fill your raised bed with a high-quality soil mix. A good blend for heirloom vegetables typically includes:
- Topsoil: Provides a base.
- Compost: Essential for nutrients and improving soil structure.
- Peat Moss or Coco Coir: Improves water retention and aeration.
- Perlite or Vermiculite: Enhances drainage and aeration.
Mix these components thoroughly, aiming for a light, fluffy, and rich soil that drains well. Fill the bed to about an inch or two below the top edge of the lumber to prevent soil from washing out during watering.
Planting Your Heirloom Veggies and Beyond
With your pest-proof raised garden bed complete and filled with nutrient-rich soil, it’s time to plant your cherished heirloom seeds or seedlings! Follow the specific spacing and light requirements for each variety. Water your newly planted bed thoroughly.
Regular maintenance will include consistent watering, occasional feeding with organic fertilizers, and monitoring for any pests that might attempt to bypass your defenses from above. With this simple, pest-proof design, you’re well on your way to enjoying a bountiful harvest of beautiful heirloom vegetables, grown with love and protection.


