


Easy DIY for rustic root cellar storage to preserve garden harvests naturally?

Embrace Ancient Wisdom: Building Your Own Rustic Root Cellar
In an age of refrigeration and elaborate canning setups, the humble root cellar offers a timeless and incredibly effective way to store your garden’s bounty without electricity. It’s a natural, energy-efficient method rooted in centuries of agricultural wisdom, perfect for preserving everything from potatoes and carrots to apples and cabbages. If you’re looking for an easy DIY project that significantly extends your harvest’s lifespan and reduces food waste, building a rustic root cellar is an incredibly rewarding endeavor.

The Core Principles of Root Cellar Storage
A successful root cellar mimics natural cave conditions, providing a stable environment ideal for long-term storage. The three critical elements are:
- Cool Temperatures: Generally between 35-50°F (2-10°C). This slows down respiration and spoilage.
- High Humidity: Around 85-95% humidity prevents produce from drying out and shriveling.
- Darkness: Keeps produce from sprouting, retains nutrients, and inhibits the growth of undesirable microorganisms.
Ventilation is also important to prevent stagnant air and off-odors, though it needs to be managed carefully to maintain humidity.
Simple DIY Approaches for Your Root Cellar
You don’t need to excavate a massive underground structure to enjoy the benefits of a root cellar. Several easy, cost-effective methods can be adapted to almost any garden or backyard.
1. The Buried Container Method (Mini Root Cellar)
This is perhaps the simplest and most accessible DIY root cellar. Ideal for smaller harvests or urban gardens.
- Materials: A large, food-grade plastic barrel or heavy-duty trash can with a tight-fitting lid, gravel, straw, and an old tire or wooden frame for insulation.
- Process:
- Dig a hole deep enough to bury most of your container, leaving just the rim exposed. Ensure good drainage.
- Place a layer of gravel at the bottom of the hole for drainage.
- Insert your container. Drill a few small drainage holes in the bottom if it doesn’t have any.
- Place straw or a similar insulating material around the sides of the container before backfilling with soil.
- Store produce directly in the container, often layered with straw or sawdust.
- Cover the lid with an old tire, more straw, and a wooden board for extra insulation and camouflage.
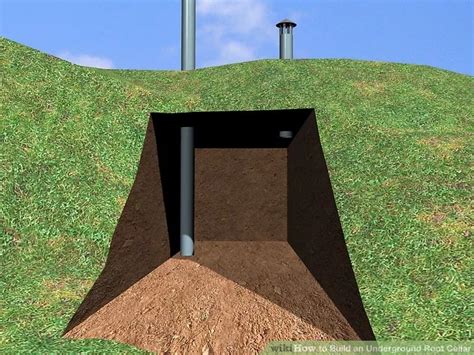
2. The Outdoor Pit or Mound Cellar
A traditional method that’s excellent for root crops. This is essentially a reinforced trench or mound.
- Process:
- Choose a well-drained, shaded spot.
- Dig a shallow trench (1-2 feet deep) or simply create a raised bed.
- Place a layer of straw, leaves, or sand at the bottom.
- Arrange your produce (e.g., potatoes, carrots, beets) on top, ensuring they don’t touch each other too much.
- Cover the produce with a thick layer of insulating material like straw or dry leaves (6-12 inches).
- Finally, mound soil over the insulation to form a protective dome. Ensure a small vent pipe or two is incorporated for air circulation.
3. Utilizing an Existing Space
If you have an unheated basement corner, a cool crawl space, or even an old, unused shed, you might already have the makings of a root cellar.
- Basement/Crawl Space: Identify the coolest, darkest, and dampest corner. You might need to add a moisture barrier (like plastic sheeting) to a wall and build simple shelves. Ensure it’s away from furnaces or hot water heaters.
- Shed Conversion: Insulate the walls, floor, and ceiling of a sturdy shed. You’ll likely need to add ventilation (inlet and outlet vents) and consider a double-door system for extra insulation. Burying parts of the shed or mounding earth around the base can significantly improve temperature stability.

What to Store and How to Prepare
Not all produce is suitable for root cellar storage. The best candidates are hardier items:
- Root Vegetables: Potatoes, carrots, beets, parsnips, turnips, rutabagas, celeriac.
- Cabbages: Store whole heads.
- Apples & Pears: Store carefully, checking for bruises. Keep them separate from root vegetables, as they release ethylene gas which can cause other produce to ripen faster.
- Onions & Garlic: Prefer slightly cooler, drier conditions than typical root cellar items, so store them on a higher, dryer shelf if possible.
Preparation is Key:
- Curing: For potatoes, sweet potatoes, and winter squash, a curing period (warm, humid for a week or two post-harvest) can significantly improve storage life.
- Cleaning: Brush off excess soil, but avoid washing produce before storing as moisture encourages spoilage.
- Inspect: Only store perfect, unblemished produce. One bad apple (or potato) can indeed spoil the bunch.

Maintaining Your Rustic Cellar
Once built, your root cellar isn’t entirely maintenance-free, but the effort is minimal compared to the rewards.
- Monitor Temperature & Humidity: Use a simple thermometer/hygrometer. Adjust ventilation as needed.
- Regular Inspection: Check stored produce every few weeks. Remove any items showing signs of spoilage immediately.
- Pest Control: Ensure your cellar is secure from rodents and insects. Consider fine mesh on vents.
- Cleanliness: A yearly clean-out (after emptying) helps prevent mold and disease build-up.

Embrace Sustainable Storage
Building an easy, rustic root cellar is more than just a DIY project; it’s a step towards greater self-sufficiency, reduced waste, and a deeper connection to the rhythm of nature. It’s a testament to simple solutions that work, allowing you to enjoy your homegrown harvests long after the last frost.


