DIY plans for a budget-friendly, predator-proof chicken coop?

Building Your Ultimate Budget-Friendly, Predator-Proof Chicken Coop
Owning chickens can be a rewarding experience, but providing them with a safe, comfortable, and secure home is paramount. A well-designed coop not only protects your flock from the elements but, crucially, from predators. This guide will walk you through creating a DIY chicken coop that’s both easy on your wallet and impenetrable to common threats like raccoons, foxes, and hawks.
Before grabbing your tools, thoughtful planning is essential. Consider the size of your flock – a good rule of thumb is 2-4 square feet per chicken inside the coop and 8-10 square feet in an attached run. Factor in local climate, ease of cleaning, and ventilation. Sketch out your design, keeping in mind accessibility for egg collection and maintenance.

Sourcing Budget-Friendly and Durable Materials
The secret to a budget-friendly coop often lies in smart material choices. Look for reclaimed wood from pallets (ensure they are heat-treated, not chemically treated – look for ‘HT’ stamps), old fencing, or construction scraps. For the main structure, pressure-treated lumber for the base will resist rot, especially if in contact with the ground. OSB or plywood can form the walls, covered by exterior-grade paint or sealant to protect against weather.
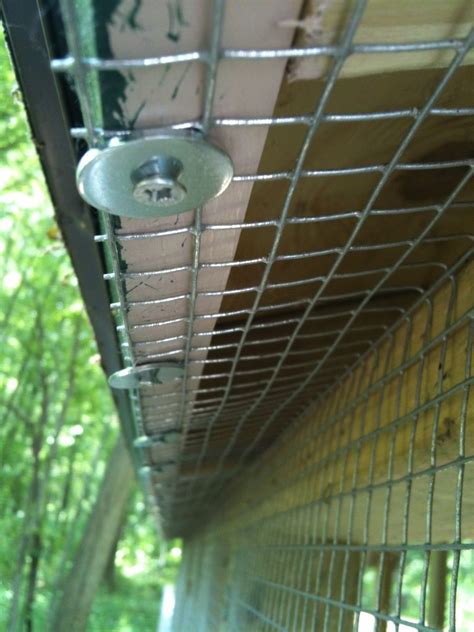
The most critical material for predator proofing is hardware cloth, not chicken wire. Chicken wire is designed to keep chickens in, not predators out. Hardware cloth, with its smaller, welded squares (1/2 inch or 1/4 inch is ideal), is much stronger and harder for predators to chew through or reach through. Galvanized metal roofing is a durable and cost-effective option for the roof.
Essential Predator-Proofing Measures
Predators are relentless and ingenious. Your coop must be built to withstand their attempts. Here’s how to make it robust:
- Dig Skirt/Apron: Predators often try to dig under the coop. Extend your hardware cloth horizontally outwards from the base of the coop for at least 12-18 inches, burying it 6-12 inches deep. This creates an apron that discourages digging.
- Secure Openings: All doors, windows, and ventilation points must have secure latches. Use barrel bolts, carabiners, or other locking mechanisms that cannot be easily manipulated by paws or pushed open. Cover any open windows or large ventilation gaps with hardware cloth.
- Strong Materials: As mentioned, use hardware cloth for all openings and the run. Ensure it’s securely fastened to the frame with screws and washers, or heavy-duty staples every few inches.
- Solid Foundation: Elevate your coop off the ground to deter digging and improve air circulation. Use concrete blocks, sturdy posts, or a well-built wooden frame.
Step-by-Step Construction Guide
1. The Foundation and Frame:
Start by building a sturdy base. Use pressure-treated 2x4s or 4x4s for the bottom frame. If elevating, secure these to posts or concrete blocks. Construct the wall frames using 2x2s or 2x4s, ensuring they are plumb and square. This forms the skeleton of your coop.

2. Walls and Flooring:
Attach your reclaimed wood, OSB, or plywood to the wall frames. For the floor, use plywood or similar sturdy material, ensuring it’s sealed. Consider adding a layer of linoleum or peel-and-stick vinyl tiles to the floor for easier cleaning.
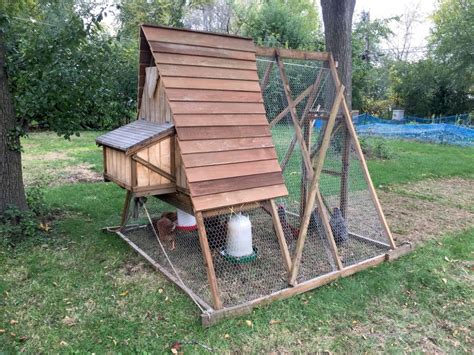
3. Roofing:
Construct a simple gable or lean-to roof frame. Cover with plywood and then attach your galvanized metal roofing or shingles. Ensure there’s a slight overhang to protect the walls from rain and provide shade.
4. Doors and Ventilation:
Cut openings for a main access door and a smaller pop-hole door for the chickens. Build these doors to fit snugly and install your chosen secure latches. Create ventilation openings near the roofline, always covering them with hardware cloth to prevent predator entry while allowing airflow.
5. Predator-Proofing the Run and Coop:
Enclose any attached run completely with hardware cloth, attaching it firmly to a wooden frame. Remember the dig skirt mentioned earlier. Check every seam, gap, and corner for potential weak points and reinforce them. Even a small hole can be an invitation for a predator.

Interior Comforts and Finishing Touches
Once the structure is complete, add the interior essentials. Install roosting bars (round branches or 2x2s with rounded edges) above the floor. Provide nest boxes (one for every 3-4 hens is usually sufficient) in a dark, quiet corner. Ensure easy access to these from outside the coop for egg collection.
Paint or seal all exterior wood to prolong the life of your coop. Regularly inspect your coop and run for any signs of wear, loose hardware cloth, or potential entry points that predators might have exploited. Diligence is key to keeping your flock safe.
Building a DIY chicken coop is a rewarding project that combines craftsmanship with the joy of caring for your flock. By focusing on budget-friendly materials and robust predator-proofing techniques, you can create a safe, comfortable, and lasting home for your chickens without breaking the bank. Happy building!