How to build an inexpensive raised garden bed for homestead vegetables?
Why Choose an Inexpensive Raised Garden Bed?
Raised garden beds offer a multitude of benefits for homesteaders and home gardeners alike, from better soil control to reduced back strain. While some kits can be pricey, building your own inexpensive version is a rewarding DIY project that empowers you to grow fresh produce without a hefty investment. These beds improve drainage, warm the soil earlier in spring, deter pests, and allow for intensive planting in customized soil mixes. They are particularly valuable for homesteaders who want to maximize their yield and efficiency on a budget.

Budget-Friendly Material Choices
The key to an inexpensive raised bed lies in smart material selection. While cedar is rot-resistant, it can be costly. For budget builds, consider:
- Untreated Pine or Fir: Readily available and affordable. While it won’t last as long as cedar, it can still give you 5-7 years of use, especially if you line the inside with a protective barrier (like pond liner or heavy-duty plastic sheeting, ensuring drainage holes are present).
- Reclaimed Wood: Pallets, old fence pickets, or salvaged lumber can be free or very cheap. Be cautious with pallets; ensure they are ‘HT’ (heat-treated) and not ‘MB’ (methyl bromide-treated) to avoid chemical contamination.
- Cinder Blocks or Rocks: These can form sturdy, long-lasting walls and often can be sourced for free or at low cost, though they can make the bed heavier.
- Corrugated Metal Roofing: New sheets can be expensive, but reclaimed pieces offer a modern, durable, and rust-resistant option, often paired with wooden corner posts for stability.
For most DIYers, untreated lumber offers the best balance of cost, ease of workability, and longevity for an inexpensive project.

Planning Your Raised Bed Design
Before you cut any wood, a little planning goes a long way:
- Location: Choose a spot that receives at least 6-8 hours of direct sunlight per day. Ensure it’s relatively flat or you’re prepared to level it.
- Size: A common width is 3-4 feet, allowing you to reach the center from either side without stepping into the bed. Length can vary, but 8-12 feet is manageable. For height, 10-12 inches is sufficient for most vegetables, but 18-24 inches offers deeper root space and less bending.
- Tools: You’ll need basic carpentry tools: a tape measure, pencil, saw (circular, miter, or hand saw), drill, and possibly a level and spade.
- Material Calculation: Once you have your dimensions, calculate how many boards you’ll need. For a 4x8x12-inch bed, you’ll need two 8-foot boards and two 4-foot boards per layer. For 12 inches high, you’d need two layers.

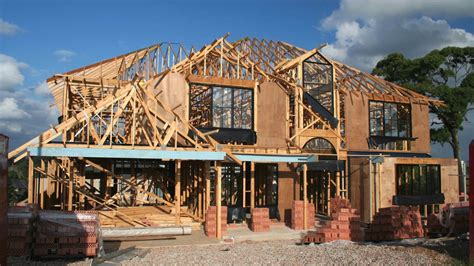
Step-by-Step Construction Guide
1. Cut Your Lumber
Measure and cut your chosen lumber to the desired lengths for the sides and ends of your raised bed. If you’re building a multi-layered bed (e.g., 12 inches high using 2×6 boards), cut enough for both layers.
2. Assemble the Frame
Join the boards at the corners to form a rectangle. You can use:
- Screws: Long exterior-grade screws (e.g., 3-inch deck screws) driven through the end of one board into the side of the other work well. Use at least two screws per joint per layer.
- Corner Brackets: Metal corner brackets can add extra strength, though they increase cost slightly.
- Internal Corner Posts: You can cut 2×2 or 4×4 lumber into short posts (matching the height of your bed) and screw your side and end boards into these posts for a very sturdy frame. This is highly recommended for longevity.
Once the first layer is assembled, stack and screw the second layer on top, offsetting the joints slightly for added strength if possible.

3. Level the Site
Place your assembled frame in its final location. Use a spade to dig out high spots or add soil to low spots until the bed is level. This ensures even watering and prevents structural strain on your bed over time.
4. Add a Weed Barrier (Optional but Recommended)
Line the bottom of your raised bed with cardboard (remove tape and labels) or landscape fabric. This helps suppress weeds from growing up into your garden bed while still allowing drainage and beneficial soil organisms to pass through. Avoid plastic sheeting at the bottom, as it prevents essential drainage.
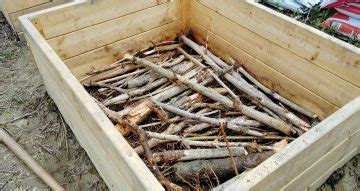
Filling Your Raised Bed Effectively and Affordably
Filling a large raised bed with bagged potting soil can be very expensive. Employ the “lasagna gardening” method to build nutrient-rich soil on a budget:
- Bottom Layer (Drainage & Organic Matter): Start with a layer of coarse organic materials like small logs, branches, wood chips, or straw. This helps with drainage and will decompose over time.
- Carbon Layers: Add layers of “brown” materials like cardboard (torn up), dry leaves, straw, or shredded newspaper.
- Nitrogen Layers: Alternate with “green” materials such as grass clippings (untreated), kitchen scraps (avoid meat/dairy), or fresh manure (if well-composted).
- Compost and Topsoil: Fill the top 6-12 inches with a good quality mix of garden soil, compost, and perhaps some perlite or vermiculite for aeration. Look for bulk soil and compost from local nurseries or landscapers; it’s often much cheaper than bags.
Water each layer thoroughly as you build it to help kickstart decomposition.
Planting and Maintenance
Once your bed is filled, you’re ready to plant! Follow good gardening practices: plant appropriate vegetables for your climate, water regularly, and replenish nutrients annually with compost. An inexpensive raised bed is a sustainable way to provide fresh, healthy food for your homestead for years to come.