How to build a sturdy raised garden bed for organic vegetables?
Why Build a Raised Garden Bed?
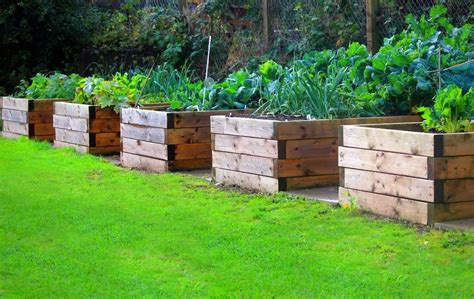
Raised garden beds offer numerous advantages, especially for growing organic vegetables. They allow you to control soil quality, ensuring nutrient-rich, well-draining soil free from contaminants. Raised beds also improve drainage, warm up faster in spring, and reduce strain on your back and knees. Building a sturdy one means it will withstand the elements and provide a productive growing space for many seasons.
Planning Your Raised Bed
Careful planning is the first step towards a successful and sturdy raised bed. Consider the ideal location in your yard that receives at least 6-8 hours of direct sunlight daily. Determine the appropriate size and height; a common height is 10-12 inches for good root development, but 18-24 inches offers even better ergonomics. For width, aim for no more than 4 feet so you can reach the center easily from either side without stepping on the soil.
Also, think about the materials. The longevity and sturdiness of your bed largely depend on your material choices.
Choosing the Right Materials
Selecting the right materials is crucial for both the longevity and safety of your organic garden. Avoid pressure-treated wood as it often contains chemicals that can leach into your soil. Better options include:
- Cedar or Redwood: Naturally rot-resistant and durable, though more expensive.
- Untreated Pine or Fir: More affordable, but will decompose faster unless protected with a liner or treated naturally (e.g., with linseed oil on the exterior).
- Composite Decking: Made from recycled plastic and wood fibers, very durable and low maintenance, but can be costly.
- Galvanized Metal Panels: A modern, long-lasting, and often attractive option.
You’ll also need sturdy fasteners like galvanized screws or exterior-grade deck screws (3-inch or longer), corner brackets for added stability, and possibly rebar or stakes for longer beds to prevent bowing.
Step-by-Step Construction Guide
Step 1: Prepare the Site
Clear the chosen area of any weeds, grass, or debris. Level the ground as much as possible to ensure your bed sits evenly. This prevents warping and provides a more stable foundation.
Step 2: Cut Your Lumber
Based on your planned dimensions, cut your lumber. For a 4×8 foot bed, you’ll need two 8-foot boards and two 4-foot boards. If you choose a double-height bed, you’ll double these quantities. Ensure all cuts are straight for tight, strong joints.
Step 3: Assemble the Frame
Lay out your cut boards to form the rectangular or square shape. The strongest joint for wood construction is often a lap joint, but a simple butt joint reinforced with strong corner brackets and plenty of screws will also be very sturdy. Pre-drill pilot holes to prevent wood splitting. For each corner, use at least 2-3 screws per board, staggered, to firmly attach them. If you’re building a taller bed, stack the layers, offsetting the joints for increased strength, and screw them together.

Step 4: Add Reinforcements
For beds longer than 6 feet, the weight of soil can cause the sides to bow outwards over time. To prevent this, add internal cross-bracing. You can use sections of lumber or metal strapping across the width of the bed, secured to the long sides. Alternatively, drive rebar stakes into the ground along the outside of the long boards, securing them with fencing wire or screws if your material allows.
Step 5: Install a Liner (Optional)
While not strictly necessary, a weed barrier fabric or hardware cloth on the bottom can prevent weeds from growing up into your bed and deter burrowing pests like gophers. If using wood that’s not naturally rot-resistant, you can line the inside walls with heavy-duty pond liner or thick plastic sheeting, stapling it to the wood, to extend its life. Just remember to add drainage holes if you use a full bottom liner.
Filling Your Raised Bed
The success of your organic garden hinges on the quality of your soil. Don’t just fill your bed with garden soil from your yard. Instead, use the “lasagna gardening” method or a good quality soil mix. Start with a layer of cardboard (remove all tape and labels) to suppress weeds and attract earthworms. Follow with layers of organic matter like small branches, leaves, grass clippings, straw, and unfinished compost. Top this with a blend of high-quality raised bed soil, compost, and possibly some peat moss or coir for moisture retention. This layering provides excellent drainage, aeration, and a slow release of nutrients.
Planting and Maintenance
Once your bed is built and filled, it’s time to plant! Choose organic vegetable seeds or starts. Companion planting can boost growth and deter pests naturally. Ensure consistent watering, especially during dry spells, as raised beds tend to dry out faster. Mulch the top layer of soil with straw, shredded leaves, or wood chips to conserve moisture, regulate soil temperature, and suppress weeds. Regularly add more compost to maintain soil fertility, feeding your plants the organic way.

Conclusion
Building a sturdy raised garden bed for organic vegetables is a rewarding DIY project that pays dividends for years to come. With careful planning, the right materials, and a bit of effort, you’ll create a beautiful and productive space for growing fresh, healthy food right in your backyard. Get ready to enjoy bountiful harvests and the satisfaction of knowing exactly what goes into your meals.