How to make a truly flaky, buttery pie crust from scratch?
A truly flaky, buttery pie crust is the foundation of any exceptional pie, yet it’s often seen as an intimidating task. Forget the store-bought versions; creating a masterpiece from scratch is not only rewarding but also surprisingly achievable with a few key techniques and a little patience. This guide will walk you through the essential steps to elevate your pie game, ensuring a tender, shatteringly crisp, and rich crust every single time.
The Foundation: Quality Ingredients Are Key
Success begins with your ingredients. While seemingly simple, their quality and temperature are paramount. You’ll need all-purpose flour, preferably unbleached, which provides a good balance of protein for structure without excessive gluten development. A pinch of salt is crucial for flavor, balancing the richness of the butter.
The star of the show is butter. Always opt for unsalted, high-quality butter with a higher fat content, as it contributes significantly to both flavor and flakiness. The most critical rule for butter? It must be absolutely, positively ice-cold. This is non-negotiable for achieving those coveted flaky layers.
Finally, ice water. Yes, actual ice water. The cold temperature helps keep the butter solid, and adding it incrementally ensures you don’t overhydrate the dough, which can lead to a tough crust.

The Art of Incorporating Fat: The Butter Cut-In Method
This is where the magic happens. Start by cutting your very cold butter into small, ½-inch cubes. You want to work quickly to prevent the butter from warming up. The goal is to incorporate the butter into the flour mixture without melting it.
There are several ways to do this: using a pastry blender, two knives, your fingertips, or even a food processor. If using a pastry blender or knives, cut the butter into the flour until the mixture resembles coarse meal with some pea-sized pieces of butter still visible. These pockets of butter are what create steam during baking, resulting in those beautiful flaky layers. If using a food processor, pulse the butter and flour together in short bursts until the desired consistency is reached. Be careful not to overmix!

Hydration and Handling: The Ice Water Trick
Once your butter is perfectly cut in, it’s time to add the ice water. This must be done slowly and carefully. Add the water a tablespoon at a time, gently tossing the mixture with a fork or your hands (lightly!). You’re looking for the dough to just barely come together when squeezed.
The key here is not to add too much water. A common mistake is to overhydrate the dough, making it sticky and tough. It’s better to err on the side of slightly dry than too wet. The dough should still look a bit shaggy but hold its shape when pressed together. Only add enough water to allow it to form a cohesive ball.

The Golden Rule: Don’t Overwork Your Dough
Once the water is added and the dough starts to come together, resist the urge to knead it like bread dough. Overworking develops gluten, leading to a tough, chewy crust instead of a tender, flaky one. Gently gather the dough into a disc (or two, if making a double-crust pie). Flatten it slightly into a disc shape, wrap it tightly in plastic wrap, and prepare for the most crucial step.
Chill Out: The Essential Resting Period
Chilling the dough is non-negotiable. Place your plastic-wrapped dough disc in the refrigerator for at least 30 minutes, but ideally for 2 hours or even overnight. This resting period serves several vital purposes:
- It allows the flour to fully hydrate, making the dough easier to roll.
- It firms up the butter pockets, preventing them from melting too quickly when rolling.
- It relaxes the gluten, preventing the dough from shrinking excessively during baking.

Rolling with Precision: Tips for a Perfect Crust
When you’re ready to roll, lightly flour your work surface and rolling pin. Take the chilled dough out of the fridge a few minutes before rolling to allow it to soften slightly, but not warm up. Roll from the center outwards, rotating the dough frequently to prevent sticking and to ensure an even thickness (about 1/8 to 1/4 inch). If the dough starts to crack, gently press the cracks together and continue.
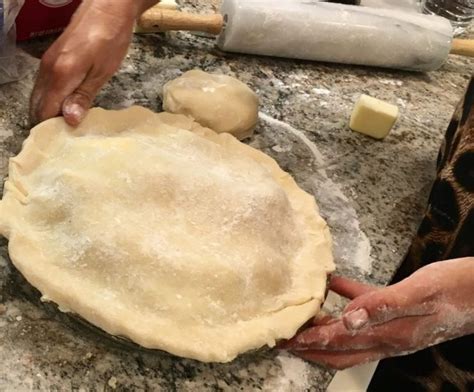
Once rolled to the desired size, carefully transfer it to your pie plate. Trim the edges, leaving about an inch of overhang, then fold it under and crimp or flute as desired. If the dough feels too warm or soft at any point, pop it back into the fridge for 10-15 minutes.

Baking for Flakiness: Blind Baking and Beyond
For most custards or wet fillings, blind baking (pre-baking) the crust is essential to prevent a soggy bottom. Line the unbaked crust with parchment paper, fill it with pie weights, dried beans, or rice, and bake according to your recipe’s instructions. This helps set the crust and creates a barrier against moisture.
When baking your finished pie, pay attention to oven temperature. A relatively high initial temperature often helps create a final burst of steam from the butter, contributing to flakiness, before lowering it to cook the filling thoroughly.
Conclusion: Master Your Pie Crust
Making a truly flaky and buttery pie crust from scratch is a fundamental skill that transforms any pie into an extraordinary dessert. By focusing on cold ingredients, proper butter incorporation, minimal handling, and sufficient chilling, you can consistently achieve a crust that is tender, flavorful, and exquisitely flaky. Practice makes perfect, so don’t be afraid to get your hands a little floury and enjoy the delicious rewards of homemade pie!