Best DIY trellis for heavy fruiting tomatoes using salvaged farm materials?

Growing heavy fruiting tomato varieties can be incredibly rewarding, but their abundant yields require robust support to thrive. Without a sturdy trellis, branches can break, fruit can rot on the ground, and plants become susceptible to disease. Instead of buying expensive commercial trellises, savvy gardeners can turn to salvaged farm materials to build an incredibly durable and eco-friendly support system. This guide will walk you through designing and constructing the best DIY trellis using repurposed items, ensuring a bountiful harvest year after year.
Why a Robust Trellis is Essential for Heavy Fruiting Tomatoes
Large, indeterminate tomato varieties, especially those producing beefsteak or heirloom tomatoes, can grow incredibly tall and bear dozens of pounds of fruit. This significant weight demands more than just a flimsy stake. A strong trellis system:
- Prevents Branch Breakage: Distributes the weight of heavy fruit, protecting branches from snapping under stress.
- Improves Air Circulation: Lifts foliage off the ground, enhancing airflow and reducing fungal diseases.
- Facilitates Harvesting: Keeps fruit clean and easily accessible, making picking a breeze.
- Maximizes Sun Exposure: Allows all parts of the plant to receive adequate sunlight, promoting ripening.
Scouting for Salvaged Treasures: Ideal Farm Materials
The beauty of building a trellis from salvaged materials lies in its cost-effectiveness and sustainability. Farmsteads, even small ones, often have a wealth of items perfect for repurposing. Before you start, consider safety – ensure any metal is free of sharp edges or rust that could compromise its integrity, and wood is free of harmful chemicals or excessive rot.
Excellent salvaged materials include:
- Cattle Panels (Hog Panels/Utility Panels): These heavy-gauge wire panels are incredibly strong, durable, and often available used. They make fantastic arch or A-frame trellises.
- T-Posts or Rebar: Excellent for ground anchors and vertical supports. T-posts are designed to be driven into the ground, while rebar can be hammered in and provides strong, rigid support.
- Old Fencing Wire or Field Fence: Can be stretched between sturdy posts to create a strong support grid.
- Dimensional Lumber Scraps: Pressure-treated 2x4s, 4x4s, or fence posts can serve as sturdy uprights for larger structures.
- Steel Pipe or Conduit: Strong and weather-resistant, perfect for vertical supports.
- Baling Twine or Heavy Gauge Wire: Useful for tying components together or training plants.

Top DIY Trellis Designs for Heavy Yields
Given the materials, here are a few highly effective designs:
1. The Cattle Panel Arch (The Workhorse)
This design is arguably the most popular and effective for heavy tomatoes. By bending a cattle panel into an arch and anchoring it, you create a massive, stable structure that can support dozens of plants. It also offers a beautiful tunnel effect.
2. The Robust T-Post & Wire System
Ideal for long rows, this involves driving sturdy T-posts (or wooden posts) at intervals and stringing heavy-gauge wire horizontally between them. Tomatoes are then woven through or tied to the wires as they grow.
3. Rebar & Frame Trellis
Combining heavy rebar stakes with a frame built from salvaged lumber or additional rebar creates an extremely rigid structure. This can be built as an A-frame or a simple rectangular cage.
Step-by-Step Guide: Building a Salvaged Cattle Panel Trellis
Let’s focus on the Cattle Panel Arch, given its excellent load-bearing capacity and common material availability. This design is highly adaptable and requires minimal specialized tools.
1. Gathering Your Materials and Tools
- One (or more) cattle panels (typically 16 ft long x 50 inches wide)
- 4-6 T-posts or lengths of sturdy rebar (5-6 ft long each) for anchors
- Heavy-duty zip ties, U-clips, or baling wire for securing
- Sledgehammer or post driver
- Wire cutters (if modifying panel size)
- Measuring tape and level
- Work gloves
2. Site Preparation
Choose a sunny location that allows ample space for your tomato plants and the arch. Clear the area of weeds and amend the soil if necessary. Consider the prevailing winds – orient your arch to provide stability.
3. Installing the Supports
Decide on the width of your arch. For a typical 16 ft panel, a 4-5 ft base width works well for a good arch height. Mark the spots where you want the base of your arch to sit. Drive two T-posts or rebar stakes deeply into the ground at each end of your desired arch span (four total posts), ensuring they are sturdy and plumb. Leave about 12-18 inches above ground to securely attach the panel.
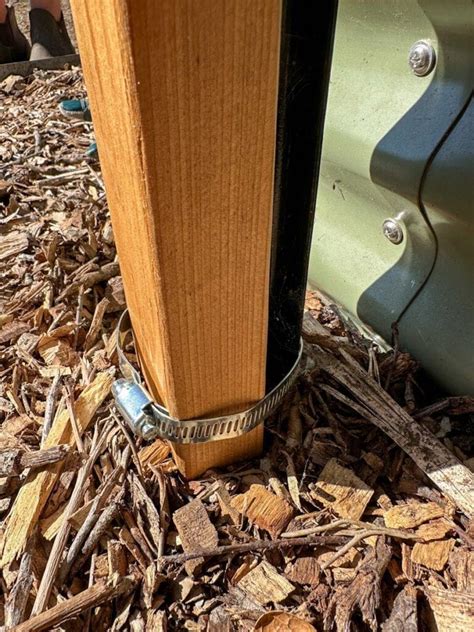
4. Shaping and Securing the Panel
Carefully bend the cattle panel into an arch. This may require two people. Place one end of the panel against the installed T-posts on one side, and gently walk towards the other side, bending the panel evenly until it reaches the other set of T-posts. Secure the panel to the T-posts using zip ties, U-clips, or baling wire. Ensure a tight, strong connection at multiple points along each base post.
5. Reinforcement and Finishing Touches
For extra stability, especially if you anticipate exceptionally heavy yields or strong winds, you can add two more T-posts halfway along the length of the arch, driving them parallel to the base posts and securing the panel to them. Double-check all connections. Your robust trellis is now ready for planting!

Training Your Tomatoes for Maximum Support
Once your plants are in the ground, begin training them early. As the tomato vines grow, gently weave them through the openings of the cattle panel. For indeterminate varieties, you can prune suckers to encourage vertical growth and manage density. Periodically check and adjust ties or weaving to ensure the plants are well-supported and not constricted. The cattle panel’s grid makes it easy to tie branches directly to the wire as needed.
Tips for Longevity and Sustainability
- Annual Inspection: Before each growing season, inspect your trellis for any loose connections, rust, or damage, and make repairs as needed.
- Winter Storage: While cattle panels are durable outdoors, if you’re using wooden components, consider disassembling and storing them in a dry place during the off-season to prolong their life.
- Expand as Needed: The modular nature of these materials allows you to easily add more arches or extend rows as your garden grows.
- Creative Reuse: Think beyond tomatoes! This type of trellis is also excellent for cucumbers, pole beans, squashes, and even small espaliered fruit trees.
Conclusion
Building a DIY trellis for your heavy fruiting tomatoes using salvaged farm materials is a testament to ingenuity and sustainable gardening. Not only will you save money and reduce waste, but you’ll also create an incredibly strong, long-lasting structure that will proudly support your plants through their most prolific growth. With a little effort and creativity, you can ensure a season of abundant, healthy tomatoes, harvested with ease from a trellis built to last.