Simple DIY Composting Methods for Rich Garden Soil?

Are you dreaming of a vibrant garden overflowing with healthy plants, but balking at the cost of commercial fertilizers? The secret to lush, productive soil often lies in your own backyard – or kitchen. Composting is an ancient, natural process that turns organic waste into a valuable soil amendment, often called ‘black gold’. It’s an eco-friendly practice that reduces landfill waste and enriches your garden naturally, improving soil structure, water retention, and nutrient availability. Best of all, it’s surprisingly simple to do yourself.
The Magic of Composting: Why Your Garden Needs It
Compost is more than just decomposed matter; it’s a living ecosystem teeming with beneficial microorganisms. When incorporated into your garden soil, it works wonders:
- Enhances Soil Structure: Improves aeration in heavy clay soils and increases water retention in sandy soils.
- Boosts Nutrient Content: Provides a slow-release supply of essential nutrients for plant growth, reducing the need for chemical fertilizers.
- Suppresses Plant Diseases: Healthy soil leads to healthy plants, making them more resistant to pests and diseases.
- Reduces Waste: Diverts kitchen scraps and yard waste from landfills, lessening your environmental footprint.
- Saves Money: Eliminates the need to purchase bagged soil amendments and fertilizers.
Getting Started: Essential Composting Principles
Regardless of the method you choose, successful composting relies on a few key ingredients and conditions:
- “Greens” (Nitrogen-Rich): Fresh grass clippings, fruit and vegetable scraps, coffee grounds, tea bags. These provide nitrogen for microbial growth.
- “Browns” (Carbon-Rich): Dry leaves, straw, shredded paper, wood chips, sawdust. These provide carbon for energy and structure.
- Water: The pile should be consistently moist, like a wrung-out sponge. Too dry, and decomposition slows; too wet, and it can become anaerobic and smelly.
- Air: Microbes need oxygen to work efficiently. Turning the pile regularly helps aerate it.
Simple DIY Composting Methods
1. Cold Composting (Passive Composting)
This is the easiest method, perfect for beginners with minimal effort. Simply create a pile or use a basic bin and add your organic materials as they become available. There’s no need to actively turn the pile or manage its moisture levels precisely. The downside is that it takes longer – often a year or more – for the material to break down into usable compost. It’s a good choice for those who have space and patience, and want to largely “set it and forget it.”
2. Hot Composting (Active Composting)
If you’re looking for faster results, hot composting is the way to go. This method involves creating an ideal environment for rapid decomposition, generating heat that speeds up the process and kills weed seeds and pathogens. It requires a balanced mix of greens and browns, consistent moisture, and regular turning (every few days to a week). With proper management, you can have finished compost in as little as a few weeks to a few months.
Steps for Hot Composting:
- Choose a bin or create a pile at least 3x3x3 feet to help retain heat.
- Layer greens and browns, aiming for about two to three parts brown to one part green.
- Moisten each layer as you build, ensuring the pile is damp throughout.
- Turn the pile regularly with a pitchfork to introduce air and mix materials, especially when the center cools down.
3. Vermicomposting (Worm Composting)
Ideal for small spaces like apartments or patios, vermicomposting utilizes red wiggler worms to break down food scraps into nutrient-rich worm castings (worm poop). These castings are an incredibly potent soil amendment. You’ll need a special worm bin (easily DIYed from plastic containers) and a supply of red wigglers.
How to Vermicompost:
- Set up a multi-tiered or single-compartment worm bin with bedding (shredded newspaper, coco coir).
- Introduce red wiggler worms (available online or at bait shops).
- Feed them small amounts of fruit and vegetable scraps, coffee grounds, and crushed eggshells. Avoid meat, dairy, oily foods, and citrus, which can attract pests or harm the worms.
- Harvest the worm castings every few months, using them directly in your garden or potting mixes.

4. Trench Composting
For those with limited visible space or who want to add nutrients directly to their garden beds, trench composting is a discreet option. Simply dig a trench or hole between plant rows or in an empty section of your garden, bury your kitchen scraps (excluding meat/dairy), and cover them with soil. The materials decompose underground, directly enriching the soil where plants will grow. This method is slow but requires virtually no maintenance once buried.
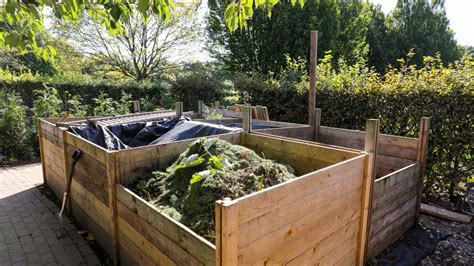
5. DIY Compost Bins & Piles
You don’t need fancy equipment to start composting. Many effective bins can be made from readily available materials:
- Pallet Bins: Four old pallets can be wired or nailed together to form a sturdy, breathable bin.
- Wire Mesh Bins: Hardware cloth or chicken wire can be formed into a cylinder for an inexpensive, airy pile.
- Tumblers: While often purchased, simple tumbling composters can be made from plastic barrels mounted on a rotating frame, offering easy aeration.
- Simple Pile: For larger yards, a designated pile in an out-of-the-way corner works perfectly for cold composting.

What to Compost (and What Not To)
Yes, Compost These:
- Vegetable and fruit scraps
- Coffee grounds and filters, tea bags
- Eggshells (crushed)
- Yard trimmings, leaves, grass clippings
- Shredded newspaper, cardboard, paper towels (non-chemical)
- Wood chips, sawdust (untreated)
No, Avoid These:
- Meat, bones, fish
- Dairy products, oily foods
- Pet waste (can contain pathogens)
- Diseased plants (can spread disease)
- Weeds with seeds (can sprout in your garden)
- Chemically treated wood or plants
Troubleshooting Common Composting Issues
- Smelly Pile: Usually indicates too much nitrogen (greens) or too much moisture, leading to anaerobic conditions. Add more browns, turn the pile, and reduce water.
- Pile Not Heating Up: Too few greens, too dry, or too small. Add more nitrogen-rich materials, moisten, or increase pile size.
- Critters: Avoid composting meat, dairy, and oily foods. Bury fresh food scraps deeply within the pile.

Harvesting Your “Black Gold”
You’ll know your compost is ready when it’s dark brown, crumbly, and smells earthy – no longer resembling the original materials. The decomposition time varies greatly depending on your method, from a few weeks to over a year. Once ready, you can sift it to remove any larger, undecomposed pieces and return them to a new pile. Spread finished compost as a top dressing around plants, mix it into garden beds before planting, or use it to enrich potting mixes.
Embracing DIY composting is a rewarding step towards a more sustainable lifestyle and a more vibrant garden. With these simple methods, you can easily turn your organic waste into a valuable resource, nurturing your soil and watching your garden flourish with nature’s own bounty.