What’s the easiest way to start a homemade sourdough starter?

Embarking on the journey of homemade sourdough might seem daunting, conjuring images of complex schedules and elusive wild yeast. However, creating your own active sourdough starter from scratch is surprisingly straightforward, requiring just two basic ingredients and a little patience. Forget the myths; this guide will walk you through the absolute easiest way to cultivate a thriving starter, perfect for baking your first loaf of artisan bread.
Demystifying the Sourdough Starter
A sourdough starter is essentially a live fermented culture of flour and water, housing wild yeast and beneficial bacteria. These microorganisms are naturally present in flour and in the air around us. When fed regularly, they multiply, creating the leavening power and unique tangy flavor that sourdough bread is famous for. The ‘easiest’ approach minimizes fuss, focusing on consistency over complicated ratios or exotic ingredients.
Gather Your Simple Ingredients and Tools
Before you begin, ensure you have the following. The quality of your ingredients can make a difference, but don’t overthink it for your first starter.
- Flour: Unbleached all-purpose flour, bread flour, or whole wheat flour. Whole wheat flour often jumpstarts activity faster due to its higher microbial content, but all-purpose works wonderfully.
- Water: Unchlorinated water is best. If your tap water is chlorinated, let it sit out in an open container for 24 hours to allow the chlorine to dissipate, or use filtered/bottled water.
- A Glass Jar: A wide-mouth 1-quart (1-liter) canning jar or similar container is ideal.
- A Spoon or Spatula: For mixing.
- A Loose Lid or Cloth: To cover the jar without sealing it tightly.
The Easiest Day-by-Day Method
This method focuses on equal parts flour and water (by weight), making it simple to remember and execute.
Day 1: The Initial Mix
In your clean glass jar, combine 50g (approx. 1/4 cup) unbleached all-purpose or whole wheat flour with 50g (approx. 1/4 cup) unchlorinated water. Mix thoroughly until there are no dry spots and the mixture resembles a thick pancake batter. Scrape down the sides of the jar, cover loosely with a lid or cloth, and leave it at room temperature (ideally 70-75°F / 21-24°C) for 24 hours.
Days 2-3: First Feedings and Observation
After 24 hours, you might see a few tiny bubbles or no activity at all – both are normal. Discard all but 50g of your starter (this helps manage volume and concentrate the yeast). Add 50g fresh flour and 50g fresh water to the remaining 50g starter. Mix well, scrape down the sides, cover loosely, and return to room temperature. Repeat this feeding process every 12-24 hours. You should start to see more consistent bubbles and possibly a slight rise and fall.
Days 4-7+: Establishing Consistency
Continue the daily (or twice-daily if very active) feeding routine: discard all but 50g, feed with 50g flour and 50g water. By day 4 or 5, you should consistently notice significant bubbling, a noticeable rise after feeding (it might double in size), and a slightly tangy but pleasant aroma. Your starter is gaining strength! It’s ready when it consistently doubles in size within 4-8 hours after feeding.

Key Signs of a Thriving Starter
You’ll know your starter is strong and ready to bake with when it exhibits these characteristics:
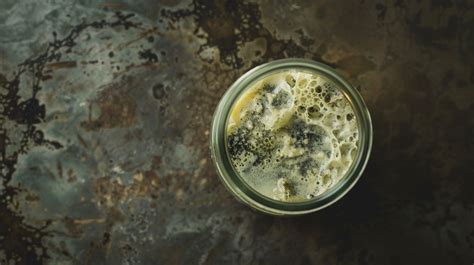
- Bubbles: A good starter will be visibly bubbly throughout, not just on the surface.
- Rise and Fall: After feeding, it should noticeably rise (often doubling in size) and then gradually fall back down as the yeast consumes the food. This cycle is a strong indicator of activity.
- A Tangy Aroma: It should smell fresh, yeasty, and slightly sour, like ripe fruit or good beer. Avoid any sharp, unpleasant, or moldy smells.
- Float Test: Take a small spoonful of starter at its peak (when it has risen significantly) and drop it into a glass of water. If it floats, it’s ready!

Troubleshooting Common Issues
- No Activity: Ensure your room temperature isn’t too cold. Warmer temperatures (75-80°F) can speed things up. Try switching to whole wheat flour for a few feedings.
- Hooch: A dark liquid on top means your starter is hungry. Stir it in (it adds flavor) or pour it off, and ensure you’re feeding regularly.
- Mold: If you see any fuzzy, colored spots (black, green, orange), discard the starter and start fresh. This is rare with proper care.
Maintaining Your Starter for Longevity
Once your starter is robust, you can maintain it on the counter with daily feedings, or store it in the refrigerator to slow down its metabolism. For refrigeration, feed it, let it sit at room temperature for an hour, then transfer it to the fridge. Feed it once a week when stored this way. Before baking, take it out, feed it a few times over 1-2 days, and let it return to full activity.
Your Sourdough Journey Begins!
Starting a sourdough starter is a rewarding culinary adventure. With just flour, water, and a bit of commitment, you’ll soon have a thriving culture ready to transform simple ingredients into incredible loaves of bread. Don’t be afraid to experiment and trust the process – the easiest way is often the most effective. Happy baking!