


How to build a simple, sturdy DIY canning shelf for heavy jars?

Why Build Your Own Sturdy Canning Shelf?
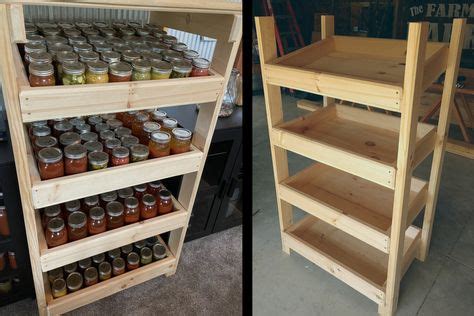
For home canners, the challenge isn’t just in preserving delicious foods, but also in storing them safely and efficiently. Jars of preserved goods are surprisingly heavy, and standard shelving often isn’t up to the task, leading to potential hazards and wasted effort. Building your own DIY canning shelf ensures you have a custom, robust storage solution that can reliably hold hundreds of pounds without sagging or collapsing.
This guide will walk you through creating a simple yet incredibly sturdy shelf using common lumber, designed to withstand the significant weight of fully loaded canning jars. Not only will it bring peace of mind, but it will also help organize your pantry or storage area, making your canning efforts even more rewarding.
Planning Your Sturdy Shelf
Careful planning is the foundation of a successful and durable canning shelf. Consider these factors before you start cutting lumber:
- Location and Dimensions: Measure your available space. Will it be in a pantry, basement, or garage? Determine the desired height, width, and depth of your shelf. Remember that jars need adequate clearance above them for easy access.
- Weight Capacity: A quart jar of food weighs approximately 2-3 pounds. A single shelf could hold dozens of jars, so calculate the potential total weight. Our design focuses on maximizing strength for this very reason.
- Materials Choice: For ultimate strength, 2x4s (or 2x6s for exceptionally deep shelves) are recommended for the frame, with 3/4-inch plywood for the shelves themselves. Avoid particle board or thin plywood, as they will sag under heavy loads.
Tools and Materials You’ll Need
Having the right tools and materials on hand will make the construction process smooth and efficient.
Tools:
- Measuring tape
- Pencil
- Circular saw or miter saw
- Drill/driver
- Wood clamps (optional, but helpful)
- Level
- Speed square
- Safety glasses and hearing protection
Materials:
- Lumber for Frame: 2x4s (number depends on shelf size; e.g., for a 4-foot wide, 6-foot tall, 16-inch deep shelf with 4 shelves, you might need 8-10 eight-foot 2x4s).
- Shelving Material: 3/4-inch plywood or MDF (cut to size for your shelves).
- Wood Screws: 2.5-inch or 3-inch construction screws (e.g., #9 or #10).
- Wood Glue: For added strength at all joints.
- Sandpaper: For smoothing rough edges.
- Optional: Wall anchors or lag screws for securing the unit to a wall.

Step-by-Step Construction Guide
Step 1: Cut Your Lumber
Based on your planned dimensions, accurately cut all your lumber. You’ll need:
- Vertical Support Posts: Four pieces for the height of your shelf.
- Horizontal Side Supports: Pieces to define the depth of your shelf (e.g., 8 pieces for 4 shelves).
- Horizontal Front/Back Supports: Pieces to define the width of your shelf (e.g., 8 pieces for 4 shelves).
- Shelf Platforms: Cut your plywood or MDF to the exact dimensions of your shelves.
Measure twice, cut once! Precision here will ensure a square and sturdy build.
Step 2: Assemble the Side Frames
Begin by creating two identical side frames. Lay two vertical support posts parallel on a flat surface. Position two horizontal side supports between them, one near the top and one near the bottom, creating a rectangle. Ensure the top edges are flush. Apply wood glue to the ends of the horizontal supports and screw them into the vertical posts using two screws per joint. Repeat for the second side frame.
Step 3: Connect the Sides
Stand your two assembled side frames upright. Now, connect them using your horizontal front and back supports. Position a front support and a back support at the top, connecting the two side frames. Use wood glue and two screws per joint. Repeat this process for the bottom. This forms the basic rectangular box frame of your shelving unit.

Step 4: Install the Shelf Supports
Determine the desired spacing for your shelves. Mark these heights on the inside of all four vertical posts. For maximum strength, you will add horizontal supports at each shelf level. Apply wood glue to the ends of your remaining horizontal supports and screw them securely into the vertical posts at your marked heights. Ensure these supports are level and flush with the inside edges of the frame.
Step 5: Add the Shelf Platforms
Now, place your pre-cut plywood or MDF shelf platforms onto the horizontal supports. For ultimate stability, you can secure the shelves to the supports with short screws from the top down. Ensure the shelves are sitting flat and level.
Step 6: Reinforce for Extra Strength
While the design is inherently strong, you can add extra reinforcement. Consider adding diagonal bracing on the back of the unit (using 1x4s or similar) to prevent racking. If the unit is tall, securing it to a wall stud with L-brackets or lag screws is highly recommended, especially in earthquake-prone areas or homes with children/pets.
Important Safety Considerations
- Always wear safety glasses when cutting or drilling.
- Use hearing protection when operating power tools.
- Ensure your workspace is clear and well-lit.
- Test the stability of the shelf before loading it with jars.
- Never overload shelves beyond their engineered capacity.
- If you live in an area prone to earthquakes, secure your shelves to wall studs using appropriate hardware.
Finishing Touches and Maintenance
Once built, you can sand any rough edges to prevent splinters. For added durability and ease of cleaning, consider painting or sealing the wood, especially if it’s in a damp environment like a basement. Regularly check your shelf for any signs of wear or loosening screws, and tighten as needed. Proper maintenance will ensure your sturdy canning shelf serves you well for many years to come.

Conclusion
Building a robust DIY canning shelf is a rewarding project that provides practical, long-lasting storage for your valuable home-canned goods. By following these steps and focusing on strong materials and construction techniques, you’ll create a shelving unit that is not only simple to build but also incredibly durable. Enjoy the peace of mind that comes with knowing your preserves are stored safely and neatly!