


How to build a sturdy, budget-friendly chicken coop for 6 backyard hens?

Why Build Your Own Chicken Coop?
Raising backyard chickens offers a wealth of benefits, from fresh eggs to natural pest control and even delightful companionship. However, providing a safe, comfortable, and functional home for your flock is paramount. While pre-made coops can be costly, building your own allows for customization, significant cost savings, and the satisfaction of a DIY project. This guide will walk you through creating a sturdy, budget-friendly coop perfectly sized for six happy hens.
Planning Your Perfect Hen House
Before lifting a hammer, thoughtful planning is key. For six hens, you’ll need adequate space: typically 2-3 square feet per bird inside the coop and 8-10 square feet per bird in an attached run. This means an interior of 12-18 sq ft and a run of 48-60 sq ft. Consider your coop’s location carefully: choose a spot with good drainage, some sun exposure in winter but shade in summer, and away from potential predator hiding spots.
Sketching a simple design will help visualize the layout, including doors for access and cleaning, ventilation points, roosting bars, and nesting boxes. Prioritize predator-proofing, ease of cleaning, and good ventilation for the health of your flock.
Sourcing Budget-Friendly Materials
Saving money starts with smart material choices. Look for reclaimed wood, such as pallets (ensure they are heat-treated, marked HT, not chemically treated), old fence posts, or discarded lumber from construction sites (with permission). Corrugated metal roofing remnants can be very affordable and durable. For the run, hardware cloth (1/2-inch or 1/4-inch mesh) is crucial for predator protection and more effective than chicken wire. Old windows or recycled plastic sheeting can be used for light and wind protection.
Check local classifieds, social media groups, and community salvage yards for free or low-cost materials. Even leftover paint or stain can extend the life of your coop.
![Wood Pallet Recycling Near Me [Locator Map + Guide + FAQ]](/images/aHR0cHM6Ly90czQubW0uYmluZy5uZXQvdGg/aWQ9T0lQLnhYVUhjVndWRWZ4V0NGT3pPVkhIaHdIYUVLJnBpZD0xNS4x.webp)
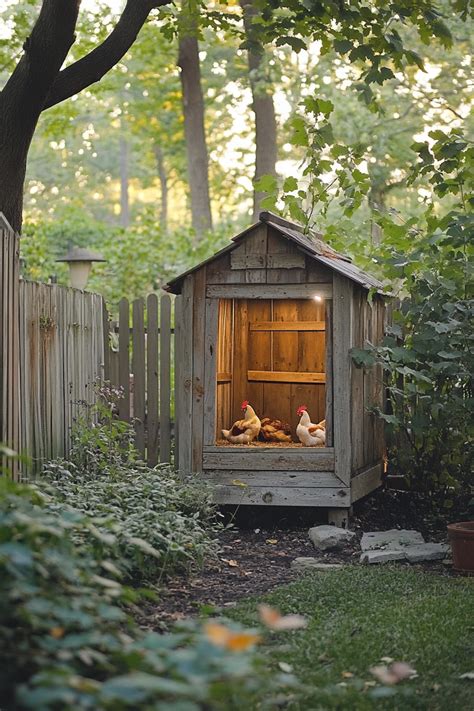
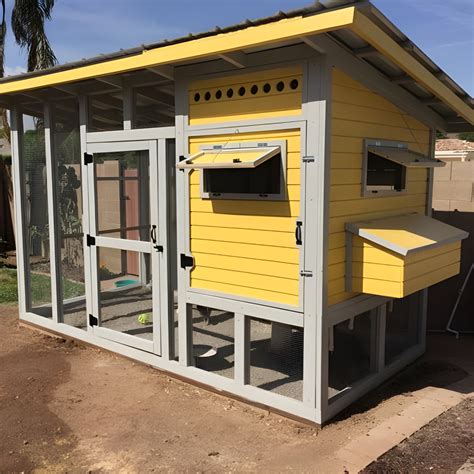
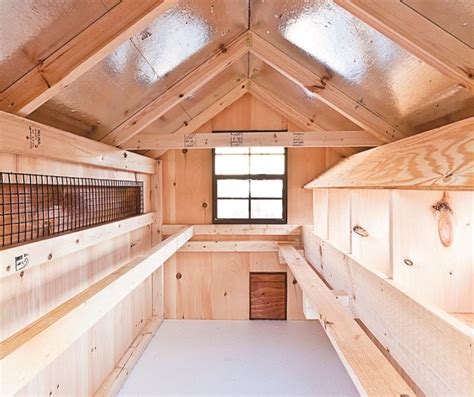
Essential Features for a Sturdy and Safe Coop
Predator Protection
This is non-negotiable. Bury hardware cloth at least 12-18 inches deep around the perimeter of the run to prevent digging predators. Cover all windows and ventilation openings with hardware cloth. Use sturdy latches on all doors that raccoons and other clever critters can’t manipulate.
Ventilation
Good airflow prevents respiratory issues and reduces ammonia buildup. Install upper vents (near the roofline) and lower vents (near the floor) on opposite sides to create a cross-breeze. These should always be covered with hardware cloth.
Roosting Bars
Hens love to roost off the ground. Provide sturdy 2×2 or 2×4 lumber with rounded edges, placed 18-24 inches off the floor, allowing at least 8-10 inches of bar space per hen.
Nesting Boxes
For six hens, 2-3 nesting boxes are sufficient (one for every 3-4 hens). Boxes should be about 12x12x12 inches, placed in a dark, quiet corner of the coop, filled with soft bedding like straw or pine shavings.
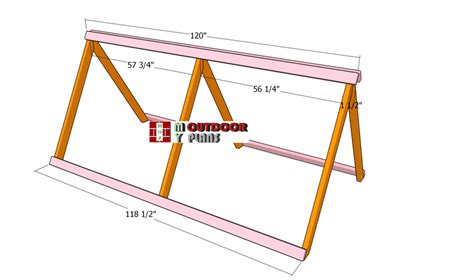
Step-by-Step Construction Overview
- Build a Sturdy Base: A skid-style base (using treated 4x4s) allows for easy relocation if needed and keeps the coop off the ground, preventing rot.
- Frame the Walls: Use 2x4s or salvaged lumber to create a strong frame according to your design. Ensure all joints are securely fastened.
- Add Siding and Roofing: Attach your reclaimed wood, plywood, or pallet wood siding. Install your chosen roofing material, ensuring it’s waterproof and extends beyond the walls to protect from rain.
- Install Interior Elements: Secure roosting bars and build/install nesting boxes. Cut out openings for doors and ventilation.
- Construct the Run: Frame the run with lumber and cover it entirely with hardware cloth, including the top to protect from aerial predators. Dig a trench to bury hardware cloth around the perimeter.
- Final Touches: Install doors with secure latches, paint or seal the exterior for weather protection, and add bedding.
Maintenance for Longevity
A well-built coop still requires ongoing care. Regularly clean out soiled bedding, at least once a week, to maintain hygiene and reduce odors. Inspect the coop and run periodically for any signs of wear, predator breaches, or structural issues. Promptly repair any damage to ensure your hens remain safe and healthy for years to come.
Conclusion
Building your own sturdy, budget-friendly chicken coop for six backyard hens is a rewarding endeavor that provides a secure, comfortable home for your flock while saving you money. With careful planning, smart material sourcing, and attention to essential features like predator protection and ventilation, you can create a durable structure that serves your chickens well and brings satisfaction to your DIY spirit.