


What are essential DIY steps for building a small, efficient root cellar for harvest storage?

Why Build a Small, Efficient Root Cellar?
For centuries, root cellars have been an invaluable tool for preserving harvests without the need for refrigeration. A well-designed small root cellar leverages the earth’s natural cooling and humidity to create optimal storage conditions for fruits, vegetables, and other perishables. Building one yourself can be a rewarding project, offering fresh produce long after the growing season ends and contributing to a more sustainable lifestyle. This guide outlines the essential DIY steps to construct your own efficient root cellar.
Step 1: Planning and Site Selection
The success of your root cellar begins with careful planning. Consider the size of your typical harvest and the space available. A small cellar can be integrated into an existing basement, tucked into a hillside, or built as a standalone structure partially underground. Key factors for site selection include:
- Location: Choose a naturally cool and shaded spot, ideally on the north side of a building or a gentle slope.
- Drainage: Avoid areas prone to standing water or high water tables to prevent moisture issues and structural damage. Good drainage is paramount.
- Accessibility: Ensure easy access for moving produce in and out.
- Existing Structures: Utilizing an existing basement corner or a natural earth bank can simplify construction.
Research local soil conditions and average frost lines, as these will influence excavation depth and insulation needs.
![How to Build a Root Cellar Cheap [But Effective] - Outdoor Happens ...](/images/aHR0cHM6Ly90czQubW0uYmluZy5uZXQvdGg/aWQ9T0lQLkFvZUNZSlZOUW9oczRPVWQ0TWxMbUFIYUtUJnBpZD0xNS4x.webp)
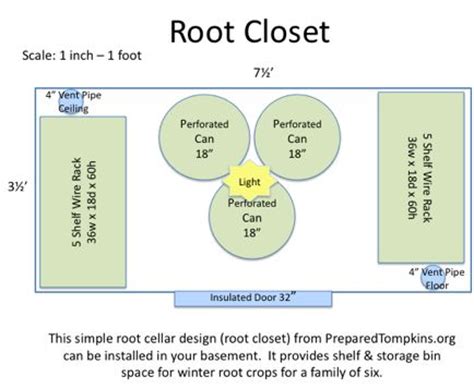
Step 2: Essential Design Principles for Efficiency
An efficient root cellar relies on a few core principles to maintain the ideal storage environment (typically 35-50°F / 2-10°C with 85-95% humidity). Your design should incorporate:
- Earth Contact: Maximize contact with the earth, as the ground acts as a natural insulator and thermal regulator.
- Insulation: Insulate the roof and any exposed walls thoroughly to prevent temperature fluctuations.
- Ventilation: Proper airflow is critical to prevent spoilage and maintain humidity. You’ll need an intake and an exhaust vent.
- Darkness: Keep the cellar completely dark to inhibit sprouting and retain produce quality.
- Humidity Control: Earth floors or a layer of damp sand can help maintain high humidity.
Sketch out your design, including dimensions, ventilation pipe placement, and shelving layout.
Step 3: Excavation and Foundation
Once your plan is solid, it’s time for excavation. Dig out the chosen area to the required depth, ensuring the bottom is level and compacted. For most small root cellars, digging at least 3-4 feet into the earth is beneficial, with the roof slightly above or at ground level. Create a solid foundation:
- Drainage Layer: Lay a layer of gravel or crushed stone at the bottom to ensure good drainage and prevent moisture from wicking up.
- Foundation Walls: Depending on your design, you might pour a concrete slab foundation or prepare a stable base for concrete block walls.

Step 4: Building Walls and Structural Elements
The choice of materials for your walls is crucial. Common options include:
- Concrete Blocks: Durable, readily available, and good for structural integrity.
- Stone or Brick: Aesthetically pleasing and very durable, but more labor-intensive.
- Treated Lumber: For above-ground sections or internal framing, ensure it’s suitable for damp environments.
Construct the walls according to your design, ensuring they are plumb and sturdy. If building underground, consider external waterproofing membranes to prevent moisture intrusion. Install a sturdy, insulated door that seals tightly to maintain consistent internal conditions.
Step 5: Implementing Ventilation and Insulation
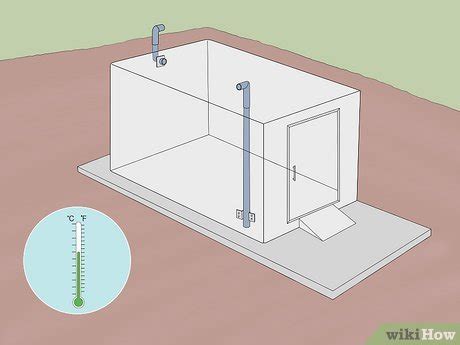
Effective ventilation and insulation are the hallmarks of an efficient root cellar:
- Ventilation System: Install two pipes – an intake pipe extending close to the floor (drawing in cooler air) and an exhaust pipe positioned near the ceiling (allowing warmer air to escape). Both should have screens to keep pests out and caps to prevent rain entry. Manual dampers can help regulate airflow.
- Roof Insulation: The roof is often the most vulnerable point for temperature loss. Insulate heavily with materials like rigid foam boards, straw bales, or a thick layer of earth.
- Wall Insulation: Any walls not in direct contact with the earth (e.g., entrance walls, upper sections) should also be insulated.
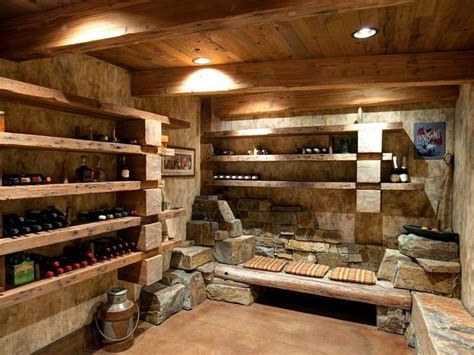
Step 6: Interior Finishing and Shelving
With the structure complete, focus on the interior to maximize storage and efficiency:
- Flooring: An earthen floor is ideal for maintaining humidity. If you used concrete, a layer of damp sand can serve the same purpose.
- Shelving: Install sturdy, slatted shelves or bins. Wood is traditional, but plastic or metal can also work. Ensure good air circulation around stored produce. Labeling shelves can help with organization.
- Monitoring: Place an accurate thermometer/hygrometer inside to monitor conditions and make adjustments to ventilation as needed.
Enjoying Your Harvest
Building a small, efficient root cellar is an investment in your food security and a testament to self-sufficiency. By following these essential DIY steps, you can create a reliable, energy-free storage solution that keeps your homegrown produce fresh, crisp, and flavorful throughout the year. Regular monitoring and proper organization will ensure your root cellar serves you well for many seasons to come.