


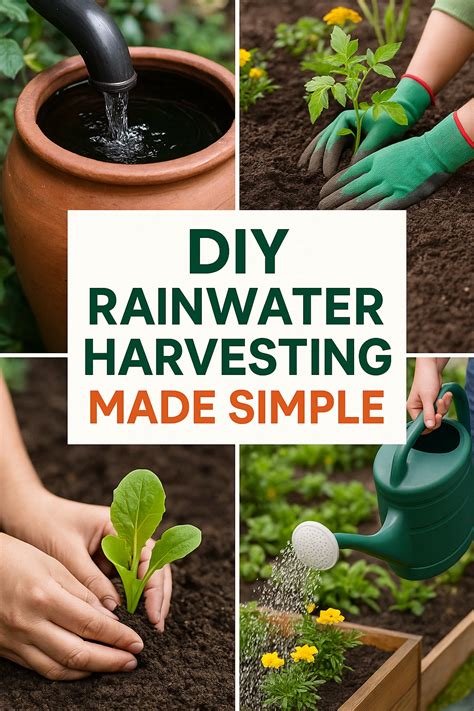
How to DIY a simple, effective rainwater harvesting system for homestead gardens?
Embrace Sustainability: Why Harvest Rainwater for Your Homestead Garden?
For any homesteader, water is a precious resource. Ensuring a consistent, affordable, and high-quality water supply for your garden can be a significant challenge. A simple, effective DIY rainwater harvesting system offers a brilliant solution, turning rainfall into a valuable asset. Beyond just saving money on your water bill, rainwater is naturally soft and free of chlorine and other chemicals often found in municipal tap water, making it ideal for nourishing your plants.
This guide will walk you through building a basic system that’s perfect for homestead gardens, focusing on components that are accessible and easy to install, even for beginners. Get ready to tap into nature’s bounty!
Benefits of Rainwater Harvesting for Homesteaders
The advantages of collecting rainwater extend far beyond mere cost savings. For homestead gardens, particularly:
- Eco-Friendly Hydration: Reduce your reliance on municipal or well water, lessening your environmental footprint.
- Superior Plant Health: Rainwater is naturally free of salts, chlorine, and other additives that can accumulate in soil and harm sensitive plants. Its slightly acidic pH is often preferred by many garden plants.
- Drought Resilience: Build a reserve that can sustain your garden through dry spells, reducing stress on your plants and your peace of mind.
- Reduced Water Bills: Depending on your water source, using harvested rainwater can significantly cut down on your utility expenses.

Essential Components of a Simple System
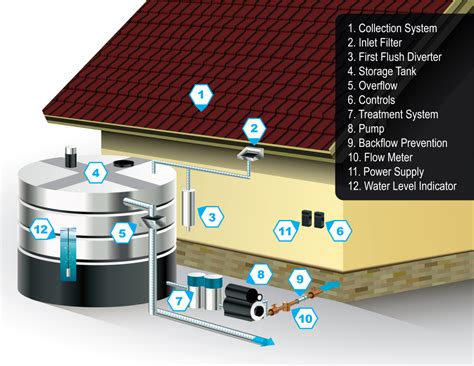
Building a basic rainwater harvesting system doesn’t require complex machinery. Here are the core components you’ll need:
- Catchment Surface: Typically your home’s roof or shed roof. The larger and cleaner the surface, the more water you can collect.
- Gutters and Downspouts: To collect water from the roof and direct it towards your storage. Ensure they are clean and free of debris.
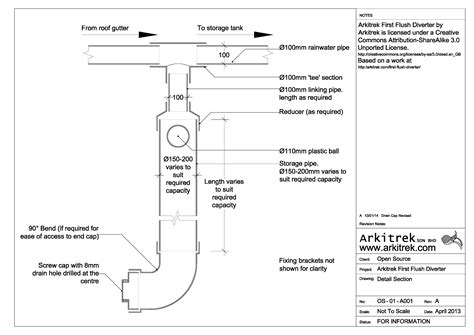
- First-Flush Diverter: An essential component that diverts the first few gallons of rainfall, which often contain dirt, leaves, and other contaminants from the roof, preventing them from entering your main storage tank.
- Leaf Screen/Filter: Placed at the top of the downspout or tank inlet to prevent larger debris (leaves, twigs) from entering the system.
- Storage Tank (Rain Barrel): The most common choice for homestead gardens is a food-grade plastic barrel (55-gallon drums are popular), or larger IBC totes. Ensure it’s opaque to prevent algae growth.
- Overflow: A pipe or opening near the top of the tank to allow excess water to escape once the tank is full, preventing damage and directing water away from your foundation.
- Spigot/Tap: Installed at the bottom of the tank for easy access to the stored water, often connected to a hose or watering can.
- Foundation/Stand: To elevate the barrel, providing better water pressure and making it easier to fill watering cans.

Step-by-Step Installation Guide
1. Site Selection and Sizing
Choose a location near a suitable downspout that is level and stable. Consider the size of your roof and your garden’s water needs to determine the appropriate tank capacity. A general rule of thumb is that 1 inch of rain on a 1,000 sq ft roof can yield approximately 600 gallons of water.

2. Prepare Gutters and Downspouts
Clean your gutters thoroughly to remove leaves, dirt, and other debris. Repair any leaks or damage. Install a downspout adapter or diverter that will direct water from the downspout into your rain barrel. You may need to cut your existing downspout to fit these components.
3. Install the First-Flush Diverter
This is a crucial step for clean water. A first-flush diverter typically consists of a section of pipe that fills up with the initial dirty rainwater before the cleaner water is then routed to your main storage tank. DIY options often involve a capped vertical pipe with a small drip hole at the bottom for slow drainage.
4. Connect the Storage Tank
Place your rain barrel on a sturdy, elevated stand to provide gravity-fed water pressure. Connect the downspout adapter/diverter to the inlet opening at the top of your barrel. Ensure all connections are watertight using appropriate seals and connectors.
5. Add an Overflow and Spigot
Install an overflow pipe near the top of your tank to direct excess water away from your foundation once the tank is full. This can be routed to a garden bed, a French drain, or another safe discharge area. Finally, install a spigot or hose bib near the bottom of the tank for easy access to your harvested water.
Maintenance Tips for Longevity
Regular maintenance will ensure your system remains effective and provides clean water:
- Clean Gutters: Periodically clear leaves and debris from your gutters, especially before rainy seasons.
- Check First-Flush Diverter: Ensure it’s draining properly and not clogged.
- Inspect for Leaks: Regularly check all connections, pipes, and the tank for any signs of leaks.
- Algae Control: Keep your tank opaque and covered to prevent sunlight from entering, which can encourage algae growth. If algae develops, drain the tank, scrub it clean, and rinse thoroughly.
- Winterizing (in cold climates): Before freezing temperatures arrive, drain your system completely to prevent pipes and the tank from cracking due to expanding ice. Disconnect downspout diverters and direct water away from the system.
Start Harvesting Today!
Building a simple rainwater harvesting system is a rewarding DIY project that empowers you to take control of your garden’s water supply. It’s a tangible step towards greater self-sufficiency and environmental stewardship on your homestead. Start small with one barrel, observe its performance, and expand as your needs grow. Your garden, and the planet, will thank you!