


How to build a sturdy, budget-friendly chicken coop for 6 hens?
Why Build Your Own Chicken Coop?
Embarking on a DIY chicken coop project offers numerous advantages, especially when catering to a small flock of six hens. Not only does it provide a rewarding hands-on experience, but it also allows for customization to suit your specific needs and budget. A homemade coop ensures you know exactly what materials went into its construction, guaranteeing a sturdy, safe, and comfortable home for your feathered friends without breaking the bank. This guide will walk you through the essential steps to build a durable and economical shelter for your flock.
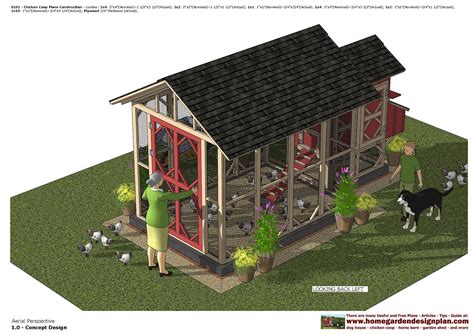
Planning and Design for Six Hens
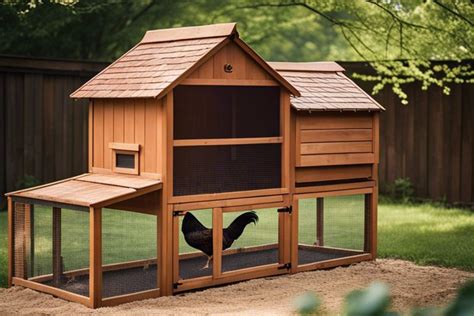
Before lifting a single hammer, meticulous planning is crucial. For six hens, you’ll need approximately 2-3 square feet per hen inside the coop and 8-10 square feet per hen in an attached run, totaling 12-18 sq ft coop space and 48-60 sq ft run space. Consider a coop footprint of at least 4×4 feet for the enclosed area. Key design elements include:
- Predator Protection: This is paramount. Use 1/2-inch hardware cloth (not chicken wire) for all openings and bury it at least 12 inches deep around the perimeter of the run.
- Ventilation: Essential for air quality and temperature regulation. Include high and low vents that can be opened or closed, but are predator-proof.
- Nesting Boxes: Aim for one nesting box per 3-4 hens. For six hens, 2-3 boxes (approx. 12x12x12 inches each) should suffice.
- Roosts: Provide at least 8-12 inches of roosting space per hen. A 2×2 inch or branch roost is comfortable. Place them higher than the nesting boxes.
- Ease of Cleaning: Design with easy access for cleaning, such as a large access door or a removable floor/tray.

Budget-Friendly Material Sourcing
One of the biggest cost-saving aspects of a DIY coop is smart material sourcing. Look for:
- Reclaimed Lumber: Check local construction sites (with permission), pallet companies, or even online marketplaces for free or low-cost wood. Pallets can be dismantled for framing and siding.
- Recycled Materials: Old windows (ensure they can be secured), metal roofing scraps, or even plastic drums cut in half for nesting boxes can be repurposed.
- Hardware Cloth: While an upfront cost, investing in quality 1/2-inch galvanized hardware cloth is non-negotiable for predator protection. Look for sales or bulk purchases.
- Roofing: Corrugated metal, asphalt shingles, or even a tarp secured over a sturdy frame can work. Recycled metal roofing is often available.
- Fasteners: Buy screws and nails in bulk, as they tend to be cheaper per unit.
Step-by-Step Construction Guide
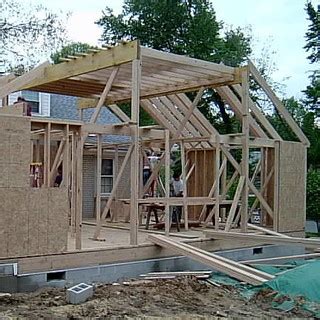
1. Building the Base and Frame
Start with a sturdy foundation. Use pressure-treated lumber for the base frame to resist rot. Create a rectangular frame, ensuring it’s square. Then, construct the wall frames, including openings for doors, windows, and vents. Securely attach the wall frames to the base.
2. Walls, Siding, and Flooring
Once the frame is up, add the flooring. Plywood is common, ideally covered with a linoleum remnant for easy cleaning. For the walls, use your reclaimed lumber, plywood sheets, or even overlapping fence pickets for a rustic look. Ensure all exterior gaps are sealed to prevent drafts and predator entry.
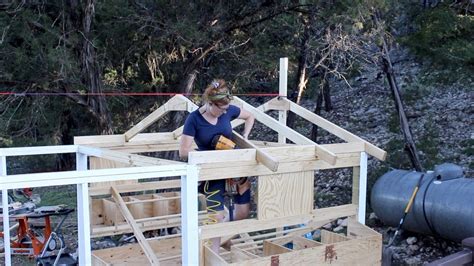
3. Roofing and Doors
Construct a sloped roof frame to allow for water runoff. Attach your chosen roofing material securely. Build a main access door for you to enter and a smaller pop-door for the hens, complete with a ramp. Ensure all doors can be latched securely against predators.
4. Interior Fixtures and Ventilation
Install the roosting bars and nesting boxes. For ventilation, cut openings near the top and bottom of the coop walls. Cover all ventilation openings with 1/2-inch hardware cloth to keep predators out while allowing airflow. Consider a sliding or hinged cover for extreme weather.
5. Predator Proofing and Finishing Touches
This is critical. Dig a trench around the perimeter of your coop and run and bury hardware cloth at least 12 inches deep, bending it outwards into an L-shape to deter burrowing predators. Ensure all hardware cloth is securely stapled to the frame, leaving no gaps. Apply a non-toxic paint or sealant to the exterior wood to protect it from the elements, prolonging the life of your coop. Add bedding like pine shavings or straw inside the coop and nesting boxes.

Conclusion
Building a sturdy, budget-friendly chicken coop for your six hens is a rewarding project that provides a safe and comfortable home for your flock. By planning carefully, sourcing materials smartly, and focusing on key elements like predator protection and ventilation, you can create a functional and durable coop that will serve your backyard chickens for years to come. Enjoy the fresh eggs and the satisfaction of a job well done!