


Simple steps for dehydrating garden herbs for winter use?

Bringing the vibrant flavors of your summer garden indoors for winter is easier than you think. Dehydrating herbs is a time-honhonored method of preservation that concentrates their aroma and taste, making them perfect for adding a burst of freshness to your cooking long after the growing season has ended. Forget expensive store-bought dried herbs; with a few simple steps, you can create your own superior collection.
Why Dehydrate Your Herbs?
Dehydrating herbs offers numerous benefits. Firstly, it locks in their natural oils and flavor compounds, providing a more intense and authentic taste compared to many commercial alternatives. Secondly, it’s a cost-effective way to utilize an abundant harvest, preventing waste and saving money. Lastly, it allows you to enjoy organic, chemical-free herbs you’ve grown yourself, giving you complete control over your ingredients.

Preparation is Key for Best Results
Before you begin the drying process, proper preparation is crucial for quality. Start by harvesting your herbs in the late morning, after the dew has evaporated but before the intense midday sun. Choose healthy, vibrant leaves and stems, avoiding any that show signs of damage or disease.
- Clean Gently: Rinse your herbs under cool running water to remove any dirt, dust, or insects. Be very gentle to avoid bruising the delicate leaves.
- Pat Dry Thoroughly: Spread the washed herbs on clean paper towels or a kitchen towel and gently pat them completely dry. Excess moisture can lead to mold during dehydration, so this step is critical.
- Remove Damaged Parts: Discard any yellowed, browned, or otherwise damaged leaves.
Method 1: Air Drying (The Traditional Way)
Air drying is the simplest and most energy-efficient method, ideal for herbs with lower moisture content like rosemary, thyme, oregano, and bay leaves.
- Bundle and Hang: Gather small bunches of 5-10 stems and tie them loosely at the base with kitchen twine or a rubber band.
- Find the Right Spot: Hang the bundles upside down in a warm, dry, dark, and well-ventilated area. Avoid direct sunlight, which can bleach the herbs and diminish their flavor. A pantry, attic, or even a corner of your kitchen (away from humidity) works well.
- Monitor Progress: Depending on the herb and humidity, air drying can take 1-4 weeks. The herbs are fully dry when they crumble easily between your fingers.

Method 2: Oven Drying (Quick & Convenient)
Oven drying is a faster alternative for when you need dried herbs quickly, but it requires careful monitoring to prevent ‘cooking’ or burning them. This method works well for most herbs, but be especially watchful with delicate varieties.
- Preheat Oven: Set your oven to its lowest possible temperature (usually 100-150°F / 40-65°C). If your oven runs hot, you might even prop the door open slightly with a wooden spoon to allow moisture to escape and prevent overheating.
- Arrange Herbs: Spread a single layer of herbs on baking sheets. You can line the sheets with parchment paper for easier cleanup.
- Dry and Turn: Bake for 1-4 hours, turning the herbs every 30 minutes to ensure even drying. Check frequently; herbs are done when they are crisp and crumbly.

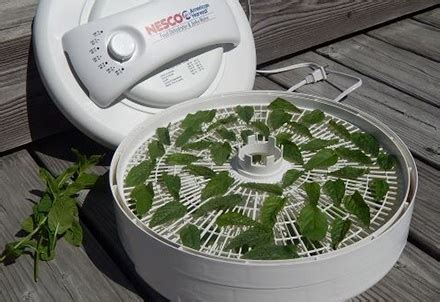
Method 3: Using a Food Dehydrator (Most Efficient)
For consistent results and larger quantities, a food dehydrator is an excellent investment. It provides controlled heat and airflow, making it an efficient method for all types of herbs.
- Prepare Trays: Arrange your clean, dry herbs in a single layer on the dehydrator trays, ensuring good airflow between them.
- Set Temperature: Follow your dehydrator’s instructions, but typically, herbs dry best at a low temperature, around 95-115°F (35-46°C).
- Dehydrate: Drying time can range from 2-12 hours, depending on the herb’s moisture content and the dehydrator model. Check periodically until the herbs are brittle and crumble easily.
Storing Your Dehydrated Herbs
Once your herbs are thoroughly dry, proper storage is essential to maintain their potency and flavor.
- Cool Completely: Allow the dried herbs to cool completely before storing.
- Crush or Leave Whole: You can either gently crumble the herbs or leave the leaves whole. Storing them whole helps preserve their flavor for longer, and you can crush them just before use.
- Airtight Containers: Transfer the dried herbs to airtight glass jars or containers. Mason jars work perfectly.
- Dark, Cool Place: Store the containers in a cool, dark pantry or cupboard, away from heat and direct sunlight, which can degrade their quality.
- Label and Date: Always label your containers with the herb name and the date of drying. Properly stored, most dried herbs will retain their flavor for 6-12 months.

With these simple steps, you can easily transform your fresh garden bounty into a treasure trove of dried herbs, ready to infuse your winter meals with the taste of summer. Happy preserving!