


DIY root cellar tips for storing homegrown produce all winter?
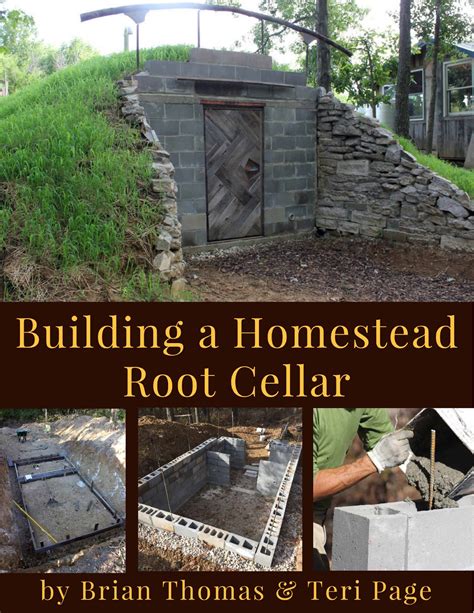
Unlock Winter Freshness with a DIY Root Cellar
After a season of dedicated gardening, the last thing you want is for your hard-earned harvest to go to waste. A DIY root cellar offers an ingenious, low-cost, and sustainable solution to keep your homegrown produce fresh for months, eliminating reliance on refrigeration for many items. Imagine crisp apples, firm potatoes, and vibrant carrots ready for your kitchen even when snow blankets the ground outside.
Creating your own root cellar isn’t as daunting as it sounds. With a bit of planning and some elbow grease, you can construct an effective storage solution that taps into the earth’s natural cooling and humidifying properties.
Why Build a Root Cellar? The Benefits
Beyond simply extending the shelf life of your produce, a root cellar brings a host of advantages. It reduces your energy consumption by minimizing the need for refrigeration, especially for large quantities of bulky vegetables. It empowers you to eat locally and seasonally, even in the off-season, boosting your food security and self-sufficiency. Plus, many vegetables, like potatoes and carrots, actually improve in flavor and texture when cured and stored properly in a cool, humid environment.
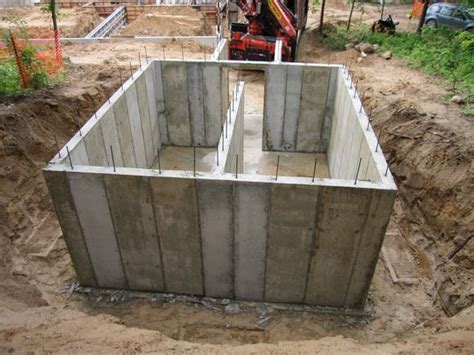
Choosing the Right Location and Type
The success of your root cellar hinges on its location. The ideal spot will maintain consistently cool temperatures (just above freezing, typically 35-45°F or 1-7°C) and high humidity (around 85-95%). Common locations include:
- Underground or partially underground: This is the most effective method, utilizing the earth’s insulating properties. Options range from simple buried bins to excavated rooms.
- Unheated basements or crawl spaces: If you have an existing space that stays consistently cool and can be modified for humidity, it’s a great starting point.
- Outdoor bins or mounds: For smaller quantities, a buried garbage can or a traditional earth mound (clamp) can work well.
Consider drainage carefully. You want moisture, but not standing water, which can lead to rot.
Essential Elements for a Functional Root Cellar
Regardless of your chosen design, every effective root cellar needs three key elements:
- Consistent Temperature: As close to freezing as possible without actually freezing. This is achieved through insulation from the earth or added materials, and proper ventilation.
- High Humidity: Essential for preventing produce from drying out. This often comes naturally from the surrounding soil or can be supplemented with damp sand, gravel, or water bins.
- Good Ventilation: To circulate air, prevent stale odors, and help regulate temperature and humidity. This typically involves an intake vent near the floor and an exhaust vent near the ceiling.
DIY Construction Tips and Ideas
Small-Scale Solutions:
- Buried Trash Can Cellar: Dig a hole, place a clean, galvanized trash can (with drainage holes), add a layer of straw, fill with produce, and cover with straw and a well-sealed lid.
- Earth Mound (Clamp): Create a mound of produce on a well-drained spot, cover with straw, then a layer of soil, leaving a small vent.
Larger Permanent Cellars:
If you’re building a more substantial structure, whether in a basement or fully underground, focus on:
- Insulation: Beyond earth, consider rigid foam insulation for walls and ceiling to maintain stable temperatures.
- Vapor Barrier: Crucial to control moisture and prevent it from damaging structural elements.
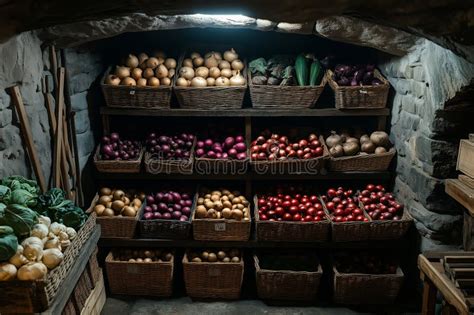
- Shelving: Use slatted shelves or bins to allow for air circulation around stored produce. Wood is a good choice as it doesn’t conduct cold as much as metal.
- Door: An insulated, tightly sealing door is vital to maintain internal conditions.

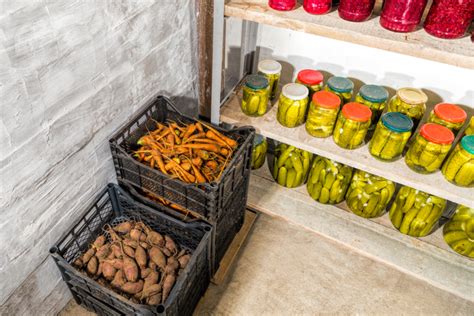
What to Store and How to Prepare It
Not all produce is suitable for root cellaring, but many common garden staples thrive:
- Root Vegetables: Potatoes, carrots, beets, parsnips, turnips, rutabagas, and celeriac are excellent candidates. Cure potatoes and sweet potatoes for a few weeks before storing.
- Hardy Fruits: Apples and pears store well, but keep them separate from root vegetables as they emit ethylene gas, which can cause other produce to spoil faster.
- Winter Squash & Pumpkins: Cure these in a warm, dry place for 1-2 weeks before storing in slightly warmer (50-55°F) and drier conditions than most root cellar items.
- Cabbage & Celery: Can be stored for shorter periods, often wrapped in newspaper or buried in sand.
- Onions & Garlic: Prefer cool (but not cold) and dry conditions, so they might need a slightly different section of your cellar or a separate, drier space.
Always store only blemish-free produce. One bad apple can spoil the whole barrel! Do not wash produce before storing; simply brush off excess dirt.
Monitoring and Maintenance
Once your root cellar is built and stocked, it’s not entirely hands-off. Regularly monitor the temperature and humidity with a thermometer and hygrometer. Adjust ventilation as needed to fine-tune conditions. Inspect your produce every few weeks, removing any items showing signs of rot or spoilage to prevent contamination. Clean your cellar annually, preferably in spring, before the next harvest season begins.
Embrace Year-Round Abundance
Building a DIY root cellar is a rewarding project that transforms your relationship with your garden. It’s a testament to sustainable living, providing a direct link between your summer efforts and your winter pantry. With these tips, you’re well on your way to enjoying the bounty of your homegrown produce all year long, fresh from your very own root cellar.