

Best DIY root cellar plans for storing garden harvest without electricity?

Reclaim Your Harvest: The Art of Root Cellaring
For centuries, root cellars have been the unsung heroes of food preservation, allowing families to enjoy their harvest long after the growing season ends. In an age dominated by refrigerators and freezers, the traditional root cellar offers an elegant, energy-independent solution for storing your garden’s bounty. If you’re looking to extend the life of your vegetables and fruits without relying on electricity, a DIY root cellar is a rewarding and sustainable project.
Understanding the Core Principles of Root Cellaring
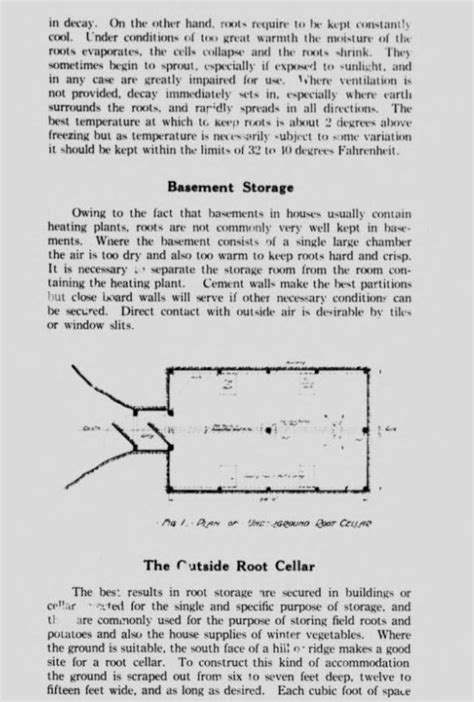
A successful root cellar isn’t just a hole in the ground; it’s a carefully designed environment that mimics nature’s ideal storage conditions. The three critical factors are consistent temperature, stable humidity, and proper ventilation. Most root vegetables and some fruits thrive in cool (just above freezing, 35-45°F or 2-7°C), moist (85-95% humidity), and dark conditions. These conditions slow down respiration and ripening, preventing spoilage and maintaining quality.
Adequate ventilation is crucial to prevent the buildup of ethylene gas (released by some fruits and vegetables, causing others to ripen faster) and to circulate fresh air, deterring mold and mildew. Darkness is also important to prevent sprouting in root crops like potatoes and onions.
Popular DIY Root Cellar Designs for Every Homestead
1. The Buried Barrel/Trash Can Cellar
This is arguably the simplest and most accessible DIY root cellar. Ideal for smaller harvests, it involves burying a large, food-grade plastic barrel or galvanized steel trash can horizontally or vertically. Dig a hole, ensuring good drainage, and line it with gravel. Place your container, add shelves if desired, and then cover it with a thick layer of earth, straw, or leaves for insulation. A small ventilation pipe should extend from the container to the surface for air exchange. This method is cost-effective and relatively quick to build.
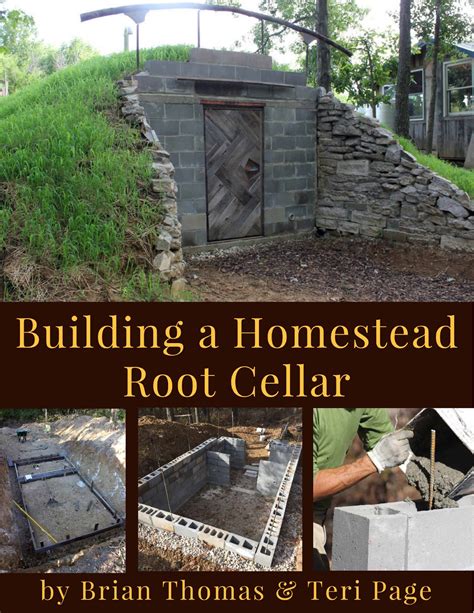
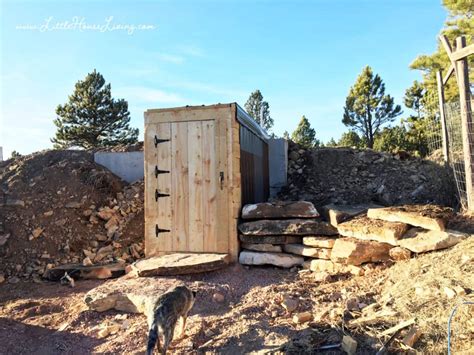
2. The Earth-Sheltered/Underground Cellar
For those with a larger harvest or more ambition, an earth-sheltered or fully underground root cellar offers superior temperature stability. This typically involves excavating a larger space, building walls from concrete blocks, stone, or treated lumber, and then burying the structure under several feet of earth. A well-designed underground cellar will include a sturdy roof (often reinforced concrete or treated wood with a waterproof membrane) and a robust ventilation system with both intake and exhaust pipes.
3. The Hillside/Bank Cellar
If your property has a natural slope or hillside, you have an ideal location for a bank cellar. This design leverages the natural insulation of the earth on three sides, requiring excavation into the bank and building only the front wall and door. Good drainage is paramount in hillside designs to prevent water intrusion. Like other underground options, careful planning for the foundation, walls, and ventilation system will ensure a dry, cool environment.
Planning Your Root Cellar Project: Key Considerations
Before breaking ground, careful planning is essential. Consider the following:
- Site Selection: Choose a spot that drains well, is shaded, and is easily accessible from your garden and home. Avoid areas prone to flooding or with a high water table.
- Materials: Concrete blocks, poured concrete, stone, and treated lumber are common choices for walls and foundations. Natural insulation like straw bales or rigid foam insulation can be incorporated.
- Ventilation: A passive ventilation system usually involves an intake pipe (low to the ground) and an exhaust pipe (high up, often with a wind-driven turbine or cap) to create a natural air current. Screens on both ends are crucial to keep pests out.
- Shelving: Design sturdy shelves from slatted wood or wire to allow for air circulation around stored items. Bins and crates also work well for specific crops.

Basic Steps for Construction (General Guide)
- Excavation: Dig your chosen area to the required depth and width, ensuring level ground for the foundation.
- Foundation & Walls: Pour a concrete slab or lay a gravel base, then build your walls using chosen materials. Ensure walls are plumb and strong.
- Roofing: Construct a strong roof system, waterproofing it if necessary, before backfilling with earth.
- Ventilation System: Install your intake and exhaust pipes, making sure they are securely fitted and properly screened.
- Interior: Build or install shelving, and ensure the door seals tightly to maintain consistent internal conditions.

Maintaining Your Off-Grid Storage System
Once built, your root cellar requires minimal maintenance. Regularly monitor the temperature and humidity with simple gauges. Inspect your stored produce periodically, removing any items that show signs of spoilage to prevent them from affecting others. Clean your cellar annually, usually in the spring after all produce has been removed, to prepare it for the next harvest.
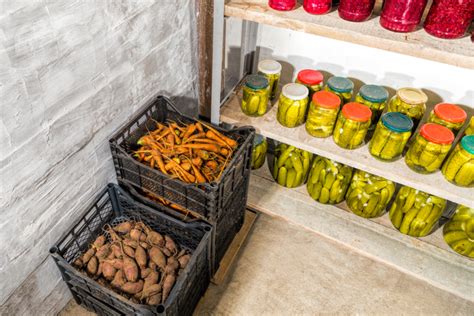
Best Crops for Root Cellar Storage
Root cellars excel at storing a variety of produce. Ideal candidates include:
- Root Vegetables: Carrots, potatoes, beets, parsnips, turnips, rutabagas, and sweet potatoes.
- Winter Squash & Pumpkins: Acorn, butternut, spaghetti squash (often prefer slightly warmer, drier conditions within the cellar).
- Cabbage: Whole heads can last for months.
- Apples & Pears: Store separately from other produce due to ethylene gas release.
- Onions & Garlic: Prefer cool, dry conditions, so place them in a drier section of the cellar.

Embrace Sustainable Food Preservation
Building a DIY root cellar is more than just a project; it’s a step towards greater self-sufficiency and sustainable living. It connects you to time-honored traditions, reduces your carbon footprint, and provides fresh, homegrown food throughout the year. With careful planning and a bit of effort, you can create a reliable, electricity-free storage solution that serves your garden and your family for decades to come.