
Easy method for canning surplus garden tomatoes without special equipment?

Turn Your Tomato Bounty into Pantry Staples
There’s nothing quite like the taste of a homegrown tomato, fresh from the vine. But when your garden yields a bumper crop, the dilemma of how to preserve that glorious surplus without letting any go to waste can feel daunting. While traditional canning often conjures images of specialized equipment, the good news is you can easily preserve your tomatoes using a basic water bath method with items you likely already have in your kitchen.
This guide will walk you through a straightforward process to safely can your surplus garden tomatoes, ensuring you can enjoy their vibrant flavor long after the growing season ends.
Why Can Tomatoes at Home?
Canning your own tomatoes is incredibly rewarding. Not only does it allow you to control the ingredients, avoiding unwanted preservatives and excess sodium, but it also locks in the fresh, natural flavor of your garden’s finest. Imagine opening a jar of your own canned diced tomatoes in the dead of winter for a pasta sauce or soup – it’s a taste of summer sunshine!
What You’ll Need (No Special Equipment Required!)
Forget the expensive pressure canners and fancy jar lifters. For this method, you’ll need just a few basic kitchen essentials:
- Large Pot: A deep stockpot (at least 10-12 quarts) with a lid, tall enough for water to cover your jars by at least an inch, and some space for boiling.
- Canning Jars: Glass canning jars (pint or quart size) with new lids and screw bands. Make sure they are free of chips or cracks.
- Tongs: Long-handled tongs for safely handling hot jars.
- Funnel: A wide-mouth funnel for easy filling of jars (optional but highly recommended).
- Dish Towel or Wire Rack: A clean kitchen towel or small wire rack to place at the bottom of your pot. This prevents jars from touching the direct heat and rattling during processing.
- Basic Kitchen Tools: A sharp knife, cutting board, large bowls, a ladle, and measuring spoons.
- Acid: Bottled lemon juice or citric acid (essential for safe tomato canning).
- Fresh Tomatoes: Ripe, unblemished garden tomatoes.
Step 1: Prepare Your Tomatoes
Proper preparation is key to safe and delicious home-canned tomatoes.
- Wash and Sort: Thoroughly wash your tomatoes. Discard any bruised, cracked, or overripe tomatoes.
- Blanch and Peel: Bring a large pot of water to a rolling boil. Score a shallow ‘X’ on the bottom of each tomato. Immerse a few tomatoes at a time into the boiling water for 30-60 seconds, until the skin begins to crack. Immediately transfer them to an ice bath to stop the cooking. The skins should then slip off easily.
- Core and Chop: Remove the core from each tomato. You can then chop them into desired pieces (diced, crushed, or left whole if small enough for the jar opening).
Step 2: Pack Your Jars
This stage involves sterilizing, adding acid, and filling your jars.
- Sterilize Jars: While you’re preparing tomatoes, wash your canning jars, lids, and bands in hot, soapy water. Rinse well. Keep jars hot by either running them through a dishwasher cycle or submerging them in hot (not boiling) water until ready to fill. Place new lids in a small pot of simmering water (not boiling) to soften the sealing compound.
- Add Acid: This is a crucial safety step for canning tomatoes. For each pint jar, add 1 tablespoon of bottled lemon juice or ¼ teaspoon of citric acid. For each quart jar, add 2 tablespoons of bottled lemon juice or ½ teaspoon of citric acid. Do NOT reduce the amount of acid.
- Hot Pack Tomatoes: Bring your prepared chopped tomatoes to a boil in a large saucepan and simmer for 5 minutes. This is called ‘hot packing’ and helps remove air, creating a better seal.
- Fill Jars: Using your funnel and ladle, carefully fill the hot jars with hot tomatoes, leaving 1/2 inch of headspace from the rim. Gently press out any air bubbles with a clean knife or plastic utensil, adding more tomatoes if needed to maintain headspace.
- Clean Rims: Wipe jar rims thoroughly with a clean, damp cloth to ensure a good seal.
- Seal Jars: Center a hot lid on each jar, then screw on a band until fingertip tight (just until resistance is met, no need to overtighten).
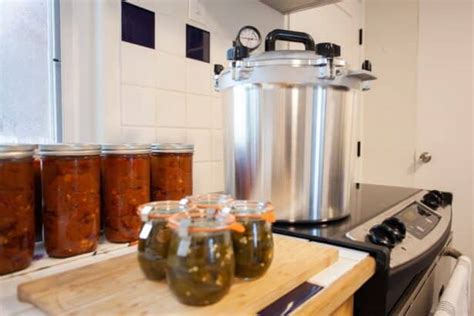
Step 3: The Water Bath Process
Now it’s time to process your jars to create a vacuum seal and ensure shelf stability.
- Set up the Pot: Place your clean dish towel or wire rack at the bottom of your large stockpot. Carefully place the filled and sealed jars on the towel, ensuring they don’t touch each other or the sides of the pot.
- Add Water: Fill the pot with hot water, ensuring the water level covers the tops of the jars by at least 1-2 inches.
- Boil: Cover the pot with its lid and bring the water to a full, rolling boil.
- Process: Once boiling, start your timer. The processing time varies based on jar size and altitude. For pints, generally process for 35-40 minutes; for quarts, 45-50 minutes. (Always consult a reliable source like the National Center for Home Food Preservation for precise times based on your altitude.)

Step 4: Cooling and Sealing
The final step is crucial for checking your seals and proper storage.
- Cool Down: Once processing time is complete, carefully turn off the heat and remove the pot lid. Let the jars sit in the hot water for 5 minutes before carefully lifting them out with tongs.
- Cool Jars: Place the hot jars on a clean towel or cooling rack, ensuring they are not touching and are away from drafts. Let them cool undisturbed for 12-24 hours. You’ll often hear a satisfying ‘ping!’ sound as the lids seal.
- Check Seals: After cooling, remove the screw bands. Press down on the center of each lid. If the lid does not flex, it’s sealed. If it flexes, it hasn’t sealed properly and must be refrigerated and consumed within a few days.
- Store: Wipe sealed jars clean, label them with the date and contents, and store in a cool, dark place for up to 18 months.
Troubleshooting and Tips
- Safety First: Always follow tested recipes and guidelines for canning. Do not deviate from recommended processing times or acid amounts.
- Altitude Adjustment: If you live at a high altitude, you will need to increase your processing time. Consult a local extension office or the NCHFP for specific adjustments.
- Unsealed Jars: If a jar doesn’t seal, don’t despair! You can reprocess it within 24 hours using a new lid, or refrigerate and use the contents within a week.
- Vacuum Release: Do not overtighten bands. This can prevent air from escaping during processing and lead to false seals.
With just a few common kitchen items and a little patience, you can confidently transform your garden’s bounty into delicious, shelf-stable canned tomatoes. Enjoy the satisfaction of stocking your pantry with homemade goodness, ready to elevate your meals year-round!