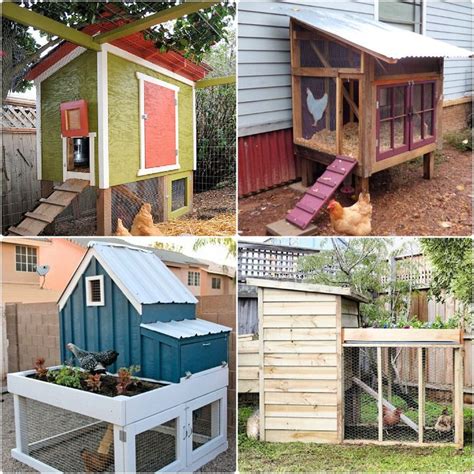


Easy DIY plans for a sturdy, critter-proof chicken coop on a budget?

Building a Secure Home for Your Flock on a Shoestring Budget
Dreaming of fresh eggs from your own backyard chickens but worried about the cost of a safe, sturdy coop? Building a critter-proof chicken coop on a budget is not only achievable but also a rewarding DIY project. With smart planning, clever material sourcing, and a bit of elbow grease, you can create a secure haven for your feathered friends that stands up to predators without draining your wallet.
Planning Your Coop: Essentials & Critter-Proofing Basics
Before you lift a hammer, thorough planning is key. Consider the number of chickens you plan to house (typically 2-3 sq ft per bird inside the coop, 8-10 sq ft in the run). A well-designed coop needs good ventilation, easy cleaning access, and ample space for roosts and nesting boxes. Critter-proofing is paramount; predators like raccoons, foxes, and even determined rats can exploit tiny weaknesses.
Key critter-proofing features:
- Hardware Cloth, Not Chicken Wire: Chicken wire keeps chickens in, but not predators out. Use 1/2-inch or 1/4-inch galvanized hardware cloth for all openings and the run. It’s much stronger and chew-resistant.
- Buried Apron: To prevent digging predators, extend hardware cloth horizontally outwards from the base of your coop and run walls, burying it at least 12 inches deep. This creates an invisible barrier.
- Secure Latches: Every door and window needs a predator-proof latch that can’t be opened by clever paws. Double-locking mechanisms or carabiners are excellent choices.
- Solid Foundation: Raising your coop off the ground on skids or posts deters burrowing predators and improves ventilation.

Material Sourcing on a Budget
This is where your budget-friendly build truly shines. Don’t rush to the hardware store for everything new. Look for:
- Reclaimed Wood: Pallets, old fences, construction scraps, or even salvaged lumber can be excellent sources for framing and siding. Always inspect for nails, rot, or chemical treatments.
- Repurposed Doors/Windows: Check local salvage yards or online marketplaces for old doors and windows that can be adapted for coop access and ventilation.
- Scrap Metal/Roofing: Leftover roofing shingles, corrugated metal, or even heavy tarps can be used for the roof.
- Discount Hardware: Keep an eye out for sales on screws, hinges, and the essential hardware cloth. Buying in bulk where possible can also save money.
Step-by-Step Construction Guide
While specific plans vary, a general sequence helps:
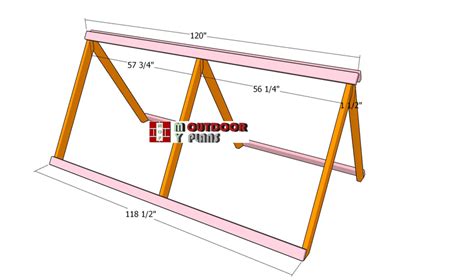
1. The Foundation
Start with a sturdy base. A skid foundation (using treated 4x4s as runners) makes the coop movable, while concrete blocks or posts lift it off the ground. Ensure it’s level.
2. Framing the Structure
Build the frame using your reclaimed or new lumber. This typically involves a floor frame, wall studs, and roof trusses. Maintain consistent dimensions for stability. Remember to factor in openings for doors and windows during this stage.
3. Walls and Critter-Proofing
Sheathe the exterior walls with plywood, reclaimed fencing, or other suitable materials. Crucially, install your 1/2-inch hardware cloth. For the run, bury the hardware cloth apron around the entire perimeter. All ventilation openings should be covered with hardware cloth as well.
4. The Roof
Install your roof sheathing (plywood or reclaimed boards) and then apply your chosen roofing material. A slight pitch is essential for water runoff. Overhangs offer extra protection from the elements.
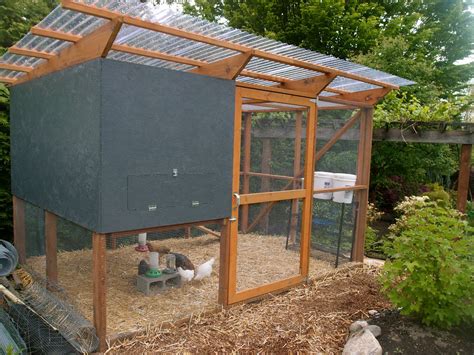
5. Doors and Windows
Construct doors for both human access and a smaller pop-door for the chickens. Install them securely with sturdy hinges and, most importantly, predator-proof latches. Windows (if desired) can be simple openings covered with hardware cloth or repurposed frames, also with secure latches.
6. Interior Furnishings
- Roosts: Chickens need elevated roosts to sleep on. Use sturdy branches or 2x4s with the wider side up, placed 2-4 feet off the ground.
- Nesting Boxes: Provide one nesting box for every 3-4 hens. Recycled plastic bins, old buckets, or wooden boxes work well, lined with straw.
- Feeders and Waterers: Position these inside or in a covered section of the run, out of the elements and protected from pests.

Final Touches & Maintenance
Once your coop is built, give it a final once-over. Check for any gaps, loose hardware cloth, or flimsy latches. Paint or seal exterior wood to prolong its life. Add a layer of absorbent bedding like pine shavings or straw. Regular maintenance is crucial: routinely check for signs of predator attempts (digging, claw marks), reinforce any weak spots, and keep the coop clean to maintain a healthy environment for your flock.
Building your own chicken coop is a rewarding endeavor that provides a safe, comfortable home for your chickens and saves you money. With these tips and a bit of DIY spirit, you’ll soon be enjoying fresh eggs from your secure, budget-friendly backyard coop!