


How to build a backyard root cellar for winter harvests?

Why Build a Backyard Root Cellar?
For centuries, root cellars have been an invaluable tool for food preservation, offering a cool, dark, and humid environment ideal for storing produce through the colder months. In an age of increasing interest in self-sufficiency and sustainable living, building your own backyard root cellar is a rewarding DIY project that can significantly extend the life of your garden’s bounty. It reduces reliance on refrigeration, saves energy, and provides a natural, chemical-free way to keep your fruits and vegetables fresh and flavorful, long after the growing season ends.
A well-designed root cellar maintains a consistent temperature between 35-50°F (1-10°C) and high humidity (around 85-95%), conditions that are perfect for potatoes, carrots, apples, beets, and many other crops. This guide will walk you through the essential steps to plan and construct a functional root cellar right in your own backyard.
Planning Your Root Cellar
Careful planning is the cornerstone of a successful root cellar. Begin by considering its location. A north-facing slope is ideal as it offers natural insulation and shade. Ensure the chosen site has good drainage to prevent water accumulation, which can lead to mold and spoilage. The size of your cellar will depend on the amount of produce you anticipate storing; a small family might find a 6×6-foot cellar sufficient, while larger gardens may require more space.
Key design considerations include insulation, ventilation, and structural integrity. The primary goal is to maintain stable temperatures and humidity. Earth provides excellent insulation, so burying the cellar is crucial. Ventilation is vital to prevent stale air, reduce ethylene gas buildup (which can ripen produce prematurely), and help regulate humidity. Finally, the structure must be robust enough to withstand the weight of the earth above and prevent collapse.
Excavation and Foundation
Once your site is chosen and marked, the first physical step is excavation. Dig a hole to your desired dimensions, ensuring the depth allows for sufficient headroom and a layer of gravel for drainage beneath the floor. A typical depth might be 6-8 feet, depending on your climate and water table. Sloping the sides slightly can help prevent collapse during construction. If your soil is particularly sandy or unstable, you may need to shore up the walls temporarily.
Next, prepare the foundation. A simple gravel floor (6-12 inches deep) provides excellent drainage and helps maintain humidity. For a more robust and permanent structure, consider pouring a concrete slab. If using concrete, ensure it’s poured over a layer of gravel and includes a vapor barrier to prevent moisture from seeping up from the ground. Level the foundation carefully, as it will be the base for your walls.
Constructing the Walls and Roof
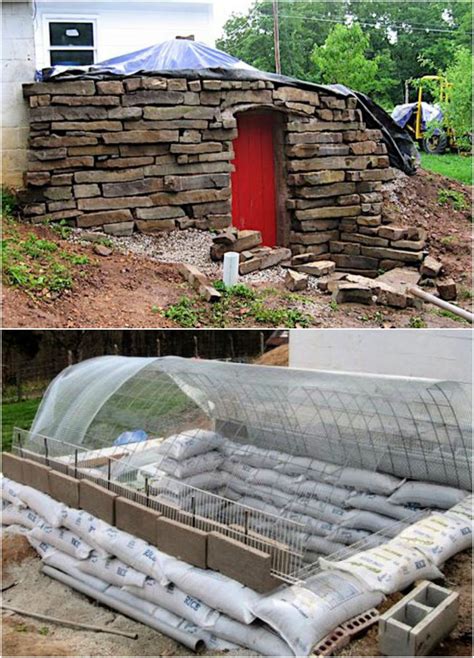
The walls of your root cellar can be built from various materials, each with pros and cons. Concrete blocks (CMUs) are durable, rot-proof, and offer good thermal mass. Lumber treated for ground contact or naturally rot-resistant wood (like cedar or redwood) can also be used, though concrete or stone are generally preferred for long-term underground structures. Mortar the blocks together, ensuring a strong, plumb wall. For additional strength, rebar can be inserted into the block cores and filled with concrete.
The roof must be strong enough to support the weight of the earth piled on top. For smaller cellars, heavy-duty treated lumber beams can be spanned across the top, topped with plywood or corrugated metal sheeting. For larger structures, poured concrete or precast concrete slabs are more appropriate. Ensure a slight slope to the roof to aid in water runoff. Seal all joints thoroughly to prevent water intrusion.
Insulation and Earth Covering
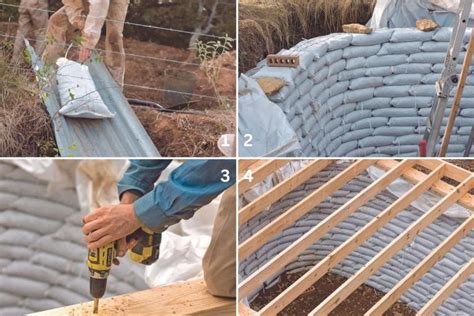
Once the basic structure of the walls and roof is complete, the crucial step of insulation and earth covering begins. Apply a waterproof membrane (such as heavy-duty pond liner or roofing membrane) over the exterior of the walls and roof. This is essential to prevent moisture from penetrating the cellar. For additional insulation and protection, you can add rigid foam insulation boards to the exterior of the walls and roof before backfilling.
Begin backfilling the earth around the walls and over the roof. Compact the soil in layers to ensure stability and minimize settling. A thick layer of earth (at least 2-3 feet) over the roof and sides will provide excellent thermal mass, helping to keep internal temperatures stable year-round. Contour the earth to allow for good drainage away from the cellar entrance and vents.

Ventilation and Finishing Touches
Proper ventilation is critical for a root cellar. You’ll need at least two vents: an intake vent near the floor and an exhaust vent near the ceiling. These create a passive airflow, drawing in cooler, fresh air and expelling warmer, stale air. Use PVC pipes (4-6 inches in diameter) for vents, ensuring they extend above the ground level and have screens to keep pests out. You can add adjustable dampers to control airflow.
Install a sturdy, insulated door that seals tightly to prevent heat transfer. For the interior, consider simple wooden shelving or bins. Avoid using treated lumber inside the cellar, as chemicals can leach onto produce. Slatted shelves allow for better air circulation around your stored items. Finally, install a thermometer and hygrometer to monitor conditions and make adjustments as needed. With these steps, your backyard root cellar will be ready to keep your winter harvests fresh and abundant!