


Beginner’s guide: Safely home canning summer tomatoes?

Embracing the Bountiful Harvest: Your Guide to Canning Summer Tomatoes
There’s nothing quite like the taste of a sun-ripened summer tomato. As the season peaks, many of us find our gardens (or local markets) overflowing with these juicy delights. While fresh is best, preserving that vibrant flavor to enjoy all year round is a truly rewarding country living skill. Home canning summer tomatoes might seem daunting to beginners, but with the right guidance and adherence to safety protocols, it’s an achievable and satisfying endeavor.
This guide will walk you through the essential steps, from selecting the perfect tomatoes to safely sealing them in jars, ensuring you can savor the taste of summer long after the warmth has faded.

Why Can Tomatoes at Home?
Beyond the simple joy of having homemade pantry staples, canning your own tomatoes offers numerous benefits. You control the ingredients, avoiding unwanted additives found in many store-bought products. It’s also an excellent way to save money when tomatoes are abundant and inexpensive. Plus, there’s immense satisfaction in opening a jar of your own preserved harvest, knowing exactly where it came from.
Gather Your Essential Canning Tools
Before you begin, ensure you have all the necessary equipment. Using the correct tools not only makes the process smoother but is also crucial for safety:
- Water Bath Canner: A large pot with a lid and a rack to hold jars off the bottom.
- Canning Jars: Mason-type jars with two-piece lids (new flat lids, reusable screw bands).
- Jar Lifter: For safely placing and removing hot jars from the canner.
- Canning Funnel: To minimize spills when filling jars.
- Headspace Tool/Bubble Remover: A non-metallic utensil to measure headspace and release air bubbles.
- Clean Kitchen Towels: For wiping jar rims and cooling jars.
- Basic Kitchen Utensils: Knives, cutting board, large pots for blanching and cooking tomatoes.
Always start with clean, sterilized jars. You can sterilize them by boiling them for 10 minutes or running them through a dishwasher’s sanitizing cycle.
From Vine to Jar: Selecting and Preparing Your Tomatoes
The quality of your canned tomatoes starts with the quality of the fresh produce. Choose firm, ripe, unblemished tomatoes. While any tomato can be canned, paste varieties like Roma or San Marzano are often preferred due to their meaty texture and fewer seeds.
- Wash Thoroughly: Rinse tomatoes under cool running water.
- Blanch and Peel: To easily remove skins, blanch tomatoes by dipping them in boiling water for 30-60 seconds, then immediately transferring them to an ice bath. The skins should slip off easily. Remove cores.
- Prepare: You can can tomatoes whole, halved, quartered, or crushed. For crushed tomatoes, you’ll simmer them down after peeling.

The Critical Step: Ensuring Safety with Added Acidity
Tomatoes are a borderline acidic food, meaning their pH can vary. To prevent the growth of Clostridium botulinum, the bacteria that causes botulism, it is absolutely crucial to add additional acid when canning tomatoes. You have two primary options:
- Bottled Lemon Juice: Add 2 tablespoons per quart jar or 1 tablespoon per pint jar. Use only bottled lemon juice, as its acidity is standardized.
- Citric Acid: Add 1/2 teaspoon per quart jar or 1/4 teaspoon per pint jar.
Place the acid directly into the bottom of each jar before adding tomatoes. You may also add 1 teaspoon of salt per quart for flavor, but it is not necessary for safety.
Step-by-Step Water Bath Canning
Once your tomatoes are prepared and acid is in the jars, you’re ready to fill and process:
- Pack Jars: Tightly pack prepared tomatoes into hot, sterilized jars. If canning whole or halved tomatoes, you can add hot water or tomato juice to cover, leaving 1/2 inch of headspace (space between the food and the rim of the jar). For crushed tomatoes, simply fill, leaving 1/2 inch headspace.
- Remove Air Bubbles: Use your headspace tool to gently remove air bubbles by running it around the inside of the jar. Add more tomatoes/liquid if necessary to maintain headspace.
- Clean Rims: Wipe jar rims thoroughly with a clean, damp cloth to ensure a good seal.
- Apply Lids and Rings: Center new, pre-warmed lids on jars. Screw on the bands finger-tight (just until resistance is met).
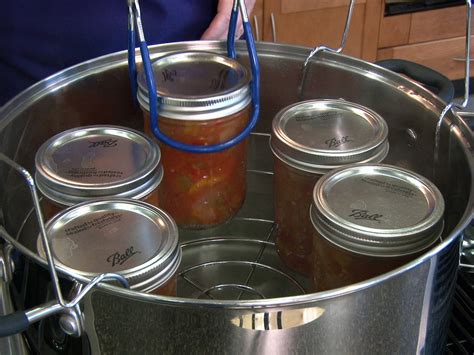
- Process in Canner: Place jars on the rack in the water bath canner. Ensure water covers jars by at least 1 inch. Bring water to a rolling boil.
- Process Time: Begin timing once the water reaches a full boil. Process time depends on your altitude and the type of tomato product (check a reliable source like the National Center for Home Food Preservation). For most crushed tomatoes or whole/halved tomatoes in water/juice, a typical processing time is 40-45 minutes for quarts at sea level.

The Final Touches: Cooling, Sealing, and Storage
Once processing is complete, turn off the heat and remove the canner lid. Let jars sit in the hot water for 5 minutes before carefully lifting them out with a jar lifter. Place jars on a clean towel on your counter, ensuring they are not touching each other, and allow them to cool undisturbed for 12-24 hours.
As they cool, you’ll hear the satisfying ‘ping!’ of lids sealing. After 24 hours, check seals by pressing the center of each lid; it should be concave and not flex when pressed. If a jar hasn’t sealed, refrigerate and use within a week, or reprocess with a new lid (after checking for any flaws) within 24 hours using the full processing time.
Remove screw bands, wipe down jars, label them with the contents and date, and store in a cool, dark, dry place. Properly canned tomatoes can last for at least a year.
Important Safety Considerations
Home canning requires strict adherence to safety guidelines to prevent foodborne illnesses. Always follow tested recipes from reputable sources (like university extensions or USDA guidelines). Never skip or reduce the amount of added acid for tomatoes. If you suspect a jar is spoiled (e.g., bulging lid, mold, off-odor), do not taste it; discard it immediately.
Enjoying Your Preserved Harvest
With a little preparation and careful attention to detail, home canning your summer tomatoes is a rewarding way to capture the essence of the season. Imagine the delight of opening a jar of your own canned tomatoes in the dead of winter, ready to transform into a vibrant sauce, hearty chili, or comforting soup. It’s a skill that connects you to your food, your garden, and the timeless traditions of country living.

