Best DIY method for preserving garden herbs for winter use?

Harvesting Your Green Gold for Winter
As the vibrant hues of summer fade, so too does the lush bounty of our herb gardens. But the joy of fresh basil, aromatic rosemary, or zesty mint doesn’t have to end with the first frost. Preserving your garden herbs for winter use is a gratifying DIY project that ensures a constant supply of flavor, fragrance, and even medicinal properties for your culinary creations and home remedies. The question isn’t just how to preserve them, but which method is truly the “best” for retaining their essence and potency.
Popular DIY Herb Preservation Methods
There are several tried-and-true techniques for extending the life of your fresh herbs, each with its own merits and ideal applications. Understanding these methods is the first step towards choosing the right one for your specific needs.
1. Air Drying or Dehydrating
Drying is perhaps the most ancient method of preservation, ideal for herbs with lower moisture content and robust leaves. Think rosemary, thyme, oregano, bay leaves, sage, and marjoram. Air drying involves hanging bundles of herbs in a cool, dark, well-ventilated area until they become brittle. For quicker results or for more delicate herbs that might mold, a food dehydrator or even a low-temperature oven can be used.

2. Freezing Herbs
Freezing is an excellent method for preserving the vibrant color and fresh flavor of many herbs, especially those with high moisture content or delicate leaves like basil, parsley, cilantro, chives, mint, and dill. There are a couple of popular approaches to freezing:
- Chopped and Frozen in Water/Oil: Chop herbs finely and pack them into ice cube trays. Cover with a little water or, for richer flavor and better preservation, olive oil. Once frozen solid, transfer the herb cubes to freezer-safe bags or containers.
- Whole Leaf Freezing: For sturdier herbs like rosemary or thyme, you can simply lay sprigs on a baking sheet, freeze until solid, then transfer to bags. For basil, blanching quickly before freezing can help maintain color.

3. Preserving in Salt, Oil, or Vinegar
While less common as a primary method for general winter use due to changes in texture and flavor profile, these techniques offer unique culinary applications:
- Herb Salts: Blending finely chopped herbs with salt creates a flavorful seasoning.
- Herb-Infused Oils and Vinegars: Steeping herbs in oil or vinegar adds wonderful aromatics, though caution must be exercised with oils to prevent botulism (always refrigerate and use quickly, or use proper sterilization for long-term storage).
The “Best” DIY Method: A Closer Look
While each method has its place, for maximizing flavor, ease of use, and versatility for most culinary purposes, freezing herbs, especially in olive oil, often emerges as the top DIY method for winter use. This technique best preserves the fresh taste and vibrant color of a wide variety of herbs, making them ready to drop into soups, stews, sauces, and roasts.
Drying is fantastic for woody herbs, but the flavor can become more concentrated and less “fresh.” Freezing in oil captures that garden-fresh essence beautifully, and the oil itself adds another layer of flavor and protects the herbs from freezer burn.

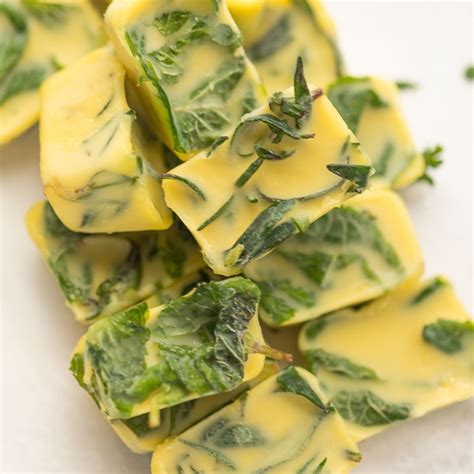
Step-by-Step: Freezing Herbs in Olive Oil
This method is simple, effective, and yields fantastic results:
- Harvest and Clean: Gather your herbs in the morning after the dew has dried. Gently wash them under cool water and pat them thoroughly dry with a clean cloth or paper towels. Moisture is the enemy of good preservation.
- Chop: Remove leaves from stems (if necessary) and finely chop the herbs. The size of the chop depends on your preference and intended use, but generally, a fine chop works best for easy integration into dishes.
- Fill Ice Cube Trays: Loosely pack the chopped herbs into the compartments of an ice cube tray, filling each about two-thirds full.
- Add Olive Oil: Pour good quality olive oil over the herbs until they are completely submerged. You can also use melted butter, vegetable oil, or even water if preferred, but olive oil provides excellent flavor and preservation.
- Freeze: Place the ice cube trays in the freezer and allow them to freeze solid, usually overnight.
- Store: Once frozen, pop the herb cubes out of the trays and transfer them to clearly labeled freezer-safe bags or containers. Label with the herb type and date.
Tips for Using Your Frozen Herb Cubes
- No Thawing Needed: Most herb cubes can be added directly to hot dishes like soups, sauces, or roasts. The oil will melt, releasing the herb’s flavor.
- Experiment: Try combining different herbs in one cube for specific flavor profiles, like “Italian Blend” (basil, oregano, thyme) or “Pesto Base” (basil, garlic, pine nuts).
- Storage Life: Properly stored, these herb cubes will last for 6-12 months in the freezer, providing fresh flavor all winter long.
Embrace Winter Flavor
Preserving your garden herbs is a rewarding way to extend the bounty of summer and infuse your winter cooking with fresh, vibrant flavors. While drying offers convenience for certain herbs, freezing them in olive oil consistently delivers the best retention of taste and color for a wide array of culinary favorites. So, don’t let your garden’s goodness disappear with the cold; embrace the simple DIY methods that bring the warmth of summer into your winter kitchen!