Best DIY methods for building a sturdy, budget-friendly compost bin?

Why Build Your Own Compost Bin?
Composting is a fantastic way to transform kitchen scraps and yard waste into nutrient-rich soil amendment, reducing landfill waste and enhancing your garden’s health. While pre-made compost bins are available, building your own can be significantly more budget-friendly and allow for customization to fit your space and needs. A sturdy bin is crucial for efficient decomposition and to deter pests, while a budget-conscious approach ensures sustainability from the start.

Key Considerations for Your DIY Compost Bin
Before diving into construction, consider a few factors: size (how much waste do you generate?), location (sunny spot for faster decomposition, away from living spaces), ventilation (essential for aerobic composting), and access (for turning and harvesting compost). The methods below balance these needs with cost-effectiveness and durability.
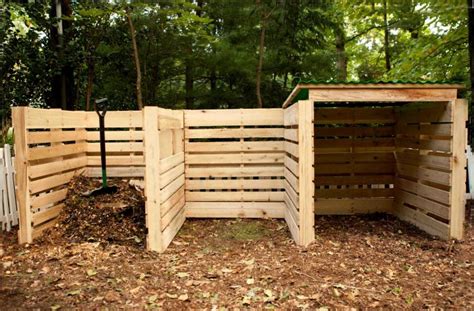
1. The Pallet Compost Bin: Sturdy and Often Free
Pallets are a goldmine for DIY projects, and compost bins are no exception. They are robust, offer natural ventilation, and can often be sourced for free from local businesses or construction sites (check for heat-treated “HT” pallets, avoiding chemically treated “MB” ones). You’ll typically need 3-4 pallets, zip ties, bolts, or screws, and basic tools like a drill and a saw if you need to cut them.
Construction:
- Stand three pallets upright to form three sides of a square or rectangle.
- Secure them together at the corners using heavy-duty zip ties, bolts, or screws.
- Optionally, use a fourth pallet for the front, attaching it with hinges for easy access, or simply leave the front open for a three-sided pile.
- Ensure the bin is stable and won’t tip over when full.
This method creates a large, robust bin suitable for significant volumes of waste, perfect for a garden with ample space.
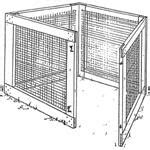
2. Wire Mesh or Hardware Cloth Bin: Simple, Modular, and Aerated
For a quicker, more flexible, and highly aerated option, a wire mesh or hardware cloth bin is excellent. Materials are relatively inexpensive, and the setup is straightforward. You’ll need a roll of galvanized wire mesh or hardware cloth (1/2-inch or 1-inch openings are good), wire cutters, and strong wire to secure the ends.
Construction:
- Unroll your chosen wire mesh to create a cylinder of your desired diameter (typically 3-4 feet).
- Overlap the ends by a few inches and securely fasten them together using more wire, zip ties, or j-clips.
- Ensure the bottom edge is flush with the ground or slightly buried to prevent contents from escaping.
These bins are lightweight, portable, and provide exceptional airflow, accelerating decomposition. You can easily expand by adding more bins or modify their size as needed.
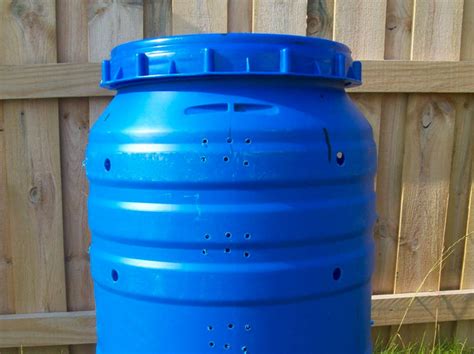
3. Upcycled Plastic Bin: Quick and Contained
If you have an old plastic trash can, a large storage tote, or even a food-grade barrel lying around, you’ve got the makings of a simple compost bin. This method is excellent for smaller spaces or for those looking for a contained system to prevent odors or pests.
Construction:
- Thoroughly clean your plastic container.
- Using a drill, create numerous drainage holes in the bottom and aeration holes on all sides, including the lid. The more holes, the better the airflow.
- Place a few inches of straw or coarse material at the bottom for initial drainage.
- Fill with your compostable materials, layering greens and browns.
- Keep the lid on to retain moisture and heat, turning the contents periodically with a long tool.
This method is super budget-friendly if you already have the container and is great for beginners due to its simplicity.
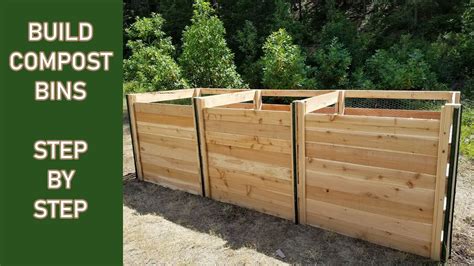
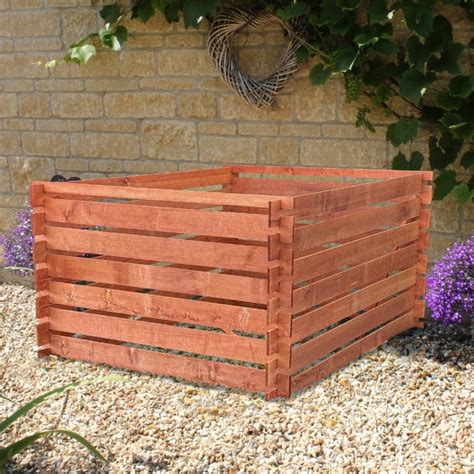
4. Wooden Slat Bin: Aesthetic and Customizable
For a more permanent and aesthetically pleasing option, a wooden slat bin can be constructed using reclaimed lumber, fence pickets, or even old decking. While potentially requiring a bit more effort and some cost if materials aren’t free, it offers great customization.
Construction:
- Cut wooden slats to desired lengths for the sides and front/back.
- Dig four corner posts into the ground, or use heavier timbers as corner supports.
- Attach the slats horizontally to the posts, leaving small gaps between them for ventilation.
- You can build a simple two- or three-bin system for batch composting, allowing one bin to mature while you fill another.
This type of bin can be tailored to perfectly blend into your garden’s landscape and is very durable.
Tips for Successful Composting
- Balance Greens and Browns: Aim for a good mix of nitrogen-rich “greens” (food scraps, grass clippings) and carbon-rich “browns” (leaves, straw, wood chips).
- Keep it Moist: The compost pile should be consistently damp, like a wrung-out sponge.
- Turn Regularly: Aerating the pile by turning it helps speed up decomposition and prevents anaerobic conditions (which can cause odors).
- Chop Materials: Smaller pieces break down faster.
- Avoid Problematic Items: Don’t add meat, dairy, oily foods, diseased plants, or pet waste, as these can attract pests and introduce pathogens.
Conclusion
Building a sturdy, budget-friendly compost bin is an an achievable and rewarding DIY project that benefits both your wallet and your garden. Whether you opt for the robustness of pallets, the simplicity of wire mesh, the containment of an upcycled plastic bin, or the custom appeal of a wooden structure, the key is to ensure good ventilation, proper moisture, and a balanced mix of materials. Get ready to turn your waste into valuable garden gold!