


Best DIY plan for sturdy raised garden beds using reclaimed wood?

Embrace Sustainability: Building Sturdy Raised Beds with Reclaimed Wood
Creating a raised garden bed is an excellent way to improve soil drainage, extend your growing season, and make gardening more accessible. When you choose reclaimed wood, you not only give old materials a new purpose but also add unique character and a touch of eco-friendliness to your outdoor space. This guide outlines the best DIY plan to construct sturdy, long-lasting raised garden beds that will serve your plants for years to come.
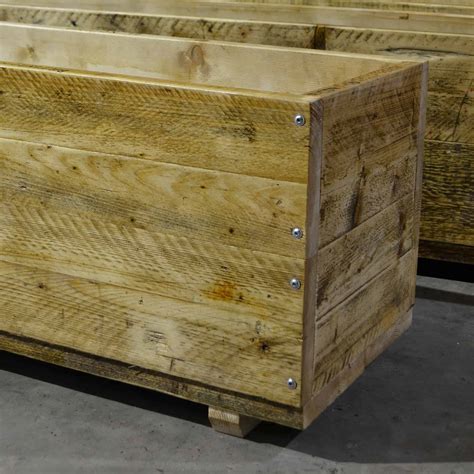
The beauty of reclaimed wood lies in its history and inherent resilience. However, selecting the right type is crucial. Opt for untreated lumber like old fence planks, barn wood, or pallet wood (ensure it’s marked HT for heat-treated, not MB for methyl bromide, which is toxic). Avoid pressure-treated wood from before 2003, as it may contain harmful chemicals. Prioritize pieces that are relatively straight and free from severe rot or insect damage.

Planning and Design for Maximum Durability
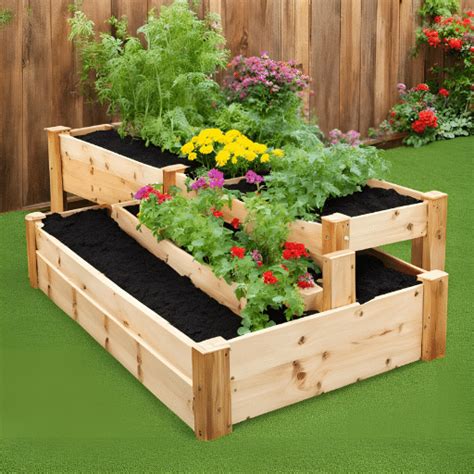
Before cutting, consider the dimensions of your raised bed. A width of 3-4 feet allows easy access from both sides without stepping into the bed, compacting soil. Length can vary based on your space and available wood. For sturdiness, a height of 10-12 inches (one plank high) is sufficient for many plants, but 18-24 inches (two planks high) is ideal for deep-rooted vegetables and less bending. Taller beds inherently require more bracing.
Essential Tools and Materials:
- Reclaimed Wood: Enough planks for your desired dimensions.
- Fasteners: 3-inch exterior-grade screws (e.g., galvanized, stainless steel) or lag screws for larger timber.
- Corner Brackets/Angles: Metal L-brackets (optional but highly recommended for sturdiness).
- Support Posts: 2×2 or 4×4 posts for internal corners, especially for taller beds.
- Weed Barrier/Liner: Cardboard or landscape fabric (optional, but helpful for weed suppression and soil retention).
- Tools: Circular saw or miter saw, drill, measuring tape, pencil, level, clamps, square, safety glasses, gloves.
Step-by-Step Construction Guide
1. Cut Your Wood to Size:
Measure and cut your reclaimed wood planks to the desired lengths for the sides and ends of your raised bed. For a rectangular bed, you’ll need two long side pieces and two shorter end pieces per layer. Ensure all cuts are straight and square for a tight fit.
2. Assemble the First Layer:
Lay out your cut pieces for the base layer. Form a rectangle, ensuring corners are square using a carpenter’s square. For a basic, single-layer bed, you can butt-join the ends and screw them together directly. For enhanced sturdiness, especially with multiple layers, attach internal corner posts (2x2s or 4x4s). These posts run vertically up the inside corners and provide a robust anchor point for each plank.
Pre-drill pilot holes to prevent the wood from splitting, especially with older, drier reclaimed wood. Use at least two screws per joint, driving them through the face of one board into the end grain of the other, or into the corner post.

3. Stack and Secure Additional Layers:
If building a multi-layer bed, simply stack the next set of planks on top of the first. Offset the joints if possible (like bricklaying) for added strength. Secure each new plank to the corner posts and to the layer below it. Drive screws through the bottom edge of the upper plank into the top edge of the lower plank, especially at mid-points if the planks are long. This creates a solid, interlocking structure.
For extra rigidity, especially in longer beds or those exposed to significant soil pressure, consider adding mid-span supports. These can be short vertical sections of wood screwed to the inside face of the long planks, tied together with a horizontal cross-brace or threaded rod to prevent bowing.
Ensuring Longevity and Sturdiness
Once your raised bed frame is complete, inspect all connections for tightness. Use a level to ensure the top edges are even, which will aid in consistent watering and a visually appealing garden. While reclaimed wood often has a natural resistance to decay, you can further extend its life.
- Drainage: Ensure the bottom of your bed has good drainage. If placing on concrete, consider drilling weep holes. On soil, prepare the ground beneath by loosening it.
- Lining (Optional): Line the inside of your bed with landscape fabric or cardboard to prevent weeds and help retain soil. Avoid plastic sheeting as it can trap moisture and accelerate wood decay.
- Exterior Protection: While not always necessary for aesthetic, you can apply a non-toxic, food-safe sealant to the exterior of the wood to protect it from the elements. Look for options specifically safe for garden use if you’re concerned about leaching into the soil.

Conclusion: Your Sustainable Garden Awaits
Building a sturdy raised garden bed from reclaimed wood is a rewarding project that combines sustainability with practical gardening. By following these steps and focusing on strong joinery and thoughtful design, you’ll create a durable and beautiful foundation for your plants to thrive. Fill it with nutrient-rich soil, plant your favorite vegetables, herbs, or flowers, and enjoy the fruits (and vegetables!) of your labor for many seasons to come.


