Best DIY root cellar design for year-round food storage?

Embracing a root cellar is a timeless method for preserving the bounty of your garden, offering a sustainable and energy-efficient alternative to modern refrigeration. For those passionate about DIY projects and self-sufficiency, building your own root cellar can be an incredibly rewarding endeavor. The key to year-round food storage lies in understanding the core principles that make these subterranean wonders work and choosing a design that best suits your resources and climate.
Why Build a Root Cellar?
A root cellar creates a naturally cool, humid, and dark environment—conditions ideal for storing root vegetables, fruits, and certain preserves without electricity. This not only reduces your carbon footprint but also saves on energy costs and provides a resilient food storage solution in the event of power outages. Beyond the practical benefits, having a root cellar connects you to age-old practices of food preservation, fostering a deeper appreciation for your homegrown produce.
It allows you to extend the lifespan of potatoes, carrots, apples, cabbage, and more, ensuring a supply of fresh produce long after the growing season has ended. Imagine enjoying crisp apples in February or hardy carrots in March, all from your backyard harvest.

Essential Elements of a Successful Root Cellar
Regardless of the design you choose, every effective root cellar must control four critical elements: temperature, humidity, ventilation, and darkness. Aim for temperatures between 32-50°F (0-10°C) and high humidity, ideally 85-95%, to prevent produce from drying out. Adequate ventilation is crucial for air circulation, preventing the buildup of ethylene gas and odors that can spoil food. Finally, complete darkness inhibits sprouting and maintains the quality of stored items.
Achieving these conditions naturally is often easier than it sounds, especially when leveraging the insulating properties of the earth. Understanding how these factors interact will guide your design and construction choices.
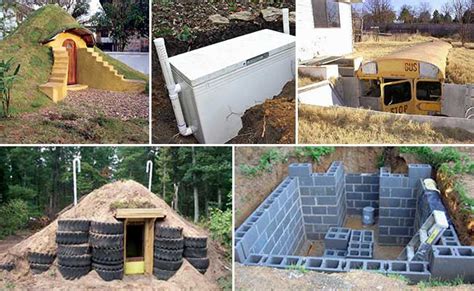
Popular DIY Root Cellar Designs
Buried or Underground Cellars
These are perhaps the most traditional and effective designs, utilizing the stable temperatures of the earth. Options range from simple buried trash cans or barrels for small quantities to more elaborate culvert cellars or earth-sheltered sheds. A buried culvert, for example, can be an excellent option for a walk-in cellar, providing consistent temperatures and requiring less excavation than a full basement. Key considerations include proper drainage and waterproofing to prevent moisture issues.
Basement or Crawlspace Conversions
If you have an existing basement or crawlspace, converting a section into a root cellar can be a straightforward solution. This typically involves insulating a corner or room from the warmer parts of the house, adding ventilation, and ensuring consistent darkness. Brick or concrete walls often provide a good foundation for maintaining stable temperatures and humidity.
Mound or Hillsite Cellars
For properties with natural slopes or hills, a mound or hillsite cellar can be a fantastic option. This design involves excavating into the side of a hill or building a structure and mounding earth over it. The earth acts as natural insulation, while the design often allows for easier drainage and access. This type can be particularly charming and blend well with the landscape.
Step-by-Step Design Considerations
Once you’ve chosen a design, planning is crucial. First, select a site that drains well and is accessible, yet ideally shaded. For underground options, consider soil type and potential water tables. Next, decide on materials: concrete blocks, bricks, recycled culverts, or even treated wood can be used, with an emphasis on durability and insulation. Ensure your design incorporates robust ventilation—often a passive system with an intake and exhaust pipe—and a sturdy door that seals tightly.
Inside, plan for shelving or bins that allow for good air circulation around your produce. Materials like slatted wood shelves or plastic bins are excellent choices, keeping produce off the floor and allowing air to flow freely. Proper organization will maximize storage capacity and make items easy to access.

Maintaining Your Root Cellar for Optimal Storage
Building a root cellar is only half the battle; maintaining its optimal conditions is key to successful long-term storage. Regularly monitor the temperature and humidity with a thermometer/hygrometer. Adjust ventilation as needed to control humidity levels and refresh the air. Before storing, cure root vegetables (like potatoes and sweet potatoes) and onions properly to extend their shelf life. Only store unblemished produce; one bad apple can indeed spoil the bunch.
Periodically inspect your stored goods for any signs of spoilage and remove affected items immediately. Keep your root cellar clean to prevent pest infestations and mold growth. With proper care, your DIY root cellar will serve as a reliable source of fresh food for months on end.

Conclusion
Building a DIY root cellar is a testament to sustainable living and provides an invaluable asset for any homesteader or avid gardener. Whether you opt for a simple buried barrel or a more elaborate earth-sheltered structure, the principles of cool, humid, dark, and well-ventilated conditions remain paramount. By carefully designing and maintaining your root cellar, you’ll unlock year-round access to fresh, healthy produce, making your food storage not just practical, but also profoundly rewarding.