Best DIY root cellar method for storing garden harvests through winter?

The Timeless Art of Root Cellaring
For centuries, root cellars have been a cornerstone of self-sufficiency, allowing gardeners to extend the bounty of their summer and fall harvests deep into the colder months. In an age of conscious consumption and local food movements, building your own DIY root cellar is a practical, rewarding project that reduces food waste, saves money, and provides access to fresh, wholesome produce long after the growing season ends.
A successful root cellar isn’t just a hole in the ground; it’s a carefully managed environment designed to mimic the cool, humid conditions of underground storage. The key principles involve maintaining a consistent cool temperature (just above freezing), high humidity, good ventilation, and complete darkness. Achieving these conditions with readily available materials is the essence of a great DIY root cellar.
Understanding Root Cellar Essentials
Before diving into construction, it’s vital to grasp the environmental factors that make a root cellar effective for different types of produce.
- Temperature: Most root crops and fruits store best between 32-40°F (0-4°C). This cool temperature slows down the respiration rate of produce, delaying spoilage.
- Humidity: High humidity, typically 85-95%, prevents produce from dehydrating and shriveling. Root vegetables like carrots, beets, and potatoes thrive in moist air.
- Ventilation: Proper airflow is crucial to prevent the buildup of ethylene gas (emitted by some fruits and vegetables, which can accelerate ripening and spoilage) and to introduce fresh, cool air while expelling stale, warmer air.
- Darkness: Light exposure, especially to potatoes, can cause them to turn green and produce solanine, a toxic compound. Darkness also inhibits sprouting.

The Best DIY Method: The Buried Container Root Cellar
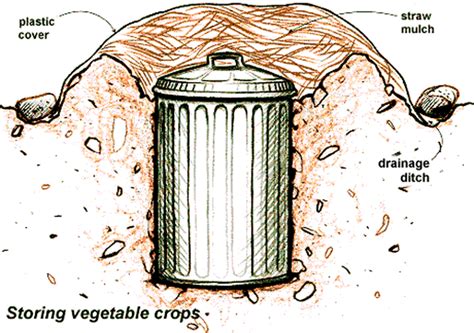
While elaborate underground structures exist, one of the most accessible, cost-effective, and highly effective DIY methods for most home gardeners is the buried container root cellar. This method often utilizes a large, food-grade plastic barrel, galvanized trash can, or even a repurposed chest freezer (without power) buried in the ground. Its simplicity and ability to provide a consistent environment make it an excellent choice.
This method leverages the earth’s natural insulating properties to maintain stable temperatures and humidity. By burying a container, you shield your produce from extreme temperature fluctuations and create a naturally humid environment, ideal for a wide range of root vegetables, apples, and cabbages.
Step-by-Step Construction of a Buried Container Cellar
- Choose Your Site: Select a well-drained, shaded area, ideally on the north side of a building or under dense trees, to minimize sun exposure. Avoid areas prone to standing water.
- Dig the Hole: Excavate a hole slightly larger and deeper than your chosen container. The depth should allow the container’s opening to be flush with or slightly above ground level after adding a drainage layer.
- Prepare the Container: For a plastic barrel or trash can, drill several small drainage holes in the bottom. For ventilation, install two PVC pipes (about 2-3 inches in diameter) — one extending from near the bottom of the container to above ground, and the other from near the top to above ground. These act as intake and exhaust vents. Cover the top of the pipes with mesh to keep pests out.
- Install Drainage and Base: Lay 4-6 inches of gravel at the bottom of the hole for drainage. Place your prepared container on this gravel bed.
- Backfill and Insulate: Backfill around the container with soil, compacting it firmly. For added insulation, especially in very cold climates, consider surrounding the container with a layer of straw, sand, or even rigid foam insulation before backfilling with soil.
- Create a Lid: Fashion a secure, insulated lid for the container’s opening. This could be a wooden lid packed with straw, a thick piece of rigid insulation, or even a repurposed patio stone. Ensure it seals well to maintain conditions and keep pests out. Add a small mound of soil over the lid for extra insulation and camouflage.

Maximizing Your Harvest Storage
Once your root cellar is built, proper preparation of your harvest is key to long-term success. Root vegetables like potatoes, carrots, beets, and parsnips should be cured (if necessary) and stored unwashed with some soil still clinging to them. Store them in bins, crates, or breathable bags (like burlap sacks) to allow air circulation and prevent moisture buildup.
Apples and pears can be stored, but keep them separate from root vegetables, as they release ethylene gas which can cause other produce to ripen and spoil faster. Check your root cellar regularly, perhaps once a week, to monitor conditions and remove any produce showing signs of spoilage, as one bad apple truly can spoil the bunch. With a little planning and maintenance, your DIY root cellar will provide a steady supply of fresh garden goodness all winter long.