Best homemade compost recipe for nutrient-rich country garden soil?

A country garden, with its expansive beds and diverse planting needs, thrives on rich, living soil. While commercial fertilizers offer a quick fix, nothing beats the sustained fertility and soil health provided by homemade compost. It’s an ecological powerhouse, transforming organic waste into ‘black gold’ that nurtures your plants, improves soil structure, and reduces the need for chemical inputs. Let’s dive into crafting the perfect compost for your expansive country landscape.
The Magic of Composting for Country Soil
Compost isn’t just about adding nutrients; it’s about rebuilding the very foundation of your soil. For country gardens, often facing depleted or overly compacted soils, compost introduces vital microorganisms, improves drainage in heavy clays, enhances water retention in sandy soils, and provides a slow-release buffet of essential nutrients. This holistic approach leads to healthier plants, better yields, and a more resilient garden ecosystem.
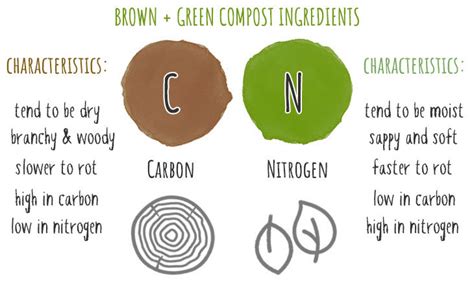
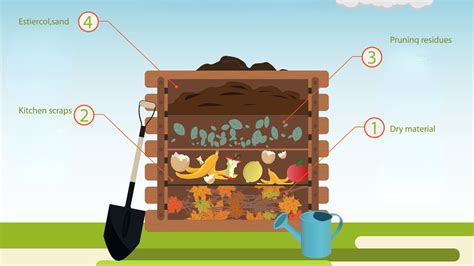
Understanding Your Composting Ingredients: Browns & Greens
The secret to great compost lies in balancing ‘brown’ (carbon-rich) and ‘green’ (nitrogen-rich) materials. Think of carbon as the fuel and nitrogen as the engine that drives the decomposition process.
- Brown Materials (Carbon-rich): These provide structure and energy for the microbes. Examples include dried leaves, straw, wood chips, shredded newspaper/cardboard, sawdust, and dry grass clippings. They tend to be drier and decompose slower.
- Green Materials (Nitrogen-rich): These heat up the pile and provide the nitrogen microbes need to multiply. Examples include fresh grass clippings, fruit and vegetable scraps, coffee grounds, tea bags, and fresh plant trimmings. They are often moist and decompose quickly.
A good variety of both ensures a well-rounded nutrient profile in your finished compost.
The Ideal Homemade Compost Recipe: The Perfect Ratio
For a hot, fast-decomposing pile that delivers nutrient-rich compost, aiming for a 3:1 ratio of browns to greens by volume is generally recommended. Don’t worry about being overly precise; it’s more of an art than a strict science.
Step-by-Step Composting Process for Country Gardens
-
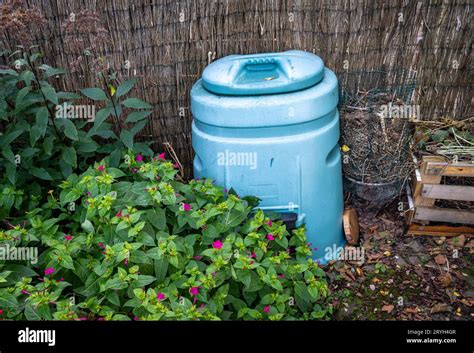
Choose Your Location and Bin:
Select a shaded or semi-shaded spot, well-drained, and convenient to your garden and kitchen. For a country garden, a larger bin or multiple bins are often practical. Options range from simple wire mesh cylinders to elaborate multi-chambered wood pallets.
-
Start with a Base Layer:
Begin with a 4-6 inch layer of coarse brown material (twigs, straw) at the bottom for good air circulation and drainage.
-
Layering Your Ingredients:
Alternate layers of browns and greens. A good pattern might be: 6-8 inches of browns, followed by 2-4 inches of greens. Sprinkle a thin layer of healthy garden soil or finished compost between green layers to introduce beneficial microbes and accelerate decomposition.
-
Moisture is Key:
Each layer, especially the browns, should be moistened thoroughly as you build the pile. The overall moisture level should feel like a wrung-out sponge – damp, but not soggy. Too dry, and decomposition slows; too wet, and it becomes anaerobic and smelly.
-
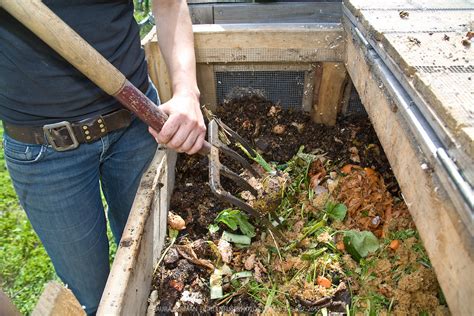
Aeration (Turning):
Oxygen is crucial for the beneficial aerobic bacteria. Turn your pile every week or two, especially if it’s heating up (you’ll feel the warmth). Turning redistributes moisture, introduces oxygen, and mixes materials for even decomposition. For large country garden piles, a compost aerator tool or pitchfork is essential.
-
Patience:
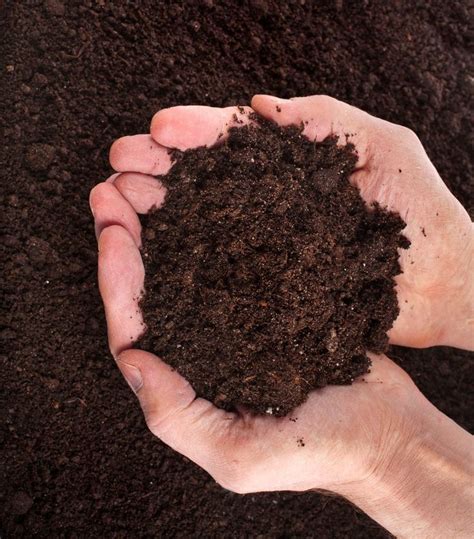
Depending on the materials, ratio, and turning frequency, your compost could be ready in 2-3 months for a hot pile or 6-12 months for a slower, cooler process. Finished compost will be dark brown, crumbly, and have an earthy smell.
Tips for Composting Success in Your Country Garden
- Size Matters: Chop or shred larger materials into smaller pieces (1-2 inches) to speed up decomposition.
- Avoid Problematic Items: Do NOT add meat, dairy, oily foods, pet waste, diseased plants, or invasive weeds, as these can attract pests, create odors, or spread pathogens.
- Keep it Covered: A tarp or lid can help retain moisture, prevent excess rain from waterlogging the pile, and deter pests.
- Monitor Temperature: A compost thermometer can help you monitor the heat, indicating active decomposition. Ideal hot composting temperatures are between 130-160°F (55-70°C).
- Continuous vs. Batch: For country gardens, a continuous system (adding scraps as they arise) is often practical, though batch composting (building a pile all at once) can yield faster results. Consider having both.
Harvesting and Using Your Nutrient-Rich Compost
Once your compost is ready, it should look and smell like rich forest earth. Sieve it if you desire a finer texture for seed starting, or use it as is for amending garden beds. Apply a 1-3 inch layer directly to your garden beds and gently work it into the topsoil. Use it as a top dressing around trees and shrubs, or as a component in potting mixes. Your country garden will thank you with vibrant growth and abundant harvests.
Embracing homemade compost is one of the most impactful steps you can take for the long-term health and productivity of your country garden. It’s a sustainable practice that enriches your soil, reduces waste, and connects you more deeply with the natural cycles of your land. Start your compost pile today and watch your garden flourish with nature’s best fertilizer!