DIY low-cost, effective root cellar ventilation?

The Essential Role of Root Cellar Ventilation
A root cellar is a fantastic way to store your harvest, extending the life of fruits and vegetables without refrigeration. However, for a root cellar to truly shine, proper ventilation is non-negotiable. Stagnant air leads to a host of problems: moisture buildup, mold growth, premature spoilage, and an accumulation of ethylene gas, which accelerates ripening and decay. An effective ventilation system ensures a continuous exchange of air, helping to regulate temperature and humidity, and flushing out gases that degrade your stored bounty.

Understanding Passive Ventilation Principles
The most low-cost and effective ventilation systems for root cellars rely on passive, natural airflow, leveraging basic physics. This involves creating a system with an inlet vent and an outlet vent. Cool, fresh air, which is denser, enters through a low-placed inlet vent. As this air warms slightly within the cellar and picks up moisture and stale gases, it becomes less dense and rises, exiting through a higher-placed outlet vent. This continuous convection current naturally circulates air without the need for electricity, making it ideal for off-grid or budget-conscious projects.
Building Low-Cost DIY Inlet Vent Solutions
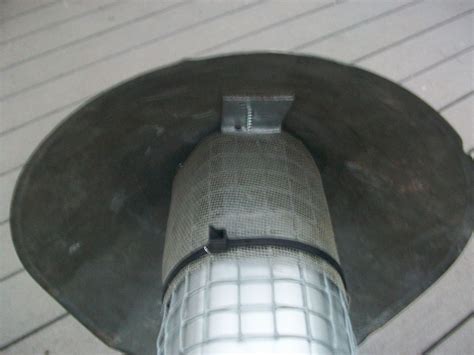
Your inlet vent should be positioned near the floor of your root cellar, ideally on the north side of the structure to draw in the coolest available air. Simple materials like PVC pipe (4-inch diameter or larger is common), corrugated drain pipe, or even a section of metal culvert can be used. Ensure the external opening is covered with a fine mesh screen to prevent pests, rodents, and insects from entering. For severe cold climates, consider adding a simple flap or damper system to partially or fully close the vent during extreme freezes, protecting your produce.
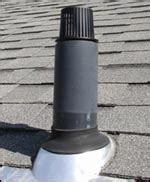
Crafting Effective DIY Outlet Vent Solutions
The outlet vent is crucial for drawing out stale air and facilitating the convection current. It should be positioned high up in the cellar, ideally extending above the roofline if the cellar is fully buried, or simply high on a wall if it’s partially above ground. Using a larger diameter pipe for the outlet (e.g., 6-inch PVC or metal ducting) will enhance airflow. The taller the outlet pipe extends above the cellar, the greater the ‘stack effect’ will be, creating a stronger draw. Top the outlet pipe with a rain cap or a simple homemade baffle to prevent precipitation from entering, while still allowing air to escape freely.
Enhancing Airflow and Monitoring Your System
While passive systems are effective, you can enhance their performance with a few simple, low-cost additions. Consider installing a small, battery-operated computer fan or a solar-powered vent fan in the outlet pipe for intermittent boosting of airflow, especially on still days or when humidity is stubbornly high. This doesn’t negate the passive system but can give it an extra push when needed. Crucially, invest in an inexpensive thermometer/hygrometer to monitor your cellar’s conditions. This allows you to make informed decisions about opening or closing vents, ensuring optimal temperature (typically 35-50°F or 2-10°C) and humidity (85-95%) for your stored produce. Regularly clean screens and check pipes for blockages like spiderwebs or debris to maintain efficiency.