


DIY root cellar for storing garden produce without refrigeration?
In an age of increasing environmental consciousness and a desire for self-sufficiency, rediscovering traditional methods of food preservation is gaining popularity. A root cellar, a time-honored solution, offers an ingenious way to store your garden’s bounty through the winter months without consuming a watt of electricity. It leverages natural earth temperatures and humidity to create ideal conditions for many fruits and vegetables, extending their freshness and reducing waste. Let’s explore how you can build your own.
Why Build a Root Cellar?
The primary advantage of a root cellar is its ability to provide a cool, dark, and humid environment – conditions that are perfect for preserving root vegetables, hardy fruits, and certain leafy greens. Unlike a refrigerator, which is often too cold and dry for many items, a root cellar mimics the stable environment of underground storage. This method not only saves on energy bills but also reduces your reliance on a fragile power grid, offering a truly resilient food storage solution. It’s an excellent way to enjoy your harvest long after the growing season has ended.
Understanding Root Cellar Principles
A successful root cellar operates on a few key environmental principles:
- Temperature: Ideally between 35-50°F (2-10°C) – cold enough to slow spoilage, but not freezing.
- Humidity: High humidity (around 85-95%) prevents produce from drying out and shriveling.
- Darkness: Light can encourage sprouting and reduce nutrient content, so a dark environment is crucial.
- Ventilation: Controlled airflow prevents the buildup of ethylene gas (emitted by ripening produce) and stale air, which can accelerate spoilage.
Choosing Your DIY Root Cellar Type
The best type of root cellar for you will depend on your climate, space, and budget. Common DIY options include:
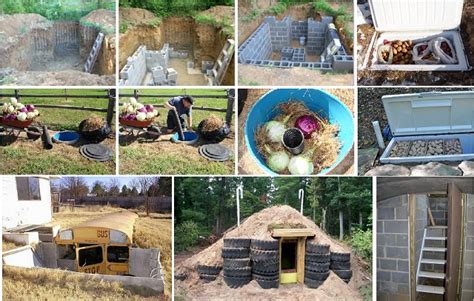
- Buried Root Cellar: The classic choice, completely or partially buried in the earth for optimal temperature stability. This can range from a simple trash can buried in the ground to a more elaborate dug-out structure with a door.
- Basement Root Cellar: If you have an unheated basement, a corner can be sectioned off and insulated to create a root cellar space. It’s generally easier to build and provides good temperature regulation.
- Earth Mound/Clamped Cellar: A temporary or semi-permanent outdoor pile of produce covered with straw and soil. Simple and effective for short-term storage.
- Insulated Bin: A smaller-scale option, like a double-walled wooden box insulated with straw or sawdust, suitable for a porch, shed, or garage in colder climates.

Step-by-Step DIY Construction Guide (Buried Option)
1. Site Selection:
Choose a shady, well-drained spot away from large tree roots. Consider proximity to your home for convenience, but ensure it’s not in an area prone to flooding.
2. Digging the Pit:
Excavate a hole to your desired dimensions. A common size for a small family might be 4×6 feet and 6-8 feet deep. Slope the floor slightly towards a French drain if water accumulation is a concern. The deeper you go, the more stable the temperature.
3. Foundation and Walls:
Pour a concrete slab for the floor, or lay gravel for drainage. For walls, consider cinder blocks, treated lumber, or natural stone. Ensure adequate insulation on the exterior walls (e.g., rigid foam insulation) before backfilling.
4. Ceiling and Roof:
A sturdy ceiling is crucial. Treated lumber joists can support a concrete slab, plywood, or even a living roof. For insulation, consider adding a thick layer of straw, sawdust, or rigid foam. Cover with a waterproof membrane and then soil to help regulate temperature.
5. Door and Ventilation:
Install a well-sealed, insulated door. For ventilation, you’ll need two vents: an intake vent near the floor (bringing in cool, fresh air) and an exhaust vent near the ceiling (releasing warmer, stale air). These should be screened to prevent pests and can be equipped with baffles to control airflow.
6. Shelving and Storage:
Inside, build sturdy, slatted shelves for airflow. Use plastic bins, wooden crates, or burlap sacks for storing different types of produce. Keep items that need higher humidity (like carrots) separate from those needing less (like onions).
Maintenance and Best Practices
- Monitoring: Regularly check temperature and humidity with a thermometer/hygrometer. Adjust ventilation as needed.
- Inspection: Inspect produce periodically and remove any items showing signs of spoilage to prevent it from spreading.
- Cleaning: Clean your root cellar annually, preferably before new produce arrives, to prevent disease and pest issues.
- Grouping: Store produce with similar temperature and humidity requirements together. Keep ethylene-producing fruits (like apples) away from other sensitive vegetables.
Building a DIY root cellar is a rewarding project that reconnects you with sustainable living practices. With careful planning and construction, you can enjoy the bounty of your garden for months, long after the first frost.


