DIY root cellar tips: How to achieve optimal humidity for year-round food storage?
The Importance of Humidity in Your Root Cellar
A well-designed root cellar is a marvel of passive preservation, allowing you to store a bounty of vegetables and fruits for months without refrigeration. However, temperature alone isn’t enough; humidity plays an equally vital role in preventing spoilage, shriveling, and loss of nutrients. The right moisture level keeps produce firm, juicy, and flavorful, extending its shelf life significantly.
Different types of produce require specific humidity ranges to thrive in storage. For instance, root vegetables like carrots, potatoes, and beets demand high humidity to prevent them from drying out and becoming rubbery, while items like onions and squash prefer a slightly drier environment to avoid rot.
Understanding Optimal Humidity Levels for Various Produce
Before you implement humidity controls, it’s essential to know what your stored goods need:
- High Humidity (90-95%): Ideal for most root vegetables (carrots, beets, parsnips, turnips), leafy greens (cabbage), and crisp fruits (apples, pears). This prevents moisture loss from their skins.
- Moderate Humidity (60-70%): Suitable for potatoes, sweet potatoes, and some fruits that need airflow to prevent mold, though often potatoes are stored slightly higher.
- Low Humidity (50-60%): Best for onions, garlic, squash, and pumpkins, which require a drier environment to cure properly and avoid fungal issues.
For most general root cellaring, aiming for 85-95% humidity is a good starting point, especially if you’re primarily storing root crops. You can then create microclimates within the cellar for items needing less moisture.
Strategies for Increasing Humidity in Your DIY Root Cellar
If your root cellar consistently runs too dry, there are several effective DIY methods to boost humidity:
- Wet Sand or Sawdust Bins: Store root vegetables packed in damp sand, sawdust, or peat moss. This directly encases them in a humid environment and provides insulation. Periodically re-wet the packing material.
- Water Barrels or Buckets: Placing open containers of water in the cellar allows for slow, continuous evaporation, increasing ambient humidity. The larger the surface area of the water, the more effective it will be.
- Misting: For quick boosts, a light misting of the cellar floor or even the produce (if appropriate) can temporarily raise humidity. Be careful not to over-saturate, which can lead to mold.
- Earthen Floors: If your root cellar has an earthen floor, keeping it slightly damp (not muddy) can contribute significantly to ambient humidity through natural evaporation.

Methods for Reducing and Regulating Humidity
Sometimes, a root cellar can become too damp, leading to mold and rot. Here’s how to reduce excess moisture:
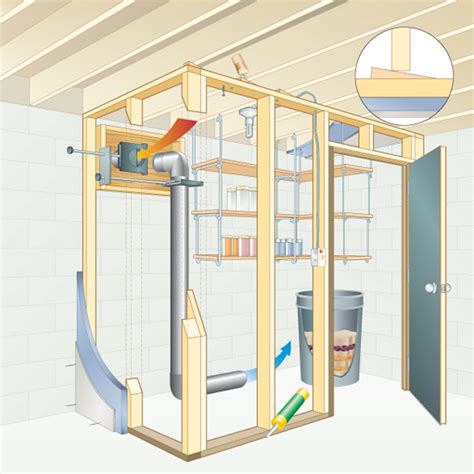
- Ventilation: This is your primary tool. Install intake and exhaust vents (often at different heights to encourage a natural draft). Opening them periodically, especially on cooler, drier days, allows humid air to escape and fresh, drier air to enter.
- Proper Drainage: Ensure your root cellar has adequate drainage to prevent standing water, which contributes heavily to humidity. A gravel base or French drain can be beneficial for below-ground structures.
- Avoid Overcrowding: Good airflow around stored produce is essential. Overcrowding can trap moisture and lead to localized high humidity and spoilage. Use shelves or bins that allow air circulation.
- Absorbents (Limited Use): For temporary or minor issues, desiccant materials like calcium chloride (often found in commercial dehumidifiers) can absorb moisture. However, these are typically for small, enclosed spaces and require frequent replacement.

Monitoring and Maintaining Humidity Levels
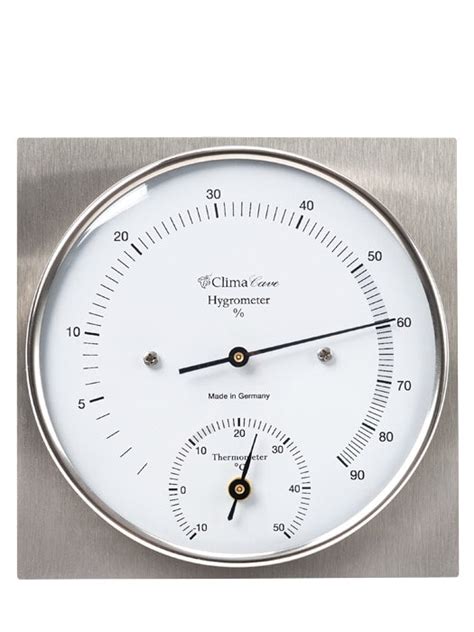
The key to success is constant monitoring. A good quality hygrometer (a device that measures humidity) is an indispensable tool for any root cellar owner. Place it in a central location and check it regularly.
Based on your readings, you can make adjustments:
- Too Low: Add more water sources, re-dampen packing materials, or temporarily close vents slightly.
- Too High: Increase ventilation, remove some water sources, or open vents wider to encourage air exchange.
Regular inspection of your produce is also critical. If you see signs of shriveling (too dry) or mold/rot (too wet), it’s a clear indication that adjustments are needed.
Conclusion
Achieving optimal humidity in your DIY root cellar is a dynamic process that requires understanding, monitoring, and ongoing adjustment. By employing a combination of humidifying and dehumidifying techniques, and consistently tracking your cellar’s conditions, you can create the perfect environment for preserving your harvest. This attention to detail will transform your root cellar into a highly effective, year-round food storage solution, bringing the satisfaction of homegrown bounty to your table long after the growing season ends.