


Easiest DIY way to build raised garden beds from reclaimed materials?
Unearthing the Simplicity of Reclaimed Raised Beds
Transforming discarded materials into a thriving garden space is not only eco-friendly but also incredibly rewarding and surprisingly easy. Raised garden beds offer numerous benefits, from better soil control and drainage to reduced back strain and pest deterrence. When you combine these advantages with the cost-saving and sustainable nature of reclaimed materials, you get a DIY project that’s a win-win for your wallet and the planet.
Why Go Raised and Reclaimed?
Raised beds provide an ideal growing environment. They allow you to create custom soil mixes, warm up faster in spring, and offer excellent drainage, preventing waterlogging. They also make gardening more accessible by reducing bending and kneeling. Opting for reclaimed materials amplifies these benefits by cutting down on expenses and reducing waste. Think beyond just “trash” – many items can be given a second life as a sturdy and attractive planter.

Choosing Your Reclaimed Treasures Wisely
The key to an easy build lies in selecting the right materials. Look for items that are durable, non-toxic, and relatively easy to work with. Popular choices include:
- Wooden Pallets: Often free, readily available, and can be disassembled into usable lumber. Ensure they are heat-treated (marked ‘HT’) rather than chemically treated (‘MB’ for Methyl Bromide).
- Scrap Lumber: Offcuts from construction sites, old fencing, or decking boards can be repurposed. Again, avoid pressure-treated wood if it’s for edible plants.
- Concrete Blocks or Cinder Blocks: Stackable and extremely durable, though they can make the bed heavier.
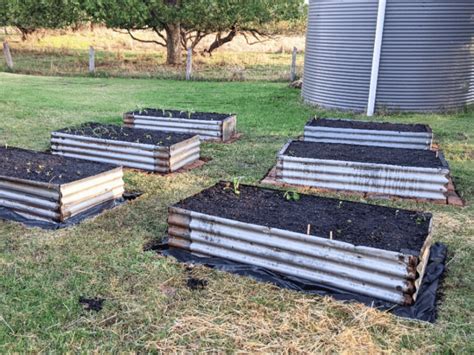
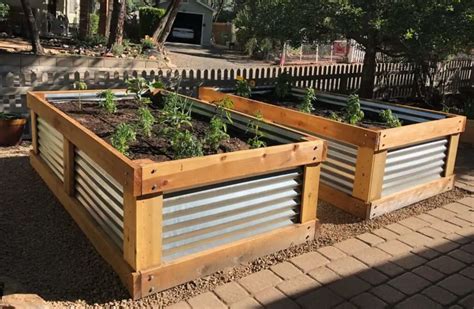
- Corrugated Metal Roofing/Siding: If available, it can form sturdy sides, but ensure edges are protected for safety.
- Large Rocks or Bricks: For a more rustic, stacked look, though construction might be more involved than simple stacking.
Avoid any materials that have been treated with harmful chemicals, especially if you plan to grow edibles. Safety and non-toxicity are paramount.

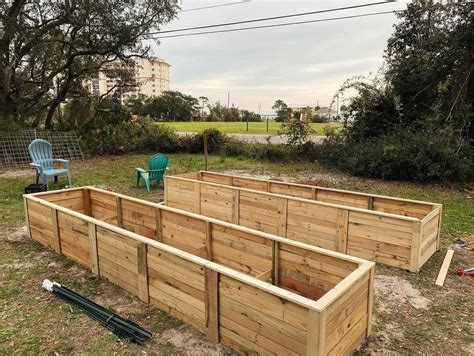
The Easiest Method: Pallets or Simple Lumber Frames
For sheer simplicity and low cost, constructing a raised bed from disassembled pallets or basic lumber scraps is hard to beat. This method typically requires minimal tools and woodworking skills.
Step 1: Planning Your Plot
Decide on the dimensions of your bed. A common and manageable size is 4×8 feet or 3×6 feet, allowing you to reach the center from either side. Choose a sunny, level spot in your garden. For most vegetables, 10-12 inches depth is sufficient, but 18-24 inches is ideal for root crops or to reduce weeding.
Step 2: Gathering and Preparing Materials
If using pallets, carefully disassemble them using a pry bar and hammer to separate the planks. Remove any protruding nails. Sort your lumber by length and condition. You’ll need four longer pieces for the sides and ends, and potentially corner posts or additional support pieces.
Step 3: Simple Assembly
The easiest construction involves creating a simple box frame. Lay out your four main boards for the perimeter. You can join them in a few straightforward ways:
- Overlap and Screw: Simply overlap the end boards over the side boards and secure with screws, creating a strong corner. Repeat for all four corners.
- Internal Corner Posts: Cut four short sections of lumber (e.g., 2×2 or 4×4 scraps) to act as internal corner braces. Position them flush with the ends of your side boards and screw the side and end boards into these posts.
- Metal Corner Brackets: For an even faster assembly, use readily available L-shaped metal brackets to join the corners.
For beds taller than one board height, simply stack additional boards on top and secure them to the layer below or to the corner posts.
Step 4: Lining (Optional but Recommended)
If your reclaimed wood is rough, or you want to prevent soil from washing out of small gaps, consider lining the inside of the bed. Cardboard (remove all tape and labels) or newspaper layers at the bottom can suppress weeds. Heavy-duty landscape fabric or even old blankets can be stapled to the inside walls to hold soil in while allowing drainage. Avoid plastic sheeting, as it can hinder drainage.
Step 5: Filling Your Bed
This is where your garden truly begins! Start with a layer of coarser organic materials at the bottom for drainage and to reduce the amount of expensive soil needed (e.g., small branches, wood chips, leaves). Top this with a high-quality mix of topsoil, compost, and other amendments tailored to what you plan to grow. Fill it almost to the top, leaving a few inches for mulch.
Other Easy Reclaimed Options
Stacking Concrete Blocks: Simply lay a perimeter of blocks on level ground, staggering layers like bricks for stability. No fasteners needed! They provide excellent thermal mass. Ensure they are standard, untreated concrete blocks.
Rock Walls: If you have an abundance of stones, you can dry stack them to form a raised bed. This requires a bit more artistic eye but can be incredibly beautiful and durable.
Maintaining Your Eco-Friendly Oasis
Once built, your reclaimed raised bed will be a beacon of sustainable gardening. Remember to keep the soil well-nourished with compost, mulch to retain moisture and suppress weeds, and enjoy the fruits (and vegetables!) of your labor. The beauty of reclaimed materials is not just in their cost-effectiveness, but in the unique character and story each piece brings to your garden.

