


Easy DIY raised garden bed plans for beginner vegetable growers?

Cultivate Your Green Thumb: Easy DIY Raised Beds for Beginners
Starting a vegetable garden can seem daunting, but with a raised garden bed, you can simplify the process and enjoy a bountiful harvest even as a complete novice. Raised beds offer numerous advantages, making them the perfect entry point into the rewarding world of home gardening. Forget about back-breaking tilling or constantly battling weeds; we’ll guide you through straightforward, budget-friendly DIY plans that will have you growing fresh produce in no time.
Why Raised Beds Are Perfect for Beginners
Raised garden beds provide an optimal environment for plants and a much easier experience for gardeners. Here’s why they’re a game-changer:
- Better Soil Control: You get to choose and create the perfect soil mix, free from compaction and poor drainage often found in native garden soil. This means healthier roots and happier plants.
- Improved Drainage: Elevated beds inherently drain better, preventing waterlogged roots and common plant diseases.
- Fewer Weeds & Pests: The contained environment makes it easier to keep weeds at bay, and some pests find it harder to access elevated plants.
- Extended Growing Season: Raised beds warm up faster in spring and retain heat longer in fall, allowing you to start planting earlier and harvest later.
- Ergonomic Benefits: No more bending and kneeling for hours! Raised beds reduce strain on your back and knees, making gardening more enjoyable and accessible.

Simple DIY Raised Bed Plans: Choosing Your Design
The beauty of DIY raised beds is their versatility. You don’t need advanced carpentry skills to build a functional and attractive bed. Here are a few beginner-friendly options:
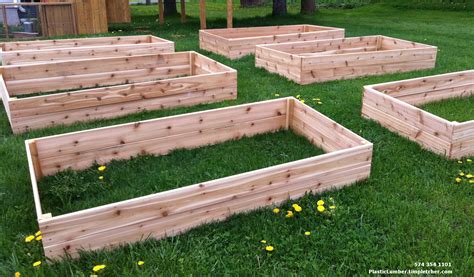
1. The Classic Lumber Frame
This is the most common and arguably the most versatile design. Using untreated lumber (like cedar, redwood, or fir for longevity; pine if on a tight budget), you can create simple rectangular frames. Untreated wood is essential for vegetable gardens to avoid chemical leaching into your soil.
2. Cinder Block Beds
For a no-tools-required option, cinder blocks are fantastic. Simply stack them to your desired height, creating a sturdy and instant raised bed. The holes in the blocks can even be filled with soil and planted with herbs or flowers, adding an extra dimension to your garden.
3. Repurposed Material Beds
Think outside the box! Old railway sleepers (ensure they are creosote-free if used for edibles), galvanized metal troughs, or even sturdy pallets (check for heat treatment, not chemical treatment) can be transformed into unique raised beds. Always research the material to ensure it’s safe for growing food.

Step-by-Step: Building a Basic Wooden Raised Bed
Let’s focus on building a simple 4×8 foot (or 4×4 foot for smaller spaces) raised bed using lumber, a popular choice for beginners.
Materials You’ll Need:
- Four 8-foot long 2×6 or 2×8 untreated lumber boards (for a 4×8 bed) OR four 4-foot long 2×6 or 2×8 boards (for a 4×4 bed). Choose a wider board (2×8, 2×10, or 2×12) for a deeper bed.
- Four 2×2 or 4×4 posts, about 12-18 inches long (for corner braces).
- 3-inch exterior wood screws.
- Measuring tape, pencil, drill, saw (or have wood cut at the store).
- Optional: Landscape fabric or hardware cloth for the bottom, weed barrier for under the bed.

Construction Steps:
- Choose Your Location: Select a sunny spot that receives at least 6-8 hours of direct sunlight daily. Ensure it’s level, or be prepared to level it before placing the bed.
- Cut Your Lumber (if necessary): For a 4×8 bed, you’ll need two 8-foot boards and two 4-foot boards. If you bought four 8-foot boards, cut two of them in half to create your four 4-foot sides.
- Assemble the First Frame: Lay two long boards and two short boards on a flat surface to form a rectangle. Place a corner brace (2×2 or 4×4 post) flush inside each corner.
- Secure the Corners: Drill pilot holes and then screw the lumber boards into the corner braces. Use at least two screws per board end into the brace. Ensure the frame is square by measuring the diagonals; they should be equal.
- Add Second Layer (Optional, for deeper beds): If you want a deeper bed, repeat step 3 and 4 to create a second identical frame. Stack it directly on top of the first frame and secure the layers together with additional screws through the sides and into the corner braces.
- Prepare the Ground: Once your frame is assembled, place it in its final location. If weeds are a concern, lay down cardboard or landscape fabric on the ground inside the bed area. This helps suppress weeds while allowing drainage.
Filling and Planting Your Raised Bed
The right soil mix is crucial for a successful raised bed. Don’t just use garden soil from your yard; it’s often too dense and may carry weed seeds.
1. Layering for Success (Hugelkultur-lite):
- Bottom Layer (Optional but Recommended): Place a layer of cardboard, old untreated logs, twigs, or wood chips at the very bottom. This provides excellent drainage, organic matter, and reduces the amount of expensive soil needed.
- Middle Layer: Add a mix of compost, aged manure, and some shredded leaves or straw.
- Top Layer: Fill the remaining space (at least 6-12 inches deep) with a high-quality raised bed mix. This typically consists of compost, topsoil, and perlite or vermiculite for drainage and aeration. You can buy pre-mixed bags or create your own blend (e.g., 60% compost, 30% topsoil, 10% perlite).
2. Choosing Your Vegetables:
For beginners, start with easy-to-grow vegetables that thrive in raised beds. Consider:
- Leafy Greens: Lettuce, spinach, kale, Swiss chard
- Root Vegetables: Radishes, carrots (choose shorter varieties for shallower beds)
- Bush Beans
- Cherry Tomatoes (determinate varieties work well)
- Zucchini (can take up a lot of space, so plant strategically or choose bush varieties)
- Herbs: Basil, mint, parsley, cilantro
Remember to space your plants according to seed packet instructions, but raised beds often allow for slightly closer planting due to superior soil quality and targeted watering.
Ongoing Care for Your Raised Bed
Once planted, your raised bed will require consistent care:
- Watering: Raised beds dry out faster than in-ground gardens. Check soil moisture daily, especially during hot, dry spells, and water deeply when the top inch or two feels dry.
- Fertilizing: While your initial soil mix will be nutrient-rich, heavy feeders may benefit from a balanced organic fertilizer every 4-6 weeks, or a top-dressing of compost mid-season.
- Weeding: Weeds will still appear, but they’re much easier to pull from the loose soil of a raised bed. Nip them in the bud when they’re small.
- Mulching: Apply a layer of organic mulch (straw, wood chips, shredded leaves) around your plants. This helps retain moisture, suppress weeds, and regulate soil temperature.

Start Your Gardening Journey Today!
Building a raised garden bed is a fantastic project for beginner vegetable growers. It’s manageable, rewarding, and sets you up for gardening success. With these easy plans and tips, you’re well on your way to enjoying fresh, homegrown produce right from your backyard. Happy gardening!


