


Easy heirloom seed saving tips for beginners?

Embarking on the journey of saving your own heirloom seeds is a rewarding step towards self-sufficiency and preserving plant diversity. For beginners, it might seem daunting, but with a few easy-to-follow tips, you’ll be building your seed bank in no time. Heirloom varieties are open-pollinated, meaning they produce seeds that will grow true to type, making them perfect candidates for saving and sharing.
Why Save Heirloom Seeds?
Beyond the joy of growing unique and flavorful plants, saving heirloom seeds connects you to gardening traditions and contributes to biodiversity. You’ll cultivate varieties adapted to your local climate, save money, and have a continuous supply of your favorite vegetables, fruits, and flowers. It’s a fundamental practice for any sustainable garden.

Choose Your Plants Wisely
The first rule for successful seed saving is to start with healthy, vigorous plants that exhibit the traits you want to reproduce. Avoid saving seeds from diseased or weak plants, as these traits can be passed on. For beginners, focus on “easy” seeds like beans, peas, lettuce, tomatoes, and peppers, which are generally self-pollinating and less prone to cross-pollination with other varieties.
Ensure your chosen plants are truly heirloom or open-pollinated. Hybrid (F1) seeds, while common, will not grow true to type in the next generation and are not suitable for seed saving if you want consistent results.
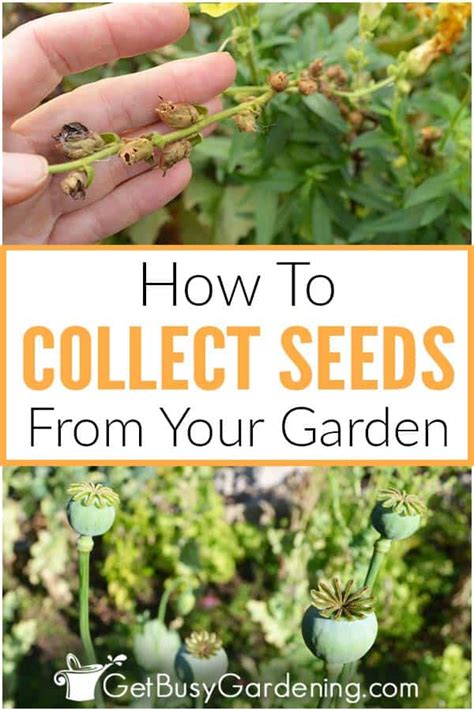
Harvesting Dry Seeds
Many common garden plants produce “dry” seeds, meaning the seeds are ready to be harvested once the pod or fruit has dried on the plant. This category includes beans, peas, corn, lettuce, calendula, and many herbs. Wait until the pods are completely brown and brittle, or the seed heads are fully mature and dry. Gently collect them, ensuring no moisture remains. For beans and peas, you can shell them by hand once dried.
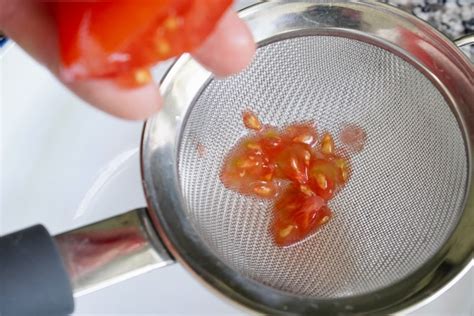
Harvesting Wet Seeds
Plants like tomatoes, cucumbers, melons, and squash produce seeds encased in a fleshy fruit. These “wet” seeds require a slightly different process. For tomatoes, a fermentation method is often recommended. Scoop out the seeds and their surrounding pulp into a jar with a little water. Let it sit for a few days, stirring daily, until a moldy film forms on top. This process breaks down germination inhibitors and kills seed-borne diseases. Once the good seeds sink to the bottom, rinse them thoroughly and proceed to drying.
For cucumbers, squash, and melons, simply scoop out the seeds, separate them from any pulp, and rinse them clean under running water.
Cleaning and Drying Your Seeds
This is a critical step for preventing mold and ensuring long-term viability. Spread your cleaned seeds in a single layer on a non-stick surface, such as a ceramic plate, coffee filter, or fine mesh screen. Avoid paper towels, as seeds can stick to them. Place them in a warm, dry, well-ventilated area, out of direct sunlight. Stir them occasionally to ensure even drying. Depending on the humidity and seed type, this can take anywhere from a few days to a couple of weeks. Seeds should be completely brittle and snap, not bend, when dry.

Proper Storage and Labeling
Once completely dry, store your seeds in airtight containers. Small paper envelopes, glass jars, or plastic baggies work well. The key is to protect them from moisture, light, and fluctuating temperatures. A cool, dark, and dry place is ideal – a closet shelf, a sealed container in the refrigerator, or even a freezer for very long-term storage (after ensuring they are bone dry). Always include a small desiccant packet (like silica gel) if storing in airtight containers to absorb any residual moisture.
Crucial for Success: Labeling! Always label your containers clearly with the plant variety, the date the seeds were harvested, and the year. This prevents confusion and helps you track seed viability over time. Without proper labeling, your hard work can quickly become a mystery!
Start Small, Grow Confident
Don’t feel pressured to save every seed from every plant in your garden right away. Start with one or two easy varieties you love. As you gain experience and confidence, you can gradually expand your seed-saving efforts. Each successful harvest will empower you, deepening your connection to your garden and the broader cycle of nature. Happy seed saving!


