


How to build a frugal, sturdy raised garden bed for year-round harvests?
Imagine fresh produce from your own backyard, even through cooler months, without breaking the bank. A well-designed raised garden bed offers superior drainage, pest control, and ergonomic gardening. Building a frugal yet sturdy raised bed ensures not only a lasting structure but also a sustainable environment for year-round cultivation, making healthy eating accessible and enjoyable.
Why Choose a Frugal, Sturdy Raised Bed?
Raised garden beds provide numerous advantages over traditional in-ground gardens. They offer better control over soil quality, improved drainage, and often warmer soil temperatures, which can extend your growing season. For those seeking year-round harvests, a raised bed is an excellent foundation.
- Superior Soil & Drainage: You can fill your bed with a custom soil mix, ensuring optimal nutrients and drainage, which is crucial for healthy plant growth and preventing root rot.
- Extended Growing Season: Raised beds warm up faster in spring and can be easily adapted with season extenders like cold frames or row covers for fall and winter harvests.
- Pest & Weed Control: The elevated structure helps deter some ground-dwelling pests and makes weeding significantly easier.
- Ergonomic Gardening: Reduced bending and kneeling make gardening more accessible and enjoyable for everyone.
- Frugality & Durability: By selecting cost-effective yet resilient materials and building techniques, you create a garden that saves money on produce and lasts for years, reducing future replacement costs.
Planning Your Raised Bed Project
Careful planning is the first step toward a successful and enduring raised bed. Consider these factors:
- Location: Choose a spot that receives at least 6-8 hours of direct sunlight daily for most vegetables. Ensure easy access to water.
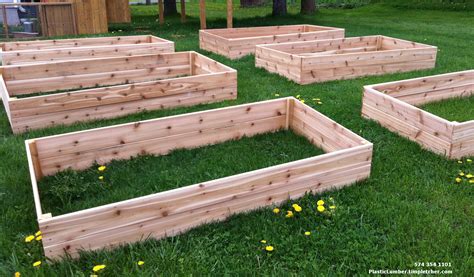
- Size and Shape: A width of no more than 4 feet allows you to reach the center from either side without stepping on the soil. Length can be flexible, and height typically ranges from 10 to 24 inches, depending on desired root depth and ergonomics.
- Material Selection: Prioritize materials that are durable, non-toxic, and affordable. Common choices include wood, metal, or concrete blocks.
- Drainage: While raised beds generally drain well, ensure your chosen site doesn’t have standing water. You might add a layer of gravel or hardware cloth at the bottom to deter burrowing pests.
Choosing Frugal & Sturdy Materials
The key to a frugal and sturdy bed lies in smart material choices that balance cost with longevity.
- Wood: Untreated cedar or redwood are naturally rot-resistant but can be expensive. A more frugal option is untreated pine or fir, especially if you line the interior with a durable pond liner or plastic sheeting to protect the wood from constant soil contact. Avoid pressure-treated lumber for edible gardens due to potential chemical leaching. Look for reclaimed wood if available, ensuring it’s free from hazardous treatments.
- Galvanized Metal: Corrugated galvanized steel sheets are incredibly durable, long-lasting, and can create a modern aesthetic. They are often more expensive than basic lumber but offer superior longevity. Secure them with sturdy corner posts (wood or metal).
- Concrete Blocks or Bricks: These offer exceptional durability and thermal mass, which can help regulate soil temperature. They are often available cheaply or even free from construction sites (always ask permission!). They are heavy to work with but require minimal maintenance.
- Recycled Plastic Lumber: While expensive upfront, recycled plastic lumber is virtually maintenance-free and lasts indefinitely. It’s an excellent long-term, sustainable choice if your budget allows.
Essential Tools You’ll Need
Gathering your tools before you start will make the construction process much smoother:
- Measuring tape and pencil
- Saw (circular, miter, or even a good hand saw)
- Drill with appropriate bits for pilot holes and driving screws
- Level (long level is best for ensuring straight sides)
- Carpenter’s square for precise corners
- Mallet or hammer
- Shovel and rake for site preparation and soil filling
- Staple gun (if using a liner)
- Safety glasses and gloves
Step-by-Step Construction Guide
Step 1: Prepare the Site
Clear the chosen area of any weeds, grass, and debris. Level the ground as much as possible. Lay down a weed barrier; layers of cardboard (remove tape and labels) are a frugal and effective option, as they suppress weeds and eventually break down, adding organic matter. You can also use landscape fabric.
Step 2: Cut Materials
Measure and cut your chosen lumber or metal sheets to the required lengths for the sides of your bed. If using wood, consider cutting additional pieces for corner bracing or internal supports, especially for longer beds, to prevent bowing.
Step 3: Assemble the Frame
Position your cut pieces to form the desired shape. For wood beds, pre-drill pilot holes to prevent splitting, then secure the corners using long, exterior-grade screws (e.g., deck screws) or bolts. For maximum sturdiness, use corner brackets or create a butt joint reinforced with an internal block of wood at each corner. If building a taller bed, stack layers, staggering the joints for enhanced stability.
Step 4: Add Internal Lining (Optional but Recommended)
To protect wooden sides from constant moisture and prolong their life, line the inside with a heavy-duty pond liner or thick plastic sheeting. Staple it securely to the top edge of the frame. Ensure good drainage by not extending the liner to the very bottom, or by piercing holes in the bottom of the liner itself.
Step 5: Fill with Soil
This is where frugality truly shines. Instead of buying expensive bagged soil for the entire bed, use the “Lasagna Method” or “Hugelkultur” principles. Start with a layer of coarse organic matter at the bottom (sticks, logs, straw). Follow with layers of leaves, grass clippings, shredded newspaper/cardboard, kitchen scraps, and finished compost. Top with a high-quality mix of topsoil and compost in the upper 6-12 inches, where your plants’ roots will primarily reside. This creates a rich, self-fertilizing environment.
Maximizing Your Harvest Year-Round
A sturdy raised bed is a platform for continuous production. Here’s how to get year-round harvests:
- Succession Planting: As soon as one crop is harvested, replant the space with another. For quick growers like lettuce or radishes, you can get multiple harvests in a single season.
- Season Extenders: Utilize low tunnels, cold frames, or cloches directly over your raised bed. These inexpensive additions protect plants from frost, extend the growing season into colder months, and allow you to grow cool-season crops like spinach, kale, and beets almost all winter in many climates.
- Crop Selection: Plan for variety. Plant cool-season crops (e.g., spinach, lettuce, carrots, brassicas) for fall and winter. Switch to warm-season crops (e.g., tomatoes, peppers, beans, squash) for spring and summer. Don’t forget perennial herbs and some berries that can provide harvests over many years.
- Companion Planting: Strategically plant compatible species together to deter pests, attract beneficial insects, and improve growth.

Maintenance for Longevity and Productivity
A little ongoing care will keep your frugal, sturdy raised bed productive for many seasons.
- Watering: Raised beds tend to dry out faster than in-ground gardens. Monitor soil moisture regularly and water deeply. Consider a drip irrigation system for efficiency.
- Soil Replenishment: Over time, soil levels will settle and nutrients will deplete. Annually top-dress your bed with a few inches of fresh compost or well-rotted manure to keep the soil rich and healthy.
- Pest and Disease Management: Regularly inspect your plants for signs of pests or diseases. Address issues promptly using organic methods where possible.
- Structural Checks: Periodically inspect the structure of your raised bed for any signs of wear, loose fasteners, or bowing. Make repairs as needed to ensure its long-term stability.
Building your own frugal and sturdy raised garden bed is a rewarding DIY project that pays dividends in fresh produce and gardening enjoyment. With careful planning, smart material choices, and consistent care, your raised bed will provide bountiful, year-round harvests for many seasons to come. Get started today and cultivate your sustainable dream garden!


