


How to build a simple, durable raised garden bed for heirloom tomatoes?
Why Choose a Raised Bed for Heirloom Tomatoes?
Heirloom tomatoes are renowned for their incredible flavor and diverse varieties, but they can be particular about their growing conditions. Building a raised garden bed offers an ideal environment, providing superior drainage, better control over soil composition, and protection from ground-dwelling pests. A well-constructed raised bed also warms up faster in spring, extending your growing season and making gardening more accessible and enjoyable.
The key to success with heirloom tomatoes lies in providing them with deep, rich, well-draining soil and consistent moisture. Raised beds excel at delivering these conditions, allowing you to create a custom soil blend tailored to their needs without battling compacted native soil or persistent weeds. Furthermore, the elevated structure means less bending and kneeling, making garden maintenance a breeze.

Planning Your Durable Raised Bed
Location and Size
Selecting the right spot is crucial. Heirloom tomatoes demand at least 6-8 hours of direct sunlight daily. Choose a level area with good sun exposure throughout the day. For size, a bed that’s 4 feet wide is ideal as it allows you to reach the center from either side without stepping on the soil, preventing compaction. The length can be anything you desire, typically 8 to 12 feet. For depth, aim for at least 12 inches, but 18-24 inches is even better to accommodate the deep root systems of tomatoes and other companion plants.
Material Selection for Durability
For a durable raised bed, untreated wood is a popular choice due to its natural look and ease of workability. Cedar, redwood, or juniper are naturally rot-resistant and chemical-free, making them excellent choices for edible gardens. While more expensive, they will last much longer than untreated pine. Alternatively, composite lumber (recycled plastic/wood fibers) offers exceptional longevity and requires no maintenance, though it can be pricier. Avoid pressure-treated lumber for edible gardens, as chemicals can leach into the soil. Other options include corrugated metal, stone, or concrete blocks, each with their own aesthetic and durability profiles.

Tools and Materials You’ll Need
Before you begin construction, gather your tools and materials:
- Lumber: Untreated cedar, redwood, or composite lumber (e.g., 2x8s or 2x10s). You’ll need enough to create your desired bed size and depth.
- Corner Posts: 4×4 posts (can be smaller, like 2x4s, for internal bracing) for structural stability at each corner.
- Wood Screws: Exterior-grade, rust-resistant screws (3-inch and 2.5-inch are common).
- Power Drill: With appropriate driver bits.
- Measuring Tape and Pencil: For accurate measurements.
- Saw: Circular saw or miter saw for cutting lumber.
- Level: To ensure your bed is level.
- Shovel and Rake: For site preparation and soil filling.
- Optional: Landscape fabric or hardware cloth (for weed suppression or critter control), heavy-duty stapler, sander, geotextile fabric.
Step-by-Step Construction Guide
1. Prepare Your Site
Clear the chosen area of any grass, weeds, or debris. If the ground is uneven, level it as much as possible with a shovel and rake. This step is critical for a stable and aesthetically pleasing raised bed.
2. Cut Your Lumber
Using your saw, cut the lumber to the desired lengths for the sides and ends of your raised bed. For a 4×8 foot bed, you would cut two 8-foot pieces and two 4-foot pieces for each layer of depth. If you’re building a deeper bed, you’ll create multiple “layers” of these frames.
3. Assemble the First Layer
Lay out the cut lumber for the bottom layer on your prepared site. Connect the long sides to the short ends using your power drill and 3-inch exterior screws. For robust connections, pre-drill pilot holes to prevent wood splitting, especially with harder woods. Attach the corner posts internally by screwing through the side boards into the posts, ensuring a strong, square frame.

4. Build Up Additional Layers (if applicable)
If you’re building a deeper bed (e.g., 18 or 24 inches), stack subsequent layers of lumber on top of the first. Align them carefully and secure each board to the corner posts and the board beneath it with 2.5-inch screws. Ensure all layers are flush and level.
5. Add Internal Bracing (Optional but Recommended)
For longer beds (over 6 feet), the pressure of the soil can cause the sides to bow outwards over time. To prevent this, add internal cross-braces using scrap wood or rebar anchored into the ground or to the opposite side of the bed. This significantly enhances durability.

6. Line the Bed (Optional)
To further deter weeds and some pests, or to separate the bed’s soil from native soil, you can line the bottom with landscape fabric or hardware cloth. Staple it securely to the inside bottom edges of the frame. This also helps prevent soil erosion from the bottom.
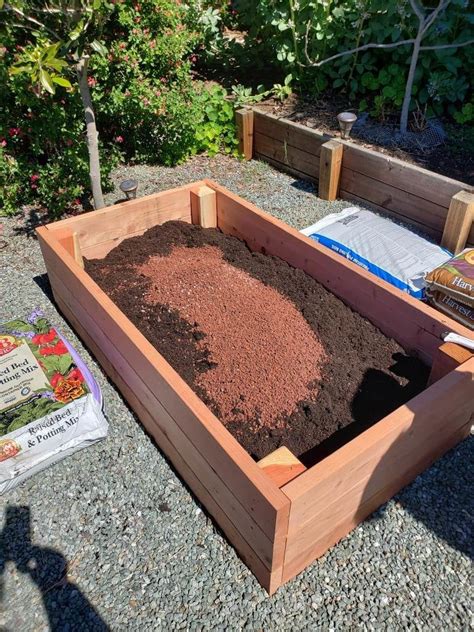
Filling and Planting Your Heirloom Tomato Bed
The Ideal Soil Mix
Heirloom tomatoes thrive in a rich, well-draining, and slightly acidic to neutral soil (pH 6.0-6.8). A good mix typically consists of:
- 50% High-Quality Topsoil or Raised Bed Mix: Provides a good base.
- 30% Organic Compost: Adds essential nutrients, improves soil structure, and encourages beneficial microbial activity.
- 20% Perlite or Vermiculite: Enhances drainage and aeration, crucial for preventing root rot.
Thoroughly mix these components before adding them to your raised bed. Fill the bed to about 1-2 inches below the top edge to allow for mulching and watering.
Planting Your Heirloom Tomatoes
Space your heirloom tomato plants generously, typically 2-3 feet apart, as they can grow quite large. Dig a hole deep enough to bury a good portion of the stem, as tomatoes can root along their buried stems, leading to a stronger plant. Add a handful of bone meal or a slow-release organic tomato fertilizer to the bottom of each planting hole. Water thoroughly after planting.
Support and Maintenance
Heirloom tomatoes are often indeterminate varieties, meaning they will continue to grow and produce fruit until frost. They require robust support from the start. Install sturdy stakes, cages, or a trellis system immediately after planting to prevent damage from wind or the weight of the fruit. Consistent watering is vital, especially during fruit development. Mulch around the base of the plants with straw or wood chips to conserve moisture, regulate soil temperature, and suppress weeds.
Enjoy Your Harvest
Building a durable raised garden bed for your heirloom tomatoes is a rewarding DIY project that pays dividends in bountiful harvests and gardening pleasure for years to come. With proper planning, construction, and care, you’ll be enjoying the unparalleled flavor of homegrown heirloom tomatoes straight from your own backyard.


