


How to build a simple, effective DIY root cellar for year-round garden harvest storage?
Unlock Year-Round Freshness: The Power of a DIY Root Cellar
Imagine enjoying crisp apples in spring, firm carrots in winter, and hearty potatoes well into the new year, all harvested from your own garden. A root cellar makes this a reality, offering a time-honored, low-tech solution for food preservation that minimizes waste and maximizes your harvest’s lifespan. Building a simple, effective DIY root cellar is an empowering project for any gardener looking to extend the season and embrace self-sufficiency.
Understanding the Core Principles of Root Cellaring
At its heart, a root cellar replicates the cool, stable conditions of an underground environment. To be effective, it must maintain a consistent temperature, adequate humidity, proper ventilation, and darkness. Most root cellars aim for temperatures between 35-50°F (2-10°C) and relative humidity levels of 85-95% for optimal storage of most produce.
- Temperature: Cool, but above freezing, to slow respiration and ripening.
- Humidity: High to prevent moisture loss, wilting, and shriveling of produce.
- Ventilation: Gentle airflow to prevent mold, odors, and the buildup of ethylene gas.
- Darkness: Essential to prevent sprouting, greening (in potatoes), and to maintain quality.
Planning Your DIY Root Cellar Project
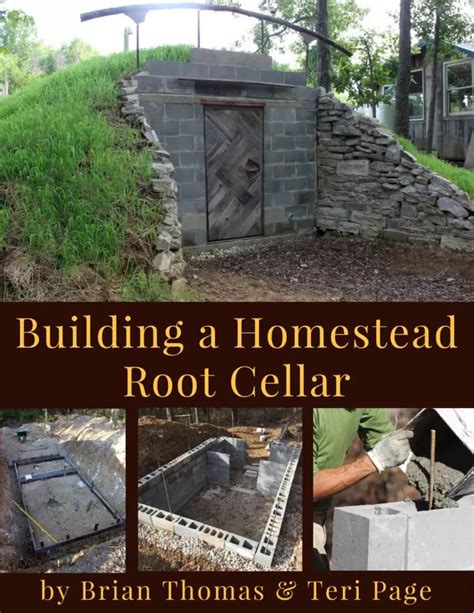
Before you dig or build, careful planning is crucial. Consider your available space, budget, and the amount of produce you intend to store. Root cellars can range from a simple buried container to an insulated room within a basement or shed.
Choosing the Right Location
The best locations are naturally cool and shaded. Consider:
- Underground: The most effective, leveraging stable earth temperatures.
- Basement Corner: A naturally cool spot, often requiring insulation and ventilation.
- Under a Porch or Deck: Can be converted with proper enclosure and insulation.
- In an Outbuilding or Shed: Requires significant insulation to maintain temperature.

Material Considerations
Materials will depend on your chosen method, but common items include:
- Insulation (rigid foam, straw, sawdust)
- Wood (for framing shelves)
- Concrete blocks or durable containers (plastic barrels, trash cans)
- Ventilation pipes (PVC)
- Thermometer/hygrometer
Step-by-Step Construction Guides for Simple Root Cellars
Method 1: The Buried Container Root Cellar (e.g., Trash Can or Barrel)
This is one of the easiest and most cost-effective DIY options, perfect for smaller harvests.
- Dig the Pit: Dig a hole slightly larger and deeper than your chosen container. Ensure it’s in a well-drained area to prevent water accumulation.
- Prepare Drainage (Optional but Recommended): Line the bottom with a few inches of gravel.
- Modify Your Container: If using a plastic trash can or barrel, drill small holes in the bottom for drainage and add a few small holes near the top rim for ventilation.
- Install Ventilation Pipe: Dig a small trench leading from the bottom of your pit (outside the container) up to ground level. Insert a PVC pipe (3-4 inches diameter) for fresh air intake. Another pipe will be needed for exhaust, reaching from the container’s lid area up to ground level.
- Place and Insulate: Position your container in the pit. Fill the space around the container with insulating material like straw, sawdust, or rigid foam.
- Secure and Cover: Place a sturdy lid on your container. Cover the entire area with a mound of soil, straw, or leaves to provide additional insulation. Ensure the ventilation pipes remain clear and protected.

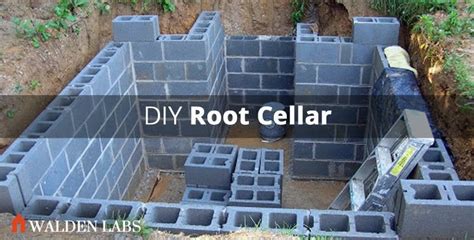
Method 2: The Insulated Basement Corner or Closet Cellar
If you have a naturally cool, damp basement, converting a corner or small closet can be ideal.
- Choose Your Space: Select an unheated, preferably north-facing corner or an existing closet.
- Frame and Insulate Walls: Build a simple stud wall to create an enclosed space. Insulate the walls and ceiling with rigid foam insulation, creating a vapor barrier on the warm side (outside the cellar).
- Install an Insulated Door: A solid, insulated door is crucial to maintain temperature and humidity.
- Ventilation: Install an intake vent low on one wall and an exhaust vent high on the opposite wall (or ceiling). These can be simple louvered vents or ducted pipes leading outside if necessary.
- Shelving: Build sturdy wooden shelves, ensuring good airflow around produce. Slatted shelves are best.
- Monitor: Place a thermometer and hygrometer to track conditions. You may need to introduce a bucket of water or damp sand to increase humidity if your basement is too dry.
Maintaining Your Root Cellar for Optimal Storage
Building it is only half the battle; proper management ensures your produce stays fresh.
- Monitor Conditions: Regularly check temperature and humidity. Adjust ventilation or add moisture (e.g., a bucket of water) as needed.
- Cure Produce: Many root vegetables (potatoes, sweet potatoes, onions, squash) benefit from a curing period before storage. This hardens skins and heals wounds.
- Store Properly: Arrange produce on shelves with good air circulation. Some items (like carrots in sand) may require specific storage methods. Keep different types of produce separate if possible, as some emit gases that can affect others.
- Inspect Regularly: Remove any spoiling produce immediately to prevent mold or rot from spreading.
Best Crops for Root Cellar Storage
A root cellar excels at storing a variety of produce:
- Potatoes
- Carrots
- Beets
- Parsnips
- Turnips
- Cabbage
- Apples
- Pears
- Winter Squash
- Onions (require slightly drier conditions)
- Garlic
By investing a little time and effort into a DIY root cellar, you’ll gain an invaluable tool for food security and enjoy the taste of your garden’s bounty all year long. It’s a sustainable step towards reducing food waste and embracing a more resilient lifestyle.

