


How to build a simple, no-cost root cellar for homestead food storage?
The Timeless Art of Root Cellaring: Why It Matters Today
In an age of refrigeration and industrial food chains, the humble root cellar might seem like a relic of the past. However, for homesteaders, self-sufficiency enthusiasts, and anyone looking to reduce their carbon footprint and grocery bill, a root cellar is a powerful, low-tech solution for long-term food storage. It harnesses the earth’s natural, stable temperatures and humidity to keep produce fresh for months, without electricity. Building one doesn’t have to be expensive or complex; with a bit of ingenuity and readily available materials, you can create a functional, no-cost root cellar right on your property.
Embracing the root cellar concept allows you to extend the enjoyment of your harvest, minimize food waste, and significantly enhance your food security, all while relying on passive, natural systems.
Embracing “No-Cost”: Sourcing Your Materials
The essence of a “no-cost” project lies in resourcefulness. Look around your property, ask neighbors, or check online classifieds for free materials. Potential finds include:
- Earth: Your primary building material.
- Rocks/Stones: For lining, drainage, or structural support.
- Reclaimed Wood: Pallets, old fence posts, discarded lumber for frames, shelves, or lids.
- Old Barrels/Totes: Plastic or metal drums (food-grade if possible) can form the core structure.
- Straw/Leaves/Sawdust: Excellent natural insulation.
- Scrap PVC/Metal Pipe: For ventilation.
- Old Doors/Windows: Can be repurposed as a sturdy lid or access point.
The key is to think creatively about how waste products or natural elements can be repurposed to serve a new function. A good scout for materials can save you hundreds, if not thousands, of dollars.

Site Selection: The Foundation of Success
Choosing the right location is paramount for your root cellar’s effectiveness. Look for a spot that:
- Has good drainage: You don’t want your cellar to flood. A slight slope can be beneficial.
- Is shaded: Underneath mature trees (mindful of roots) or on the north side of a building helps maintain cooler temperatures.
- Is accessible: You’ll need to haul produce to and from it.
- Has stable soil: Avoid areas with loose or sandy soil if you plan a dug-out pit without extensive reinforcement.
Consider the natural contours of your land. A hillside or embankment can offer excellent insulation with minimal digging, making a “hobbit-hole” style cellar an attractive option.
Simple Designs for Every Homestead
The beauty of a no-cost root cellar is its adaptability. Here are a couple of straightforward design concepts:
The Buried Barrel/Tote Cellar
This method is ideal for smaller harvests. Dig a hole large enough to accommodate a food-grade plastic barrel or tote, leaving enough space for insulation around it. Ensure the container has a secure, airtight lid. You can add a simple “chimney” for ventilation (see below). Bury it, leaving just the lid exposed or accessible via a small entry.
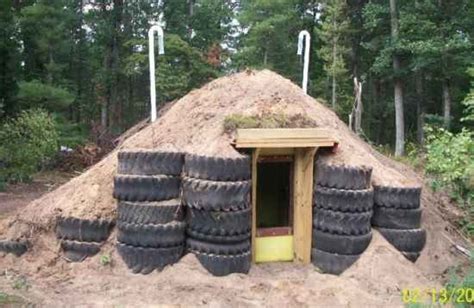
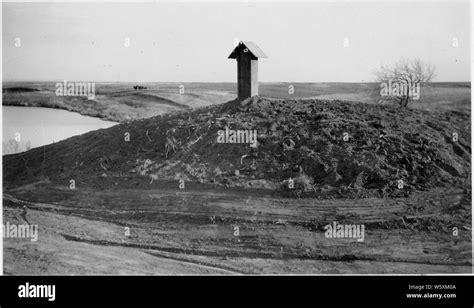
The Earthen Pit/Mound Cellar
For larger storage, an earthen pit can be excavated directly into the ground. Dig a hole of your desired dimensions, typically 3-4 feet deep, and wide enough for your needs. The deeper you go, the more stable the temperature. The walls can be left as bare earth if stable, or lined with rocks, reclaimed lumber, or even straw bales for added insulation and structure.
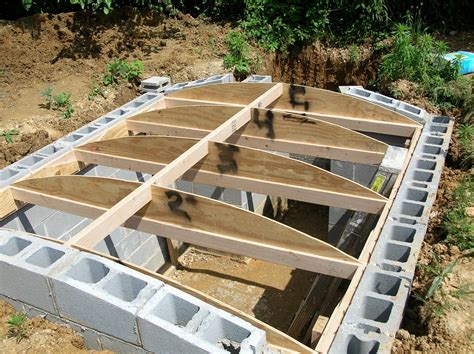
Once the pit is dug and potentially lined, you’ll need a robust roof or cover. This can be made from reclaimed lumber, old metal sheets, or even thick layers of branches and thatch, all covered with a substantial layer of earth (at least a foot thick) for insulation and temperature stability. This creates an earth-sheltered environment that mimics commercial cold storage.
Essential Elements: Insulation, Ventilation, and Humidity
Insulation
The earth itself provides significant insulation. Enhance this by surrounding your buried container or pit with layers of straw, dried leaves, sawdust, or wood chips. For the roof, a thick layer of earth is crucial, potentially topped with sod for further stability and insulation.
Ventilation
Proper airflow is critical to prevent mold, spoilage, and the buildup of ethylene gas (emitted by ripening fruits, which can spoil other produce). A simple ventilation system requires two pipes:
- Intake Vent: Positioned low, ideally bringing in cool air. A short piece of scrap PVC or metal pipe with a screen to deter critters.
- Exhaust Vent: Positioned high, allowing warm, stale air to escape. This pipe should extend a foot or two above the root cellar’s surface.
The natural convection created by the temperature difference will draw fresh air in and push old air out. Ensure both vents are screened.
Humidity Control
Most root crops thrive in high humidity (85-95%). An earthen floor naturally helps maintain this. If your cellar feels too dry, a bucket of water or damp sand can be placed inside to increase humidity. Conversely, if it’s too damp, ensure proper ventilation is in place.
Crafting the Lid and Entry
The lid or door to your root cellar needs to be sturdy, well-insulated, and critter-proof. For a buried barrel, the barrel’s lid will suffice, perhaps with an insulating layer of straw bales on top in winter. For an earthen pit, a simple frame of reclaimed wood can support a lid made from multiple layers of plywood, an old door, or even metal sheeting covered with straw and a tarp.
Ensure a tight seal to maintain consistent temperatures and keep out pests. You might even consider building a small, insulated access door or hatch if you opt for a walk-in or larger pit design.
Storing Your Harvest Wisely
Once your root cellar is complete, understanding how to store different produce types will maximize its efficiency:
- Potatoes, Carrots, Beets: Store in bins or crates, allowing air circulation. Cover with damp sand, sawdust, or leaves to maintain humidity and prevent shriveling.
- Apples, Pears: Store separately from root vegetables as they release ethylene gas, which can cause other produce to ripen and spoil faster. Wrap individually or layer in paper.
- Cabbage, Celery: Can be stored upright in damp sand or soil.
- Onions, Garlic, Winter Squash: Prefer slightly drier conditions than most root crops. Store on shelves or hanging nets with good airflow.
Regularly inspect your stored produce and remove any items showing signs of spoilage to prevent it from spreading.
Enjoying the Fruits (and Veggies) of Your Labor
Building a no-cost root cellar is a rewarding DIY project that empowers you to take control of your food storage, reduce waste, and connect more deeply with the rhythms of your garden and homestead. With a little effort and a lot of creativity, you can enjoy fresh, homegrown produce long after the growing season has ended, savoring the taste of true self-sufficiency.
