


How to build a simple root cellar to store garden produce without electricity?
Rediscover Ancient Preservation: Building Your Own Root Cellar
In an age of refrigeration and energy consumption, the humble root cellar stands as a testament to timeless food preservation. If you’re looking for an efficient, electricity-free way to store your garden’s bounty, a simple root cellar is an ideal DIY project. It harnesses the earth’s natural cooling and insulating properties to keep vegetables and fruits fresh for extended periods, making it a sustainable choice for any home gardener.
Why Build a Root Cellar?
The benefits of a root cellar extend far beyond mere storage. It provides a cool, humid environment crucial for many types of produce, from potatoes and carrots to apples and onions, significantly extending their shelf life. This reduces food waste, saves money on groceries, and lessens reliance on grid electricity. A root cellar also offers peace of mind, knowing your harvest is safely stored, come what may.

Planning Your Root Cellar
Before you dig, thoughtful planning is essential. Consider the volume of produce you typically harvest and how long you need to store it. This will dictate the size of your cellar. Location is paramount: choose a naturally cool, shaded spot, preferably on the north side of a building or under a dense tree canopy, away from any potential flooding zones. Ensure good drainage to prevent moisture issues.
Types of Simple Root Cellars
- Buried Cellar: Dug directly into the ground, offering excellent insulation.
- Mounded Cellar: Partially buried with earth mounded over the top, suitable for areas with high water tables.
- Existing Structure Conversion: Utilizing an old shed or an unused corner of a basement, with modifications for insulation and ventilation.
Essential Materials and Tools
Building a simple root cellar doesn’t require specialized tools or expensive materials. Common items you might need include:
- Shovels and picks for excavation
- Measuring tape, level, and string line
- Materials for walls: treated lumber, concrete blocks, stone, or repurposed barrels/tanks
- Roofing materials: plywood, corrugated metal, or heavy-duty plastic sheeting
- Insulation: straw bales, rigid foam board, or extra earth
- PVC pipes or ducts for ventilation
- Door and shelving materials (e.g., untreated wood)
- Gravel for drainage
Step-by-Step Construction Guide
1. Site Selection and Excavation
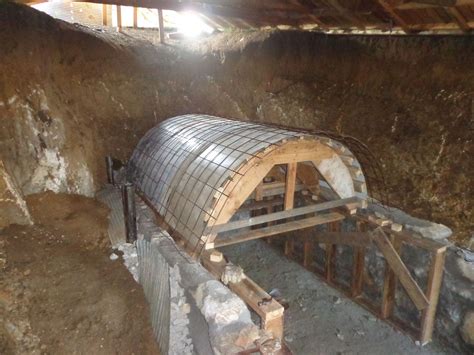
Mark out the dimensions of your cellar. Dig the hole to your desired depth, typically 4-6 feet deep for a fully buried cellar, ensuring the bottom is level. If you’re building a mounded cellar, dig shallower but prepare to mound significant earth around and over it. For basement conversions, clear and prepare the chosen area.

2. Building the Walls and Floor
For walls, concrete blocks, dry-stacked stone, or treated timber are common choices. Ensure walls are sturdy and able to withstand soil pressure. If using wood, ensure it’s suitable for ground contact. The floor can be packed earth, which helps regulate humidity, or a layer of gravel for better drainage, especially if your soil retains a lot of moisture.
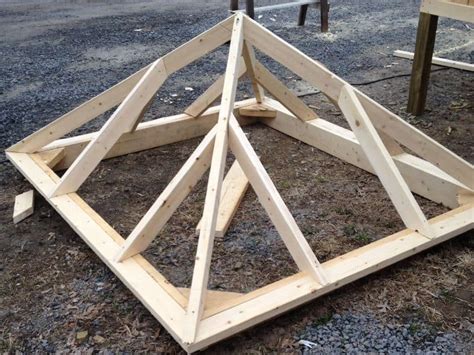
3. Roof and Insulation
Construct a robust roof frame that can support the weight of earth or insulation placed on top. Plywood covered with a waterproof membrane, or corrugated metal, works well. Cover the roof with a thick layer of insulation – several feet of earth, straw bales, or rigid foam boards. This insulates against temperature fluctuations and helps maintain a stable internal environment.
4. Ventilation is Key
Proper ventilation is crucial for a root cellar. You’ll need an intake vent and an exhaust vent to allow for continuous air circulation, preventing stale air buildup and controlling humidity. Position the intake vent low to draw in cooler air, and the exhaust vent high to expel warmer, moist air. Use screened PVC pipes or ducts to prevent pests from entering. The size of the pipes should be appropriate for the size of your cellar.
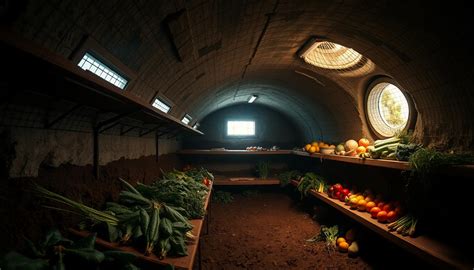
5. Door and Shelving
Install a well-sealed, insulated door to minimize temperature fluctuations. Inside, build sturdy, slatted shelves or bins. Slatted designs allow for better air circulation around your produce. Use untreated wood for shelving to avoid chemical contamination of your food. Ensure easy access and good organization.
Maintaining Your Root Cellar
Once built, a little maintenance goes a long way. Regularly check the temperature (ideally 35-50°F / 2-10°C) and humidity (85-95% for most produce). Adjust ventilation as needed. Inspect stored produce periodically and remove any spoilage immediately to prevent it from affecting neighboring items. Clean the cellar annually before the new harvest arrives.
Conclusion
Building a simple root cellar is a rewarding DIY project that connects you to traditional food preservation methods. It’s an empowering step towards greater self-sufficiency, providing a reliable, electricity-free solution for storing your garden’s bounty, and ensuring fresh, homegrown produce is available long after the harvest season has passed.


