How to build a simple, sturdy DIY chicken coop from reclaimed wood?
Why Build Your Own Chicken Coop with Reclaimed Wood?
Embarking on a DIY chicken coop project using reclaimed wood offers a multitude of benefits. Not only is it an eco-friendly approach that diverts materials from landfills, but it also significantly reduces the cost of building materials. Beyond the financial and environmental perks, a handmade coop allows for customization to fit your specific flock size, backyard space, and aesthetic preferences. With a little planning and effort, you can create a sturdy, functional, and charming home for your chickens that will last for years.
Planning Your Coop: Design and Materials
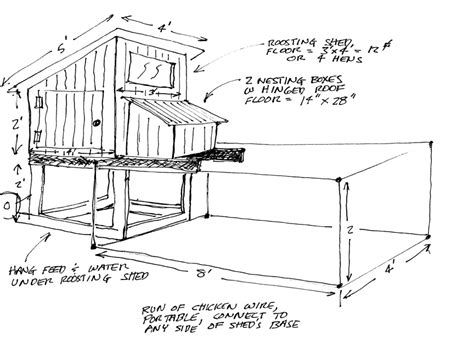
Before you even pick up a hammer, thoughtful planning is crucial. Consider the size of your flock; a general rule of thumb is 2-4 square feet per bird inside the coop and 8-10 square feet per bird in an attached run. Sketch out your design, keeping in mind key elements:
- Ventilation: Essential for air quality and temperature regulation.
- Nesting Boxes: Provide one 12x12x12 inch box for every 3-4 hens.
- Roosting Bars: Chickens prefer to sleep on elevated perches.
- Access: Easy entry for egg collection and cleaning.
- Predator-Proofing: Vital for your flock’s safety.
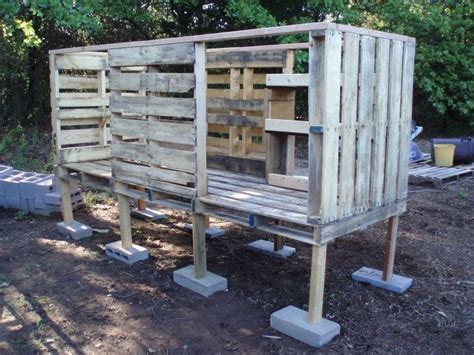
When it comes to reclaimed wood, sources are plentiful: old pallets, fences, barn wood, discarded furniture, or construction site scraps. Ensure the wood is free from rot, excessive damage, or chemical treatments harmful to chickens. You’ll also need basic tools like a saw, drill, measuring tape, hammer, screws/nails, and safety gear.
Building the Foundation and Frame
A solid foundation is key to a sturdy coop. You can opt for skids (allowing mobility), concrete blocks, or even treated lumber directly on the ground. Once the base is secure, begin constructing the frame. Use the strongest pieces of reclaimed wood for the main structural elements. Cut four corner posts to your desired height, ensuring they are level and plumb. Connect these with horizontal framing pieces at the top, bottom, and any mid-sections where windows or doors will be placed. Measure carefully and use wood screws for strong, durable connections.
Adding Walls, Roof, and Interior Elements
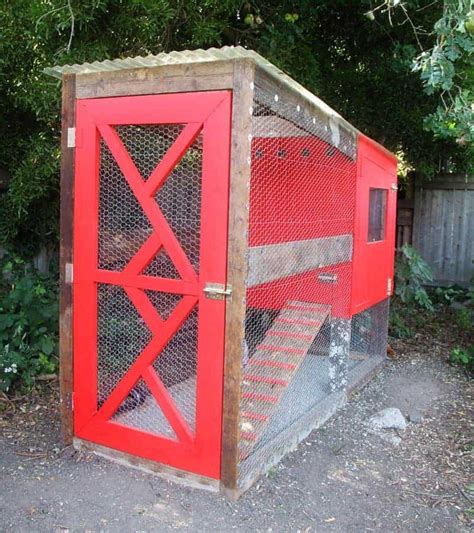
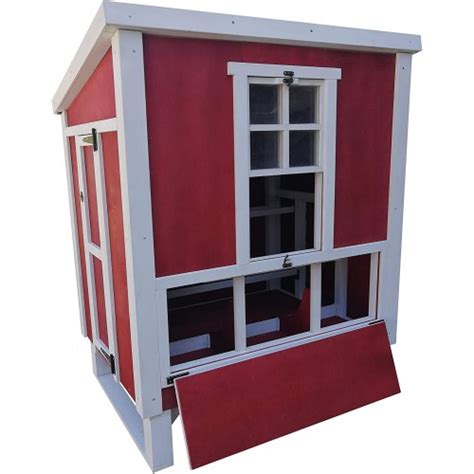
Once your frame is up, it’s time to enclose the coop. For the walls, you can use reclaimed planks, plywood, or even pallet wood, making sure to fill any significant gaps to prevent drafts and predator entry. Overlap planks slightly or use weather-stripping to create a tight seal. For the roof, consider a slight slope for water runoff. Reclaimed tin, shingles, or plywood covered with tar paper are excellent options. Secure the roofing material firmly to withstand wind and weather.
Inside, install roosting bars at varying heights, typically 2-3 feet off the ground, made from sturdy branches or smooth pieces of wood. Construct nesting boxes with sides and a roof, placing them in a darker, quieter corner of the coop. Line them with straw or pine shavings for comfort. Don’t forget to cut out openings for doors (both human access and chicken pop-door) and windows for light and additional ventilation.

Finishing Touches and Predator Proofing
The final steps involve making your coop safe and functional. Install hardware cloth (not chicken wire, which is too flimsy against predators) over all ventilation openings and windows. Secure all doors with sturdy latches that predators can’t easily manipulate. Consider adding a ramp for your chickens to access the pop-door. Paint or seal the exterior wood with a non-toxic, weather-resistant finish to prolong its life, especially if using untreated reclaimed wood.
Regular maintenance, like cleaning out bedding and checking for signs of wear or predator attempts, will ensure your DIY reclaimed wood coop remains a safe and happy home for your flock for many years to come. Enjoy the satisfaction of providing your chickens with a custom-built dwelling while making an environmentally conscious choice!