


How to build a sturdy, budget-friendly DIY chicken coop for backyard layers?

Why Build Your Own Chicken Coop?
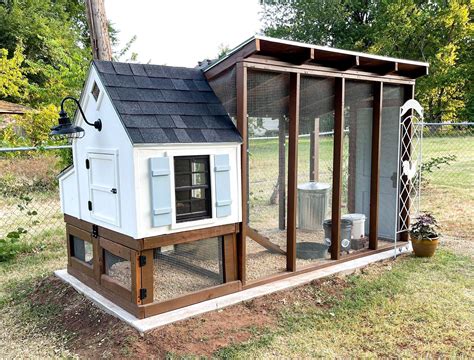
Embarking on a DIY chicken coop project is a rewarding experience that offers significant advantages over buying a pre-made one. Not only can you tailor the design to perfectly fit your backyard space and flock size, but you also gain immense satisfaction from providing a custom-built home for your feathered friends. The primary draw for many is the potential for substantial cost savings. By sourcing materials wisely and utilizing reclaimed items, you can create a sturdy, functional, and aesthetically pleasing coop without breaking your budget.
A well-built coop protects your chickens from predators and the elements, providing a safe space for roosting and laying eggs. This guide will walk you through the essential steps to construct a durable and economical coop, ensuring your backyard layers thrive.
Planning and Design: The Foundation of Your Coop
Before you even pick up a hammer, meticulous planning is crucial. Consider the size of your flock; a good rule of thumb is 2-4 square feet per chicken inside the coop and 8-10 square feet per chicken in the run. Research local zoning laws and homeowner association rules regarding backyard poultry. Sketch out your design, incorporating essential features:
- Roosting Bars: Chickens prefer to sleep on elevated bars.
- Nesting Boxes: Provide one box for every 3-4 hens.
- Ventilation: Essential for air quality, especially in warmer months.
- Predator Protection: Hardware cloth (not chicken wire) is key.
- Ease of Cleaning: Design for easy access to clean out bedding.
- Weather Protection: Shelter from rain, wind, and sun.

Sourcing Budget-Friendly Materials
The secret to a budget-friendly coop lies in smart material sourcing. Look for:
- Reclaimed Lumber: Pallets, old fences, scrap wood from construction sites (always check for chemical treatments).
- Used Roofing Materials: Leftover shingles, metal sheets, or even sturdy tarps.
- Hardware Cloth: This is a non-negotiable expense for predator protection, but buy in bulk if possible.
- Recycled Doors/Windows: Check salvage yards or online marketplaces for small windows or old cabinet doors for vents and access.
- Hardware: Hinges, latches, screws – buy in bulk or look for sales.
For new materials, consider economical options like treated lumber for the base (if directly on the ground) and exterior-grade plywood for walls. Prioritize quality for structural integrity and predator resistance where it matters most.

Essential Tools You’ll Need
You don’t need a professional workshop to build a great coop. Basic carpentry tools will suffice:
- Measuring tape
- Saw (hand saw, circular saw, or miter saw)
- Drill/driver with various bits
- Hammer
- Staple gun (for hardware cloth)
- Wire cutters
- Level
- Safety glasses and gloves
Step-by-Step Construction Guide
1. Build the Base and Frame
Start with a sturdy base, ideally elevated to deter predators and prevent rot. Use treated lumber for any part of the structure that will contact the ground. Construct a rectangular or square frame, then add vertical studs for the walls. Ensure all connections are secure with screws or strong wood joints. A solid frame is crucial for the coop’s longevity.
2. Add Walls and Roofing Support
Attach plywood or other suitable wall material to the frame. Leave openings for doors, windows/vents, and the chicken pop-door. Construct a roof frame, ideally with a slight pitch to allow for water runoff. You might opt for a simple lean-to style roof or a more complex gable roof, depending on your design.

3. Install Roofing and Siding
Cover the roof frame with plywood or OSB, then apply your chosen roofing material – asphalt shingles, metal sheeting, or even a heavy-duty tarp securely fastened. Attach siding to the exterior walls, ensuring there are no gaps for predators. Remember to cut out openings for your ventilation, windows, and doors.
4. Doors, Windows, and Ventilation
Install a secure main access door for you and a smaller pop-door for the chickens. Ensure all doors have robust, predator-proof latches. Install windows or cut ventilation holes near the top of the coop. Cover all openings with 1/2-inch hardware cloth to prevent predators from entering while allowing airflow.
5. Interior Furnishings: Roosts and Nesting Boxes
Inside, install roosting bars made from sturdy branches or 2×2 lumber, positioned higher than the nesting boxes. Build or install nesting boxes (repurposed crates or buckets work well) in a darker, quieter corner of the coop. Ensure they are easily accessible for egg collection from the outside if possible, or from the inside for cleaning.
![[Análisis] Inside - AllGamersIn](/images/aHR0cHM6Ly90czIubW0uYmluZy5uZXQvdGg/aWQ9T0lQLktvUUphb1RjdHFVQXZTX0xtU2xxb3dIYUVLJnBpZD0xNS4x.webp)
6. Predator Proofing and Finishing Touches
This is perhaps the most critical step. Bury hardware cloth around the perimeter of the coop (at least 6-12 inches deep and flared outwards) to deter digging predators. Double-check all openings for gaps. Paint or seal the exterior wood to protect it from the elements, extending the life of your coop. Add a ramp for chickens to access their pop-door.
Maintaining Your DIY Coop
Regular maintenance will ensure your coop remains sturdy and safe. Clean it out weekly, replacing bedding as needed. Periodically check for signs of wear and tear, tighten loose screws, and repair any damaged areas. Inspect the hardware cloth for breaches and ensure latches are still functioning properly. With proper care, your budget-friendly DIY coop will provide a comfortable home for your layers for years to come.
Conclusion
Building your own chicken coop is a fulfilling project that empowers you to create a secure, comfortable, and affordable home for your backyard chickens. By carefully planning, wisely sourcing materials, and diligently following construction steps, you can craft a sturdy and predator-proof structure that will serve your flock for many seasons. Enjoy the fresh eggs and the satisfaction of a job well done!


