


How to build simple canning jar shelves for a country pantry?

Crafting Sturdy Storage for Your Harvest
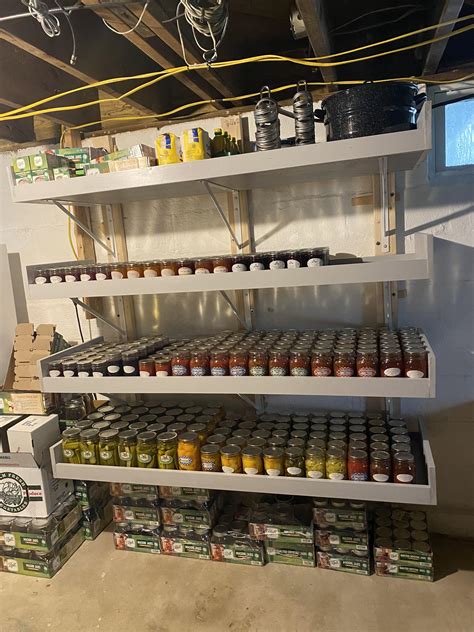
A well-stocked country pantry, brimming with home-canned goods, is a beautiful sight. But without proper storage, that abundance can quickly become an organizational nightmare. Standard bookshelves or flimsy wire racks often aren’t up to the task of holding the significant weight of glass jars. Building your own simple canning jar shelves ensures durability, maximizes space, and adds a touch of rustic charm that complements any country-style kitchen or pantry.
This guide will walk you through creating robust, custom shelving that can proudly display your preserved fruits, vegetables, and jams for years to come. It’s a rewarding project that combines practicality with the satisfaction of DIY craftsmanship.
Gathering Your Materials and Tools
The beauty of this project lies in its simplicity. You don’t need exotic hardwoods or complex machinery. Standard lumber and common household tools will suffice.
Materials Needed:
- Lumber: Typically 1×10 or 1×12 pine or common board for shelves (depending on jar depth), and 2×2 or 2×4 lumber for vertical supports. The quantity will depend on your pantry size and desired shelf count.
- Wood Screws: 2.5-inch or 3-inch wood screws for sturdy construction.
- Wood Glue: (Optional, but highly recommended) Adds significant strength to joints.
- Sandpaper: Medium to fine grit for smoothing rough edges.
- Wood Finish: Paint, stain, or polyurethane to protect the wood and match your pantry aesthetic.
- Wall Anchors/Stud Screws: If attaching shelves directly to a wall.
Tools Required:
- Measuring Tape and Pencil: For accurate measurements and marking.
- Saw: Hand saw, circular saw, or miter saw for cutting lumber.
- Drill/Driver: With appropriate bits for pilot holes and driving screws.
- Level: To ensure your shelves are perfectly straight.
- Safety Glasses and Gloves: Always prioritize safety when working with tools.
Step-by-Step Construction Guide
1. Plan Your Pantry Layout and Measurements
Before making any cuts, thoroughly measure the space where your shelves will go. Consider the width, height, and depth of your pantry. Think about the types and sizes of jars you’ll be storing (pints, quarts, half-gallons) to determine optimal shelf spacing. Remember that filled canning jars are heavy, so design for strength. Aim for shelves that are 8-10 inches deep for most standard jars.
2. Cut Your Lumber
Based on your plan, cut all your lumber. You’ll need:
- Shelf Boards: Cut to the desired width of your pantry.
- Vertical Supports: These will determine the height between your shelves. Cut these to the appropriate length.
- Horizontal Shelf Braces: If building a free-standing unit, you’ll need shorter pieces to connect the vertical supports and hold the shelf boards.
Label your pieces as you cut them to avoid confusion during assembly.
3. Assemble the Shelf Units
There are a few ways to assemble simple shelves. For a robust country pantry look, consider a design where shelf boards rest on horizontal braces attached to vertical uprights, or where shelves are dadoed into uprights (slightly more advanced). A simpler method is to screw the shelves directly into vertical supports at each end.
- Lay out two vertical supports parallel on a flat surface.
- Measure and mark where each shelf will be placed on both supports, ensuring marks are level.
- Apply wood glue (if using) to the ends of a shelf board, then align it with the marks on the vertical supports.
- Pre-drill pilot holes to prevent splitting, then secure the shelf board to the vertical supports with screws.
- Repeat for all shelves on one side, then connect the other side’s vertical supports. Ensure the entire unit is square as you go.
4. Finishing Touches
Once assembled, inspect your shelves for any rough edges or splinters. Sand these down thoroughly. Then, apply your chosen finish. A protective stain or paint will help seal the wood from moisture and make cleaning easier. For a true country look, consider a distressed paint finish or a rich, dark stain.
5. Installation and Organization
If your shelves are designed to be freestanding, place them in your pantry. For added stability and safety, especially with heavy loads of canning jars, it’s highly recommended to secure the shelves to wall studs using long wood screws. Use your level to ensure the shelves are perfectly straight before final fastening.
Begin organizing your canning jars. Group similar items, label shelves if desired, and enjoy the beauty and functionality of your new, handmade pantry storage!
Tips for Durable Canning Jar Shelves
- Over-engineer for Weight: Canning jars are surprisingly heavy. Don’t skimp on the thickness of your lumber or the number of screws. When in doubt, add more support.
- Proper Depth: Make sure your shelves are deep enough to accommodate your largest jars without them hanging off, but not so deep that jars get lost behind one another.
- Vertical Spacing: Allow enough height between shelves for easy access to jars, especially taller quart or half-gallon sizes. A good rule of thumb is at least 1-2 inches above the tallest jar on a shelf.
- Wall Anchoring is Key: Even if your shelves are sturdy on their own, securing them to wall studs prevents tipping and adds significant stability, which is crucial for safety in a busy pantry.
- Consider a Backing: A thin sheet of plywood or even a few horizontal cross-braces screwed to the back of the unit can add immense rigidity and prevent jars from accidentally being pushed off the back.

Conclusion
Building your own canning jar shelves is a practical and rewarding DIY project that transforms a chaotic pantry into an organized, attractive space. With a little planning, basic tools, and some elbow grease, you can create a storage solution that not only holds the weight of your abundant harvest but also adds authentic country charm to your home. Enjoy the satisfaction of seeing your beautifully organized jars, knowing you built the foundation for them with your own hands!


