


How to build simple, sturdy DIY shelving for storing home-canned jars safely?
The Essential Need for Robust Canning Storage
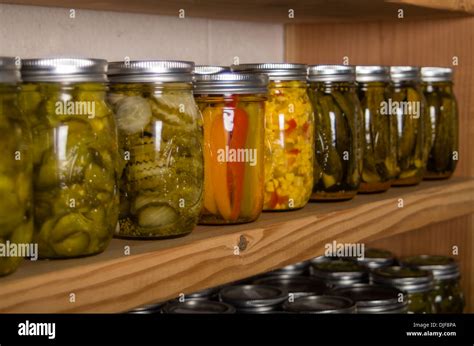
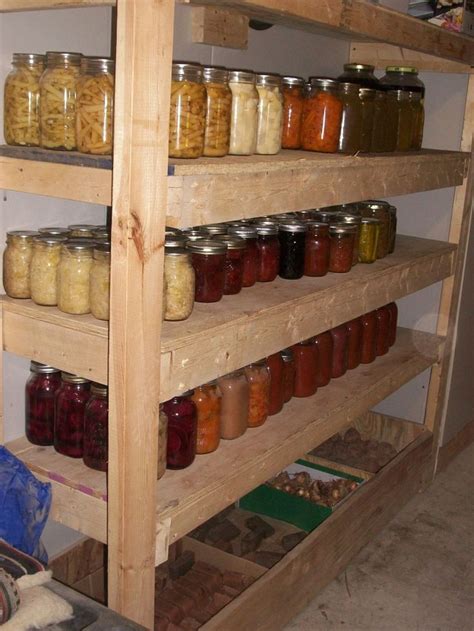
For avid home canners, the reward of a well-stocked pantry filled with homemade jams, pickles, and sauces is immense. However, the sheer weight of glass jars, especially when full, can quickly add up. Standard particleboard or flimsy shelves are simply not up to the task and can pose a significant safety risk. Building your own sturdy shelving unit ensures your precious preserves are stored securely, preventing potential collapses and messy accidents.
This guide will walk you through constructing a simple yet incredibly strong shelving unit, perfect for handling the substantial load of your home-canned goods. We’ll focus on using readily available materials and basic tools to create a reliable storage solution that will last for years.
Planning Your Canning Shelf Project
Before you pick up a single tool, thoughtful planning is crucial. Consider where your shelves will be located – a basement, pantry, or garage? Measure the available space carefully, noting both height, width, and depth. Remember to account for clearance around the jars themselves, making sure you can easily retrieve them without obstruction. A typical quart jar is about 7 inches tall, so shelves spaced 8-10 inches apart will offer ample room. Also, think about the maximum number of jars you anticipate storing to determine the overall size and number of shelves needed.
Materials and Tools You’ll Need
The beauty of this project lies in its simplicity and reliance on durable, cost-effective materials. Here’s what you’ll typically need:
- Lumber: 2x4s (for uprights and cross supports) and 1/2-inch or 3/4-inch plywood (for shelves). Heavier plywood offers greater rigidity.
- Screws: 2.5-inch wood screws for assembling the frame and 1.5-inch screws for attaching shelves.
- Wood Glue: For added strength at joints.
- Measuring Tape & Pencil: For accurate marking.
- Circular Saw or Miter Saw: For precise cuts.
- Drill/Driver: With appropriate bits for pilot holes and driving screws.
- Level & Square: To ensure everything is plumb and straight.
- Safety Gear: Eye protection and gloves are a must.
- Stud Finder (optional): If anchoring to a wall.
Step-by-Step Construction Guide
Step 1: Measure and Cut Your Wood
Based on your plan, cut your 2x4s for the vertical uprights (legs), the horizontal front and back supports, and the short side supports that will define the shelf depth. Cut your plywood into the desired shelf dimensions. Remember, accuracy in this step saves headaches later!
Step 2: Assemble the Side Frames
Lay two of your vertical 2x4s parallel on a flat surface. Mark the positions for your horizontal shelf supports on each leg. Apply wood glue to the ends of the short horizontal 2x4s that will form the depth of your shelves, then secure them between the two vertical legs using 2.5-inch screws. Pre-drill pilot holes to prevent splitting. Repeat this process to create two identical side frames for your unit.
Step 3: Connect the Side Frames with Front and Back Supports
Stand your two assembled side frames upright. Position the longer horizontal 2x4s (front and back supports) between them at each shelf level. Apply glue and secure these with 2.5-inch screws, again pre-drilling pilot holes. Ensure the entire frame is square and level as you go. This creates the full skeleton of your shelving unit.
Step 4: Install the Shelf Boards
Once the frame is complete and sturdy, lay your cut plywood shelf boards onto the assembled 2×4 supports. Secure each shelf board to the 2×4 frame beneath it using 1.5-inch wood screws. Place screws every 6-8 inches around the perimeter and along any central supports to prevent bowing under heavy loads.
Step 5: Secure the Unit (Optional but Recommended)
For maximum stability, especially in earthquake-prone areas or homes with children, it’s highly recommended to anchor your shelving unit to a wall. Locate wall studs using a stud finder and use appropriate L-brackets or hurricane ties to secure the top of the shelving unit firmly to the wall studs. This prevents any possibility of the unit tipping over.
Ensuring Longevity and Safety
Once your shelves are built, give them a thorough inspection. Wiggle them to check for any instability. Ensure all screws are tight and joints are secure. When loading, distribute the weight evenly across each shelf. While these shelves are designed to be robust, always exercise caution when handling heavy items. Regularly check your shelves for any signs of wear or damage, especially if storing extremely heavy loads for extended periods.
With a little time and effort, you’ll have a custom-built, exceptionally sturdy shelving unit perfectly suited for safely storing your valuable home-canned goods. Enjoy the peace of mind that comes with knowing your pantry is not only organized but also incredibly secure.