


How to create nutrient-rich garden compost from kitchen scraps?

Unlock the Power of Kitchen Scraps for Your Garden
Creating your own nutrient-rich compost from kitchen scraps is one of the most rewarding and sustainable practices for any gardener. Not only does it divert waste from landfills, but it also provides your garden with a free, high-quality soil amendment packed with essential nutrients, improving soil structure, water retention, and plant health. This guide will walk you through the simple steps to turn your everyday kitchen waste into black gold for your garden.
Understanding the Basics: Greens and Browns
Successful composting relies on a good balance of ‘green’ (nitrogen-rich) and ‘brown’ (carbon-rich) materials. Think of it like a recipe – too much of one ingredient can throw it off.
- Greens: These provide nitrogen and moisture. Examples include fruit and vegetable scraps, coffee grounds, tea bags, grass clippings, and fresh plant trimmings.
- Browns: These provide carbon and air pockets. Examples include dried leaves, shredded newspaper, cardboard, wood chips, and straw.
Aim for a ratio of approximately 2-3 parts brown to 1 part green by volume. Don’t worry about being exact; a rough balance works well for most home composters.
What Kitchen Scraps Can You Compost?
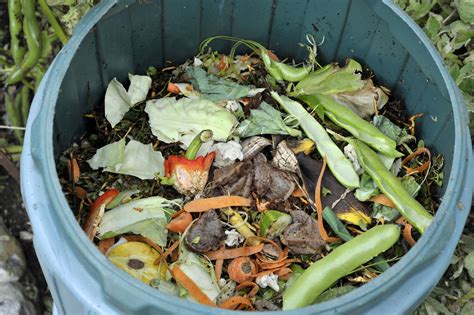
The beauty of kitchen scrap composting is that most organic waste generated in your kitchen can be composted. Here’s a quick list:
- Fruit and vegetable peels, cores, and scraps
- Coffee grounds and paper filters
- Tea bags (remove staples if present)
- Crushed eggshells
- Stale bread or cereal (in moderation)
- Cooked pasta or rice (in moderation, ensure no meat/dairy)
What to Avoid Composting from the Kitchen
Certain items should be kept out of your compost pile to prevent pests, odors, and potential pathogens:
- Meat, bones, and fish scraps
- Dairy products (milk, cheese, yogurt)
- Oils, greases, and fatty foods
- Pet waste (dog or cat feces)
- Diseased plants
- Chemically treated wood or sawdust

Setting Up Your Composting System
There are several ways to compost kitchen scraps, from simple piles to sophisticated bins. Choose a method that suits your space and needs:
- Compost Pile: Simplest method, suitable for larger yards. Just create a mound of materials.
- Compost Bin: Enclosed structures (store-bought or DIY from pallets/wire mesh) contain the pile, look tidier, and can deter pests.
- Compost Tumbler: A sealed drum that rotates, making turning easy and often speeding up decomposition.
- Worm Composting (Vermicomposting): An excellent indoor or small-space solution using special composting worms to break down scraps.
Regardless of the system, place your compost area in a shaded or partly shaded spot, away from direct sun, and ensure good drainage.
Building and Maintaining Your Compost Pile
1. Start with a Base
Begin with a layer of coarse brown materials (like twigs or straw) at the bottom to ensure good aeration and drainage.
2. Layering Your Scraps
Add kitchen scraps and other green materials in layers, alternating with brown materials. A good practice is to cover fresh kitchen scraps with a layer of browns (like dry leaves or shredded paper) to help prevent odors and deter pests.
3. Keep it Moist
Your compost pile needs moisture, similar to a wrung-out sponge. If it’s too dry, decomposition will slow down. If it’s too wet, it can become anaerobic and smelly. Water it during dry spells or if you notice it drying out.
4. Turn and Aerate
Aeration is crucial for healthy decomposition. Turn your compost pile regularly (weekly to bi-weekly is ideal) with a pitchfork or by rotating your tumbler. This introduces oxygen, mixes the materials, and helps the microbes do their work faster. You’ll notice the center of the pile heating up – a sign that decomposition is actively happening.
Troubleshooting Common Composting Issues
- Bad Odor: Usually indicates too much green material or not enough air. Turn the pile and add more brown materials.
- Slow Decomposition: Can be due to lack of moisture, insufficient greens, or poor aeration. Check moisture, add some fresh green scraps, and turn the pile.
- Pests: Often a sign that you’re adding forbidden items (meat, dairy, oils) or not covering fresh scraps with browns.
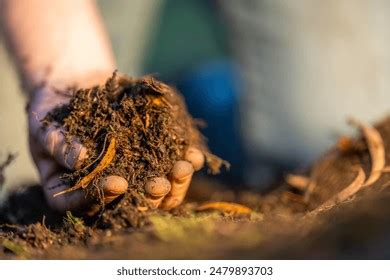
Harvesting and Using Your Finished Compost
Your compost is ready when it’s dark brown, crumbly, smells earthy, and you can no longer identify the original materials. This process can take anywhere from 2 months to a year, depending on your method and maintenance.
Once ready, you can:
- Mix into Garden Beds: Dig it directly into your soil before planting.
- Top Dressing: Spread a layer around existing plants, trees, and shrubs.
- Potting Mix Component: Mix with soil and other amendments for a nutrient-rich potting medium.
- Lawn Amendment: Spread a thin layer over your lawn to improve turf health.

Conclusion
Transforming kitchen scraps into garden compost is a simple yet powerful way to contribute to a healthier planet and a thriving garden. It reduces waste, enriches your soil, and provides your plants with a natural, nutrient-packed boost. Start small, be consistent, and soon you’ll be harvesting your own “black gold” – a testament to the magic of nature and your sustainable efforts.


