


How to DIY a basic compost bin efficiently using free, recycled materials?
Creating your own compost bin is a fantastic way to reduce household waste, enrich your garden soil, and save money on store-bought fertilizers. What’s even better is that you don’t need expensive kits or tools to get started. With a bit of ingenuity and some readily available free or recycled materials, you can build a highly efficient compost bin that will serve your gardening needs for years to come. This guide will walk you through the process, emphasizing practicality and sustainability.
The Benefits of DIY Composting
Before diving into construction, let’s briefly highlight why composting is such a valuable endeavor. Composting diverts organic waste from landfills, reducing methane emissions. It produces nutrient-rich humus that improves soil structure, water retention, and plant health, often eliminating the need for chemical fertilizers. Building your own bin, especially with recycled materials, multiplies these benefits by saving resources and keeping waste out of the system from two angles.
Gathering Your Free and Recycled Materials
The beauty of this project lies in its resourcefulness. Look around your home, ask neighbors, or check local online marketplaces for these common free materials:
- Wooden Pallets: Often available from local businesses or construction sites (ensure they are ‘HT’ heat-treated, not ‘MB’ methyl bromide treated).
- Chicken Wire or Hardware Cloth: Scraps from old fencing projects or construction.
- Old Plastic Bins or Barrels: Large containers can be repurposed.
- Scrap Wood or Stakes: For support or frames.
- Zip Ties, Wire, or Nails/Screws: For assembly.
Always prioritize safety when collecting materials, ensuring they are clean and free of hazardous chemicals or sharp edges.
Choosing a Simple Compost Bin Design
There are several easy designs suitable for recycled materials. We’ll focus on two popular and effective options:
- The Pallet Bin: A robust, square or rectangular bin made from 3 or 4 interconnected pallets. Excellent air circulation and capacity.
- The Wire Mesh Cylinder: A simple, often portable circular bin made from fencing or hardware cloth. Easy to turn and access compost.
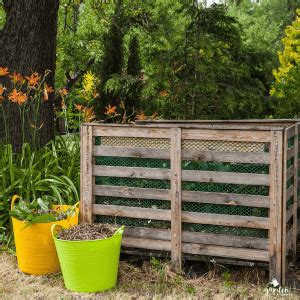
Step-by-Step Construction: The Pallet Bin
This design is sturdy and relatively quick to assemble if you have access to pallets.
- Acquire Pallets: You’ll need three or four sturdy, heat-treated wooden pallets of similar size.
- Prepare the Pallets: If necessary, remove any protruding nails or splintered wood. You might need to disassemble one pallet to get individual slats for a front gate or lid, though a simple three-sided bin is often sufficient.
- Assemble the Sides: Stand two pallets upright at a 90-degree angle to form a corner. Secure them together using heavy-duty zip ties, wire, or by screwing/nailing them together with long screws or bolts.
- Add the Third Side: Attach the third pallet to complete a U-shaped structure. This forms the back and two sides of your bin. For easier turning, a three-sided bin is often preferred, allowing open access from the front. If you want a four-sided bin, attach the final pallet to create a fully enclosed box, leaving one side less rigidly fixed for access, or creating a removable front panel.
- Optional: Add a Lid or Front Gate: While not strictly necessary, a lid can help retain moisture and deter pests. A simple tarp or a repurposed pallet laid flat can serve as a lid. For easier access to the compost, you can design a simple front gate using pallet slats or wire mesh that can be lifted or removed.
Step-by-Step Construction: The Wire Mesh Bin
This option is lightweight, very economical, and excellent for aeration.
- Gather Materials: You’ll need about 10-15 feet of chicken wire or hardware cloth (at least 3 feet high), and some heavy-gauge wire or zip ties.
- Measure and Cut: Unroll your wire mesh and cut a length that will form a cylinder roughly 3 feet in diameter (about 9-10 feet long). The height of the mesh will be the height of your bin.
- Form the Cylinder: Bring the two ends of the cut wire mesh together to form a cylinder.
- Secure the Seam: Use heavy-gauge wire or multiple zip ties to securely fasten the overlapping ends of the mesh, creating a strong seam. Ensure there are no large gaps.
- Stabilize (Optional): For extra stability, especially in windy areas, you can drive a few stakes into the ground around the base of the cylinder and secure the mesh to them.
Optimal Placement and Setup
Where you place your new compost bin is crucial for its efficiency:
- Partially Shaded Spot: Avoid direct, intense sun, which can dry out the pile too quickly.
- Well-Drained Area: Place it on bare earth for good drainage and to allow beneficial microorganisms and worms to access the pile.
- Accessible Location: Make sure it’s convenient for you to add materials and turn the compost.
- Away from Your House: While a well-maintained compost pile shouldn’t smell, a slight earthy odor is natural. Keep it a reasonable distance from living spaces.
Filling Your Bin: The Art of Composting
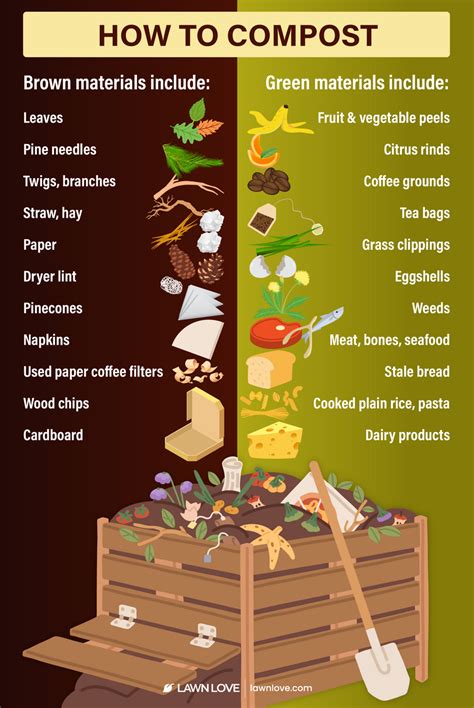
With your bin ready, it’s time to start composting! Remember the ‘greens’ and ‘browns’ balance:
- Greens (Nitrogen-rich): Fruit and vegetable scraps, coffee grounds, grass clippings, fresh plant trimmings.
- Browns (Carbon-rich): Dry leaves, shredded newspaper/cardboard, wood chips, straw.
Aim for roughly a 50/50 mix by volume. Layering greens and browns helps create an ideal environment. Keep the pile consistently moist (like a wrung-out sponge) and turn it regularly (weekly or bi-weekly) to aerate and speed up decomposition.
Troubleshooting and Maintenance Tips
- Smell: If your pile smells foul, it’s likely too wet or has too many greens. Add more browns (dry leaves, shredded paper) and turn it.
- Pests: Avoid adding meat, dairy, oily foods, or pet waste, as these attract pests. Bury food scraps deeply in the pile.
- Slow Decomposition: Your pile might be too dry, lack nitrogen, or need more turning. Adjust moisture, add greens, and aerate.
- Harvesting: Once the material at the bottom is dark, crumbly, and earthy-smelling, it’s ready to use!

Conclusion
Building a basic compost bin efficiently using free, recycled materials is a rewarding DIY project that offers significant environmental and gardening benefits. Whether you choose the sturdy pallet design or the simple wire mesh cylinder, you’ll be well on your way to transforming organic waste into valuable soil amendment. Embrace the spirit of recycling, get your hands dirty, and enjoy the fruits (and vegetables!) of your sustainable labor.
