


How to DIY a durable, low-cost root cellar for homestead food storage?

The Enduring Art of Root Cellaring for Modern Homesteads
In an era focused on self-sufficiency and sustainable living, a root cellar stands out as an invaluable asset for any homestead. This ancient method of food preservation harnesses the earth’s natural coolness and humidity to store produce without electricity, making it incredibly eco-friendly and cost-effective. Building your own durable, low-cost root cellar is a rewarding DIY project that significantly extends the shelf life of your harvest, from apples and potatoes to carrots and cabbages, ensuring a steady supply of fresh food throughout the colder months.
This guide will walk you through the essential steps and considerations for constructing a robust and affordable root cellar that will serve your homestead for decades to come, focusing on practical design and materials that won’t break the bank.
Planning Your Root Cellar: Location and Design Essentials
The success of your root cellar begins with careful planning, particularly choosing the right location. Ideally, select a spot that is naturally cool and well-drained. A north-facing slope or a shaded area under mature trees (but away from their root systems) can help maintain a consistently low temperature. Good drainage is paramount to prevent moisture issues and flooding; consider digging a test pit to assess water table levels. Accessibility for hauling produce in and out is also a practical concern.
Basic design principles revolve around maintaining stable temperatures (ideally 35-50°F / 2-10°C) and high humidity (85-95%). This requires proper insulation, ventilation, and a sealed environment. Size will depend on your anticipated harvest volume, but it’s always better to err on the side of slightly larger.

Choosing Your Materials: Durable and Economical Options
The beauty of a low-cost root cellar lies in leveraging readily available and inexpensive materials. Earth itself is your primary insulator. An earth-sheltered design, either fully buried or bermed, uses the ground’s thermal mass to regulate interior temperatures. For the structure, consider:
- Walls: Concrete blocks, repurposed stone, salvaged bricks, or treated lumber (if using for framing) are durable choices. If you’re building into a hillside, the earth can form some of your walls.
- Floor: A packed earth floor, possibly with a layer of gravel, is excellent for maintaining humidity. A simple concrete slab can also work, but may require additional methods to boost humidity.
- Roof: Timber beams topped with heavy-gauge plywood or corrugated metal, then covered with a substantial layer of earth, provides excellent insulation.
- Insulation: Beyond the earth, consider straw bales (especially for bermed walls), rigid foam insulation boards for doors or ceiling, or even sawdust.
Step-by-Step Construction Guide
1. Excavation
Begin by digging out the chosen site. Ensure the pit is deep enough to allow for standing room and the desired roof structure. For an earth-sheltered cellar, aim for at least 6-8 feet deep. Slope the floor slightly towards a French drain or sump pit if water accumulation is a concern.
2. Foundation and Floor
Lay down a stable foundation. For concrete block walls, a simple concrete footing is recommended. For an earth floor, compact the soil thoroughly and consider adding 4-6 inches of gravel beneath for improved drainage and consistent moisture.
3. Walls
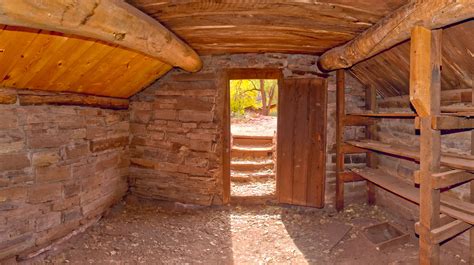
Construct your walls using your chosen material. For concrete blocks, lay them with mortar, ensuring they are plumb and level. If building into a hillside, you might only need to construct three walls, with the earth forming the fourth. Frame out a sturdy doorway during this stage.

4. Roof Structure
Install robust rafters or trusses to support the roof. This structure must be strong enough to bear the weight of soil, snow, and any other materials you’ll be placing on top. Cover the framing with plywood or corrugated metal, sealed appropriately to prevent moisture intrusion.
5. Ventilation System
A crucial component for temperature and humidity control. Install two pipes: an intake pipe near the floor and an exhaust pipe near the ceiling. Both should extend outside, ideally on opposite sides of the cellar, and be fitted with screens to keep pests out. Consider using PVC pipes for durability and ease of installation. These create a passive air circulation system.
6. Door and Shelving
Install a sturdy, insulated door that seals tightly to prevent heat transfer. For shelving, simple wooden planks, repurposed pallets, or even sturdy plastic crates can be used. Design your shelving to allow for good air circulation around stored items.
7. Earth Berming and Landscaping
Cover the roof and exposed walls with a thick layer of excavated earth. This berming provides excellent insulation and helps stabilize temperatures. Grade the surrounding earth away from the cellar to ensure proper water runoff and prevent pooling near the structure.
Maintaining Your Root Cellar and Storage Tips
Once built, your root cellar requires minimal maintenance. Monitor the temperature and humidity, adjusting ventilation as needed. Some produce requires curing before storage (e.g., pumpkins, sweet potatoes) to enhance their keeping quality. Regularly inspect stored items and remove any showing signs of spoilage to prevent it from spreading.
Organize your produce effectively; root vegetables often do well in damp sand or sawdust, while apples and pears prefer slightly drier conditions. Ensure good air circulation around all items to prevent mold and rot. With proper care, your DIY root cellar will provide a steady bounty of fresh food for years to come.

Conclusion
Building a durable, low-cost root cellar is a testament to sustainable living and an intelligent investment in your homestead’s food security. By understanding the principles of natural preservation and utilizing affordable materials, you can create an efficient storage solution that reduces waste, saves energy, and connects you more deeply with the rhythm of your harvest. Embrace this rewarding DIY project and enjoy the fruits (and roots!) of your labor all year long.


